> ## Documentation Index
> Fetch the complete documentation index at: https://relevanceai.com/docs/llms.txt
> Use this file to discover all available pages before exploring further.
# Configure Tools Output
> Configure Tools outputs and get them ready for sharing with your team
This guide will assist you in sharing and deploying your AI Tool by configuring the Tool output for a clearer, more understandable result.
After Tools are created, we want to ensure, they are user-friendly and the output(s) are configured correctly.
## Add a description
On your Tool, use the "Build" tab and add a description on top. This simple step can make your Tool UI look more professional and easier to understand.
Tool description is proven to be important in [Agents](/get-started/core-concepts/agents) performance.
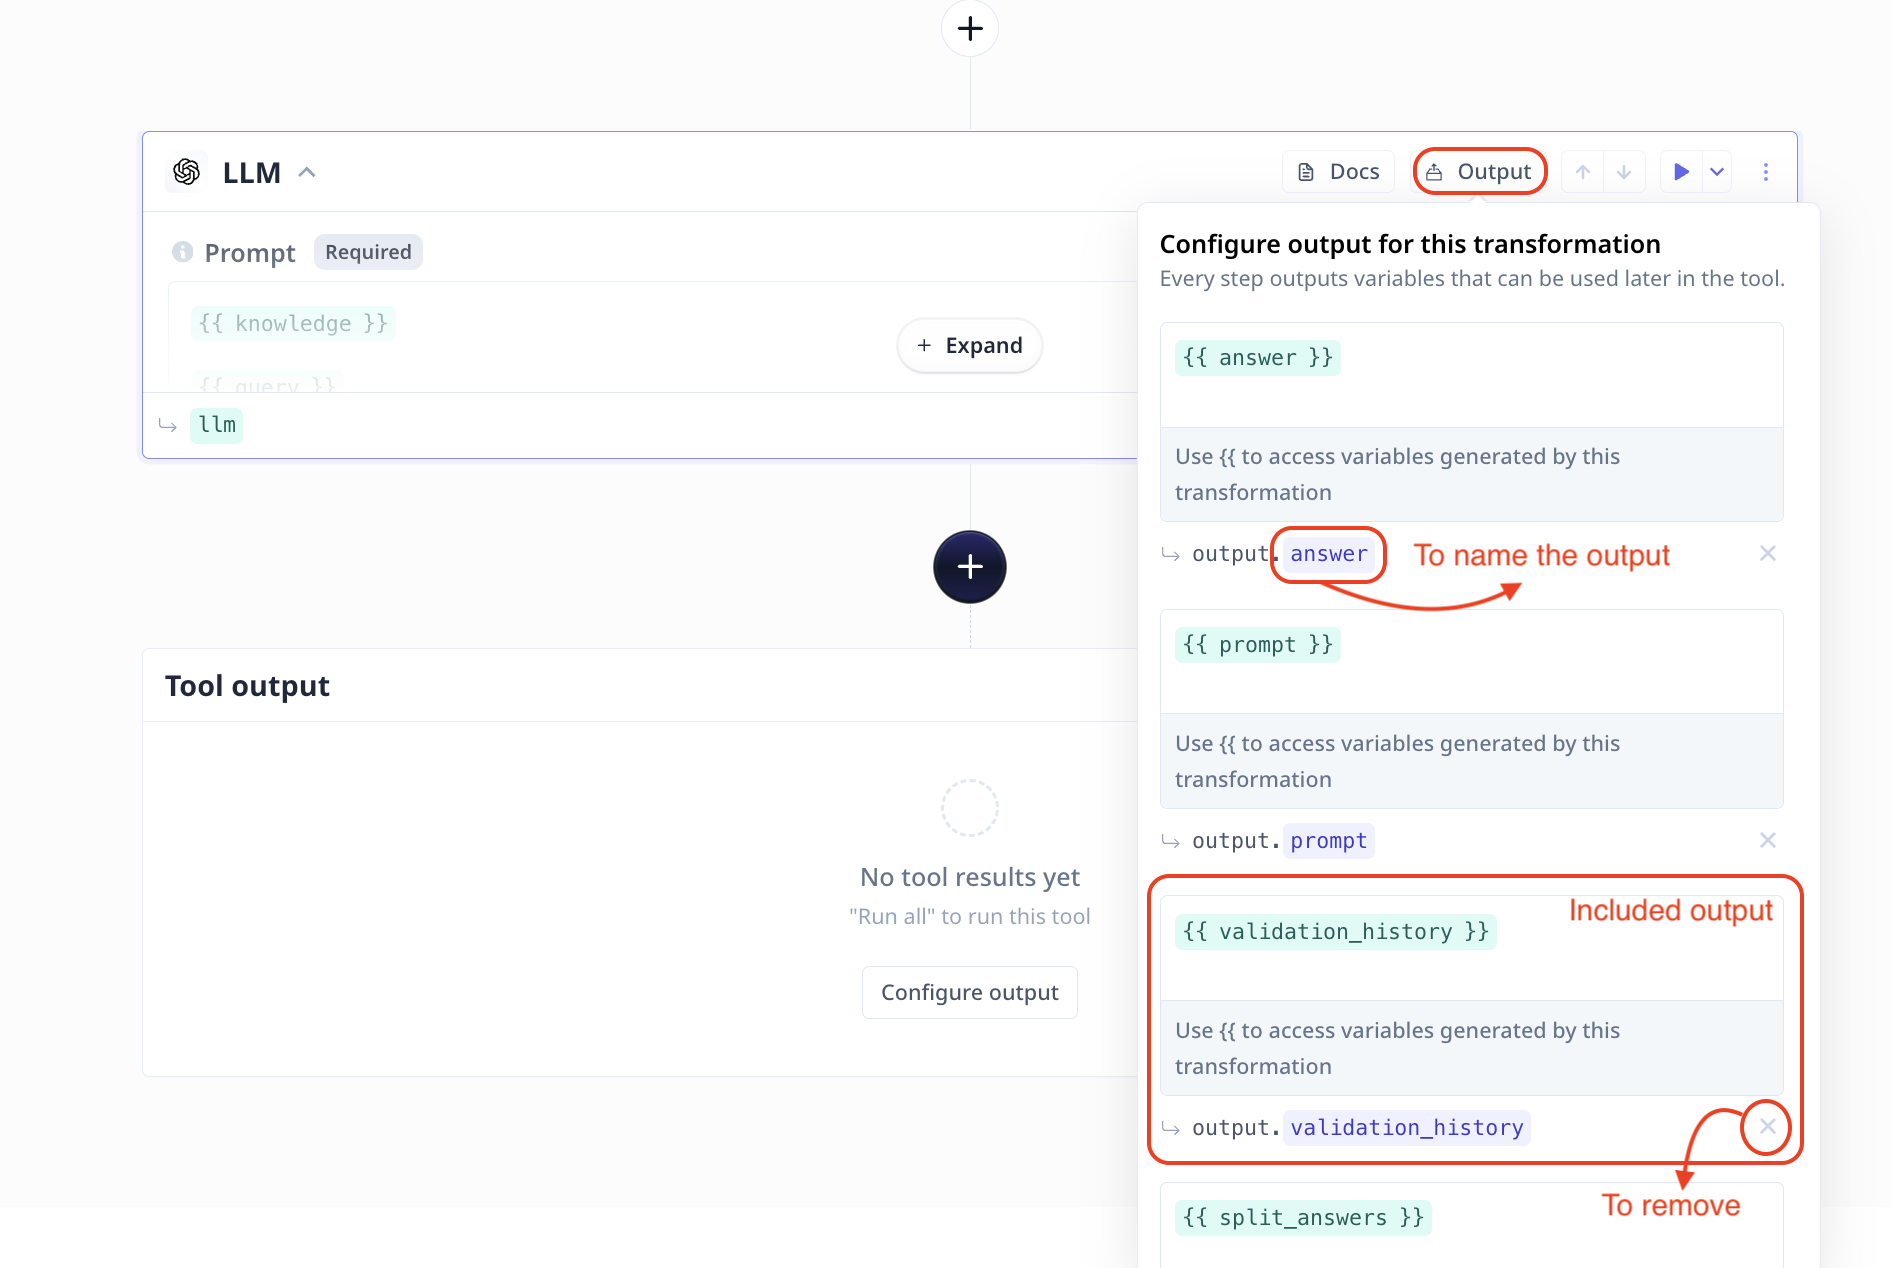
## LLM step output
The [LLM component](/build/tools/tool-steps/llms/llm-tool-step) provides you with various outputs. You can set what to include on the Tool to avoid confusing users.
On the "Build" page, scroll to your LLM component and click on `Output` on the top right of the component.
Note that you can rename each output by clicking on the name (written after `output.`). You can remove the output by clicking on `x` on the bottom right.
## Tool output
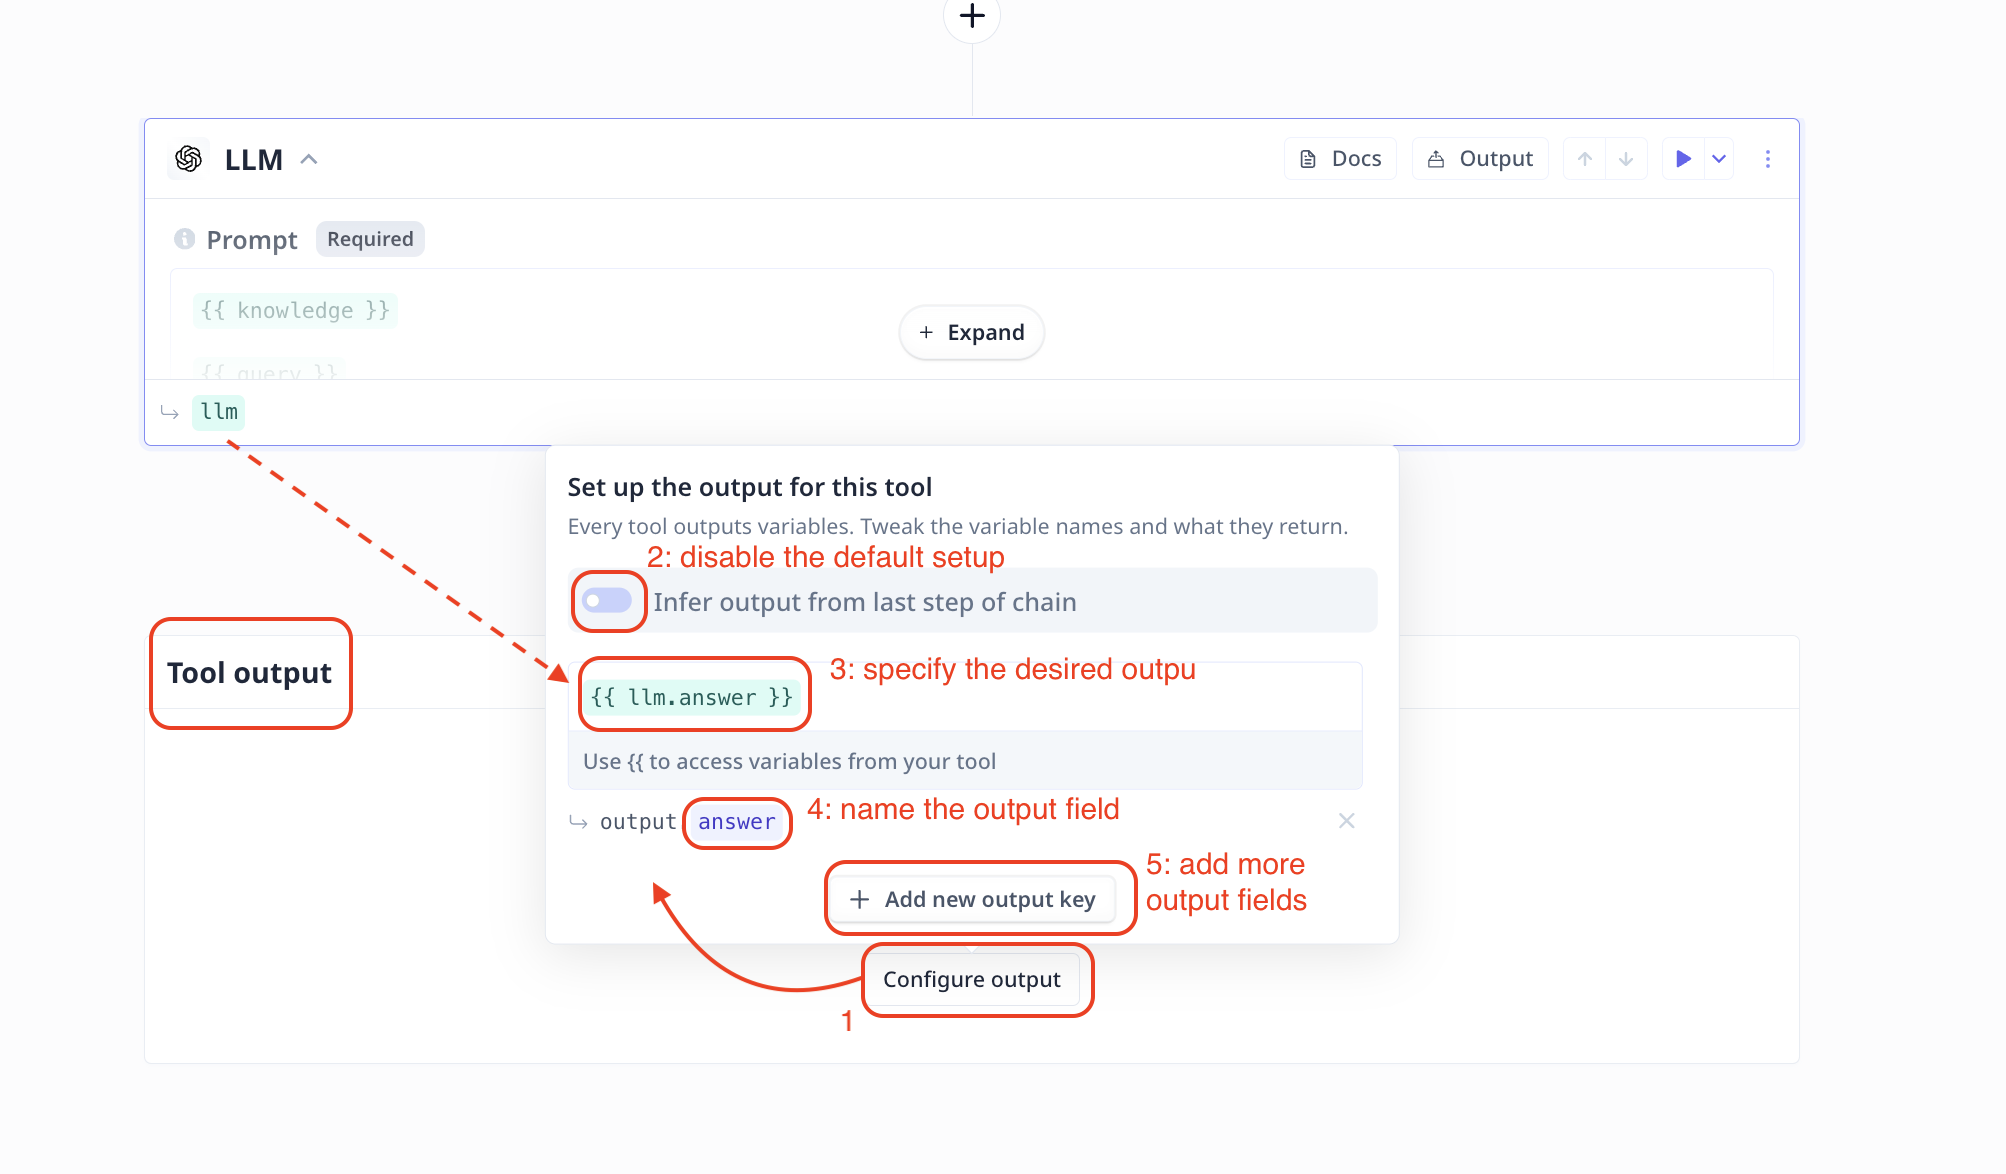
On the "Build" page, scroll to the bottom of the page to find "Tool output" box with a "Configure output" button in the center.
By default, Tools return the output of the last step. You can change the output name and modify the setup.
### Name your output
If you wish to customize the output, first click on `Configure output` and disable "Infer output from last step of tool".
Using `{{}}` select the desired output variable. For example the answer from a LLM step.
Note that when you type in `{{`, the platform provides you with all the available items.
Simply click on the desired one, for instance `{{llm.answer}}`. If there is an LLM component in your tool called `llm` whose output is saved in a variable
called `answer`.
Keep in mind that similar to all other outputs, it is possible to also name the final output filed to make it much more user-friendly.
In the picture above, we have named the output ‘answer’ (marked with number 4).
### Choose multiple outputs
On the "Set up the output for this tool" page, click on `Add new output key` to add more output variables to your Tool.
Using the `X` on the bottom right of each entry, you can remove them.
### Add references to Q\&A apps
With Relevance, it is very easy to create a Q\&A app on your knowledge-base using our [Knowledge feature](/build/tools/knowledge/knowledge).
However, a common question we are asked is **how to include references in the response**. In this page, we explain three steps to address
the referencing concern.
1. Adding fields to use as a reference
To be able to create references, you need to make sure the context you provide to the LLM includes a field that you can use as a reference.
Such a reference is typically a URL, a filename, an article title or a product name.
This means, if you are uploading a CSV to Knowledge, you need to ensure the CSV file includes a column that can be used as a reference.
When uploading a PDF or an audio file to Relevance, a filename column will be automatically created. This field can be used as a reference.
Naming the files wisely can help with referencing.
As an example, we are using a CSV including columns "title", "content" and "url" and each row refers to an article from our support documentation.
2. Configuring your Knowledge to include the correct fields
Under "Advanced options" in the LLM step, you will find a section on
[How to handle too much text](/build/tools/tool-steps/llms/how-to-handle-too-much-text).
When "edit" for the `knowledge` variable is clicked a new page pops open, click on "Advanced options".
"Columns of data to use as knowledge" is where you can specify the desired column(s) name.
In our example, we include "title", "content" and "url". Which means only these fields are fetched from the CSV and loaded to the LLM.
You can [configure](/build/tools/advanced-setup/output-configuration#llm-step-output) an LLM "Prompt" output and check what
is loaded to the LLM.
3. Updating your prompt to include the reference
Finally the instruction to the LLM (the prompt) must indicate inclusion of the reference when a question is answered. In our example,
we use the `url` field as the reference. There are various ways to format the instruction or the output. Here, we tried both JSON and Footnotes.
```
Specify the response as JSON in format { answer, references: [{title, url}]" }. Use proper punctuation.
Never provide URLs that are not included in my messages. You must respond in JSON.
```
We have asked for a JSON response that includes an `answer` and a `references` field. The `references` field is an array of objects that have a
`title` and a `url` field. The `title` field is the title of the article and the `url` field is the URL of the article.
```
Specify the response as a sentence with footnotes and include the list of references at the end that are formatted as title and url.
Format it like "answer[reference number]". Use proper punctuation. Never provide URLs that are not included in my messages.
```
We have asked for a response that is a sentence with footnotes. The footnotes will be the references to the articles.
1. Adjust the prompts to suit your data, output and accuracy. LLMs are more than capable of providing references and can even be extended to include quotes.
2. Few-shot examples of the desired input and output combinations at the start of your prompt is a great way to ensure the LLM mimics your style.
## Save and share your Tool
Once you have configured the everything, hit save on the top right. You are ready to your Tool with your
team and colleagues.
**A bit out-dated but useful video**

 Note that you can rename each output by clicking on the name (written after `output.`). You can remove the output by clicking on `x` on the bottom right.
## Tool output
On the "Build" page, scroll to the bottom of the page to find "Tool output" box with a "Configure output" button in the center.
By default, Tools return the output of the last step. You can change the output name and modify the setup.
### Name your output
If you wish to customize the output, first click on `Configure output` and disable "Infer output from last step of tool".
Using `{{}}` select the desired output variable. For example the answer from a LLM step.
Note that when you type in `{{`, the platform provides you with all the available items.
Simply click on the desired one, for instance `{{llm.answer}}`. If there is an LLM component in your tool called `llm` whose output is saved in a variable
called `answer`.
Note that you can rename each output by clicking on the name (written after `output.`). You can remove the output by clicking on `x` on the bottom right.
## Tool output
On the "Build" page, scroll to the bottom of the page to find "Tool output" box with a "Configure output" button in the center.
By default, Tools return the output of the last step. You can change the output name and modify the setup.
### Name your output
If you wish to customize the output, first click on `Configure output` and disable "Infer output from last step of tool".
Using `{{}}` select the desired output variable. For example the answer from a LLM step.
Note that when you type in `{{`, the platform provides you with all the available items.
Simply click on the desired one, for instance `{{llm.answer}}`. If there is an LLM component in your tool called `llm` whose output is saved in a variable
called `answer`.
 Keep in mind that similar to all other outputs, it is possible to also name the final output filed to make it much more user-friendly.
In the picture above, we have named the output ‘answer’ (marked with number 4).
### Choose multiple outputs
On the "Set up the output for this tool" page, click on `Add new output key` to add more output variables to your Tool.
Using the `X` on the bottom right of each entry, you can remove them.
### Add references to Q\&A apps
With Relevance, it is very easy to create a Q\&A app on your knowledge-base using our [Knowledge feature](/build/tools/knowledge/knowledge).
However, a common question we are asked is **how to include references in the response**. In this page, we explain three steps to address
the referencing concern.
1. Adding fields to use as a reference
To be able to create references, you need to make sure the context you provide to the LLM includes a field that you can use as a reference.
Such a reference is typically a URL, a filename, an article title or a product name.
This means, if you are uploading a CSV to Knowledge, you need to ensure the CSV file includes a column that can be used as a reference.
Keep in mind that similar to all other outputs, it is possible to also name the final output filed to make it much more user-friendly.
In the picture above, we have named the output ‘answer’ (marked with number 4).
### Choose multiple outputs
On the "Set up the output for this tool" page, click on `Add new output key` to add more output variables to your Tool.
Using the `X` on the bottom right of each entry, you can remove them.
### Add references to Q\&A apps
With Relevance, it is very easy to create a Q\&A app on your knowledge-base using our [Knowledge feature](/build/tools/knowledge/knowledge).
However, a common question we are asked is **how to include references in the response**. In this page, we explain three steps to address
the referencing concern.
1. Adding fields to use as a reference
To be able to create references, you need to make sure the context you provide to the LLM includes a field that you can use as a reference.
Such a reference is typically a URL, a filename, an article title or a product name.
This means, if you are uploading a CSV to Knowledge, you need to ensure the CSV file includes a column that can be used as a reference.
