> ## Documentation Index
> Fetch the complete documentation index at: https://relevanceai.com/docs/llms.txt
> Use this file to discover all available pages before exploring further.
# Directory Sync and Groups
> Sync your identity provider groups to Relevance AI for bulk user management
RBAC Groups is gradually being rolled out to our Enterprise customers. If you have an Enterprise subscription with Relevance AI and do not have access to this feature yet, please reach out to your sales representative to share your interest in this feature.
You will not be able to access this feature if you are not on an Enterprise subscription.
RBAC Groups enables organizations to connect their identity provider (IDP) such as Entra ID or Okta directly to Relevance AI. This allows bulk assignment of users via groups to projects and assets, as well as setting their permissions. Instead of manually assigning hundreds of users individually, organizations can assign entire groups (like "Marketing Team" or "Sales Operations") to projects and agents.
This feature dramatically simplifies user management for large teams by leveraging your existing organizational structure from your identity provider.
## Key Features
Connect identity providers like Entra ID or Okta directly to Relevance AI through WorkOS
Assign entire groups to projects and assets instead of managing individual users
Set permissions at the group level for efficient access control across your organization
Groups sync from your IDP approximately every 60 minutes
IDP groups are managed at the source and cannot be edited within Relevance AI
Manage group assignments alongside individual users in the same UI
Groups are managed through your identity provider and sync automatically to Relevance AI. Changes made in your IDP will be reflected in Relevance AI approximately every 60 minutes.
## Setting Up RBAC Groups
To use RBAC Groups, your organization must first connect your identity provider through WorkOS. WorkOS provides secure integrations with major identity providers including Entra ID (formerly Azure AD) and Okta.
For detailed setup instructions, see the [Setting Up Directory Sync](#setting-up-directory-sync) section below.
Once your IDP is connected, groups from your identity provider will automatically sync to Relevance AI and become available for assignment.
## Organization-Level Groups
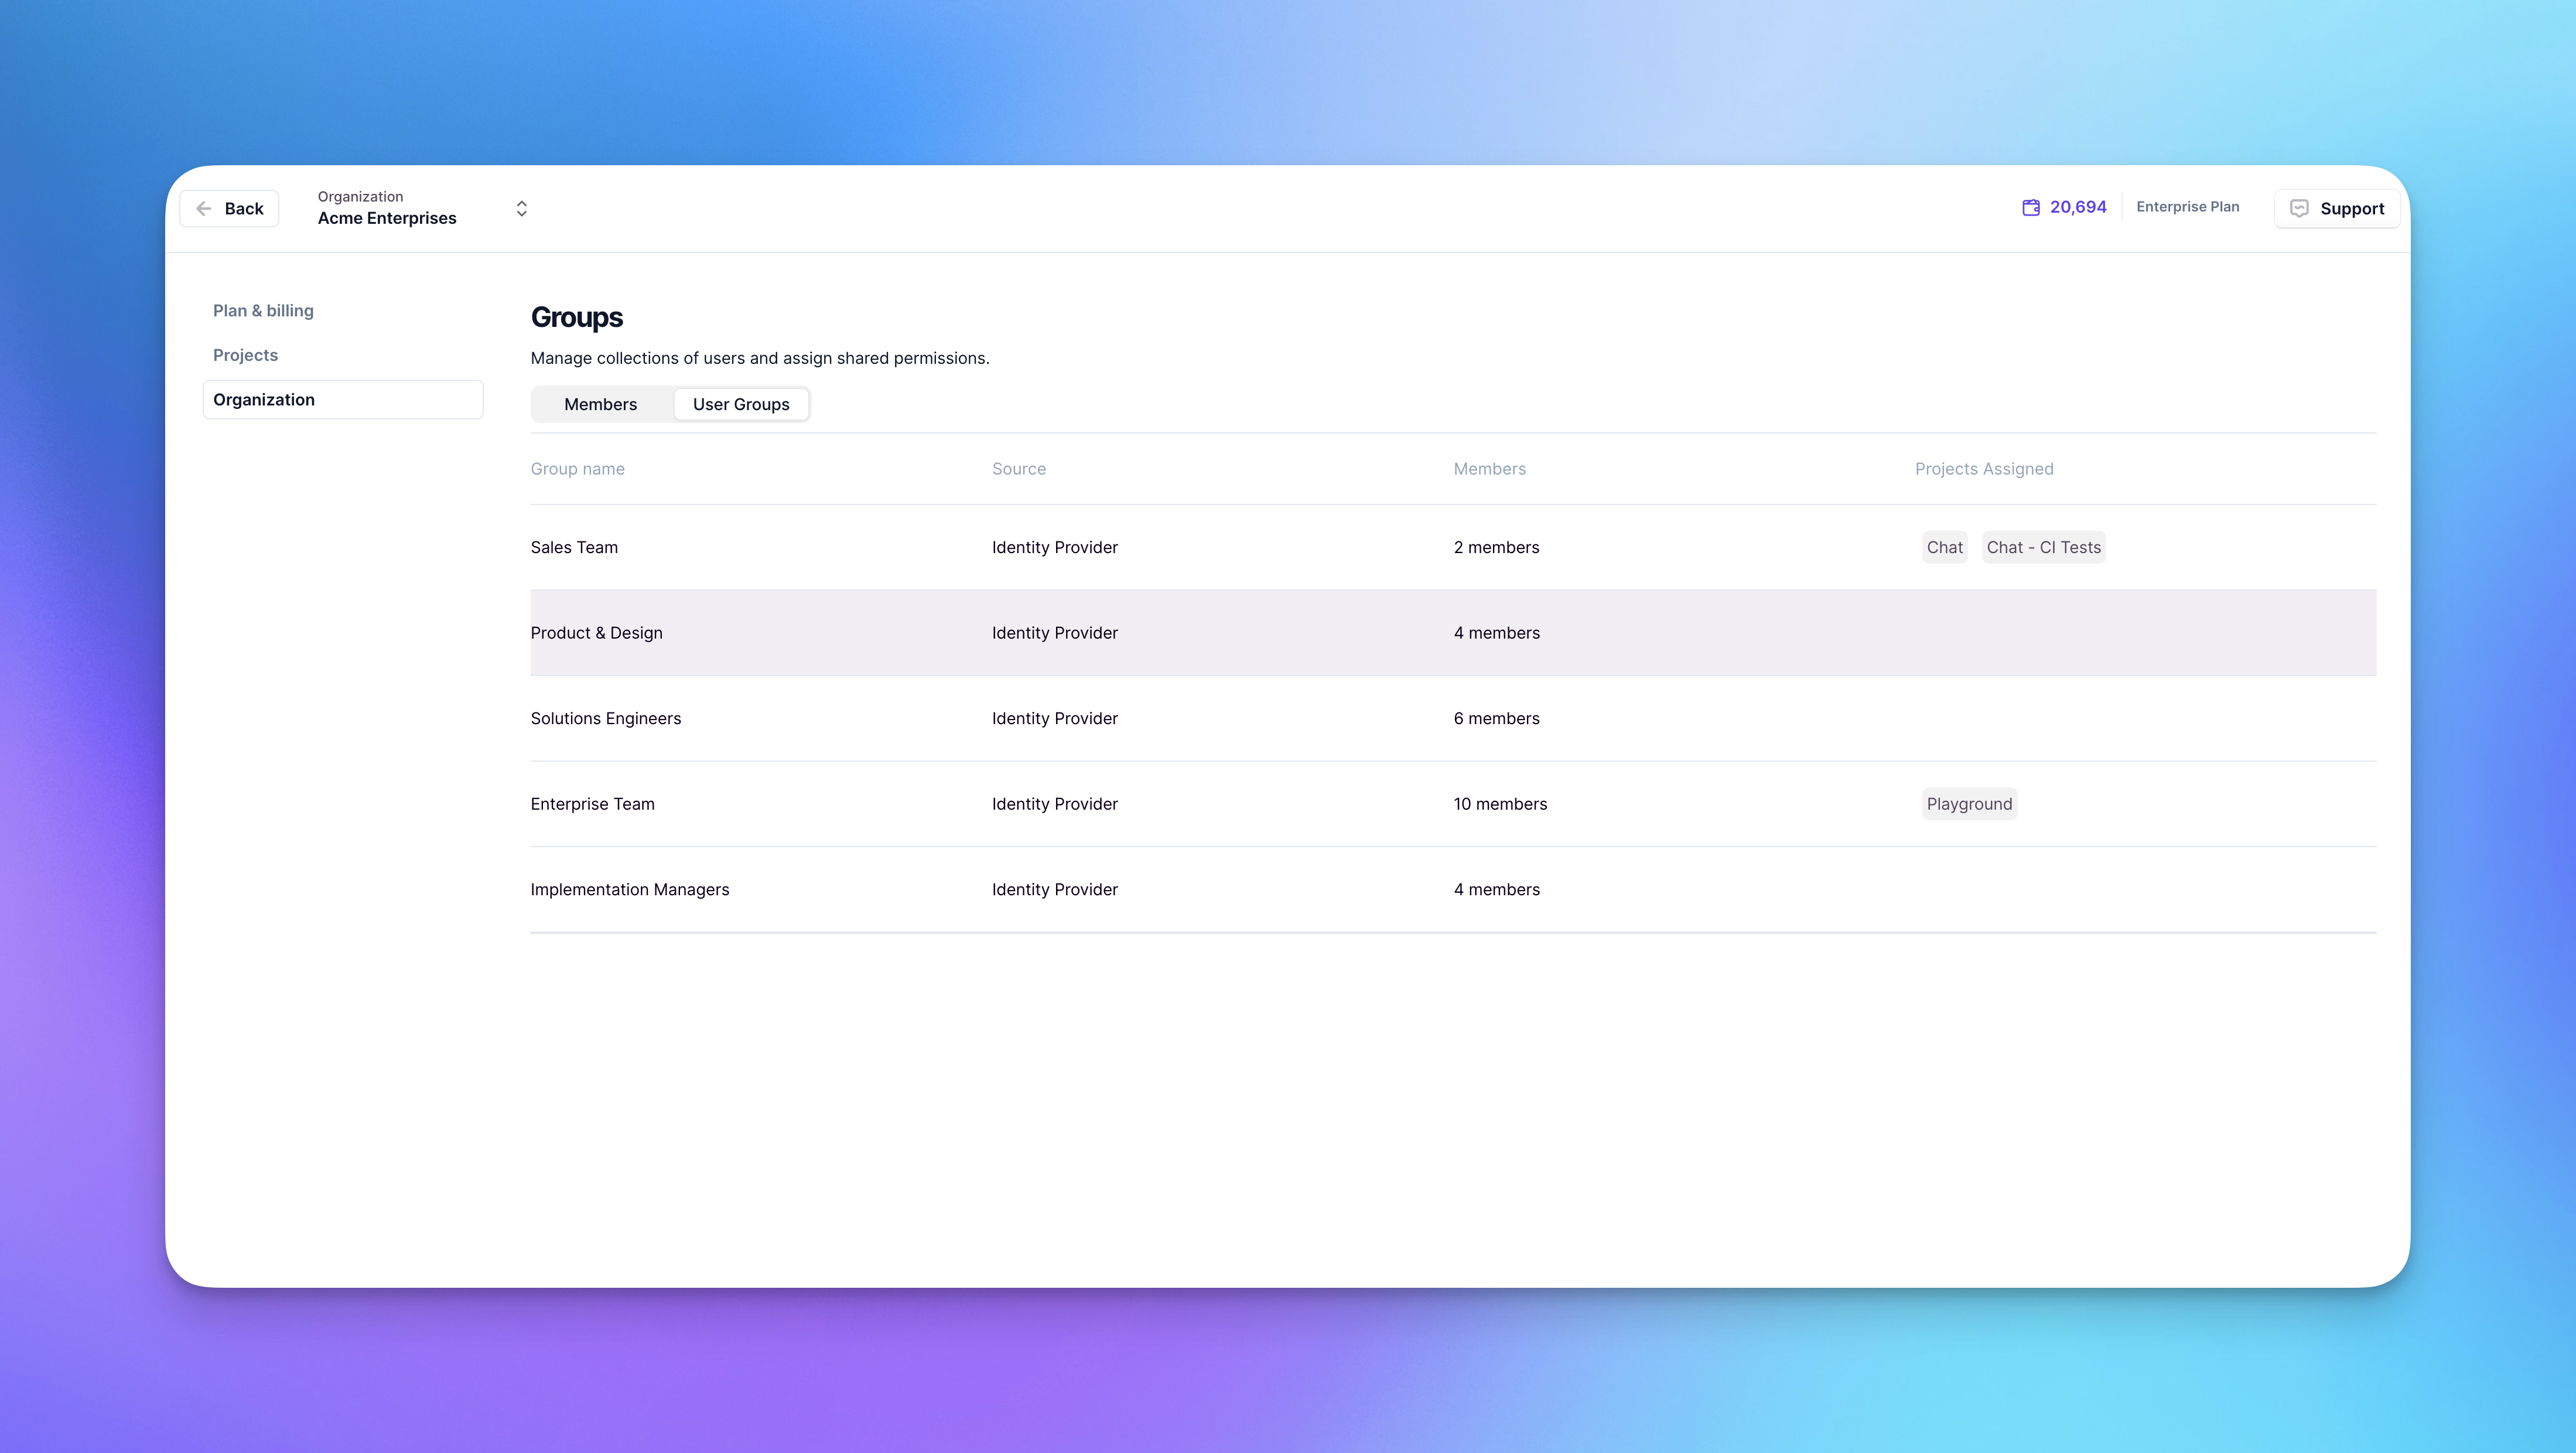 Organization-level groups are only accessible to organization admins and owners.
At the organization level, you can view all groups that have been synced from your identity provider. This provides a centralized view of your organizational structure within Relevance AI.
### Accessing organization groups
To view organization-level groups:
1. Click **Settings** in the sidebar
2. Select **Organization**
3. Click the **User Groups** tab
The groups page displays the name, source (e.g., Entra ID, Okta), and member count for each group synced from your identity provider. Note that member counts only reflect users who have already logged into Relevance AI—not your total IDP group size. The count increases as more users sign in for the first time.
To view who is in a group and the permissions they have, simply click on the group. You'll see the complete membership list and group details.
IDP groups are read-only in Relevance AI. To modify group membership, make changes in your identity provider and they will sync automatically.
## Project-Level Groups
Organization-level groups are only accessible to organization admins and owners.
At the organization level, you can view all groups that have been synced from your identity provider. This provides a centralized view of your organizational structure within Relevance AI.
### Accessing organization groups
To view organization-level groups:
1. Click **Settings** in the sidebar
2. Select **Organization**
3. Click the **User Groups** tab
The groups page displays the name, source (e.g., Entra ID, Okta), and member count for each group synced from your identity provider. Note that member counts only reflect users who have already logged into Relevance AI—not your total IDP group size. The count increases as more users sign in for the first time.
To view who is in a group and the permissions they have, simply click on the group. You'll see the complete membership list and group details.
IDP groups are read-only in Relevance AI. To modify group membership, make changes in your identity provider and they will sync automatically.
## Project-Level Groups
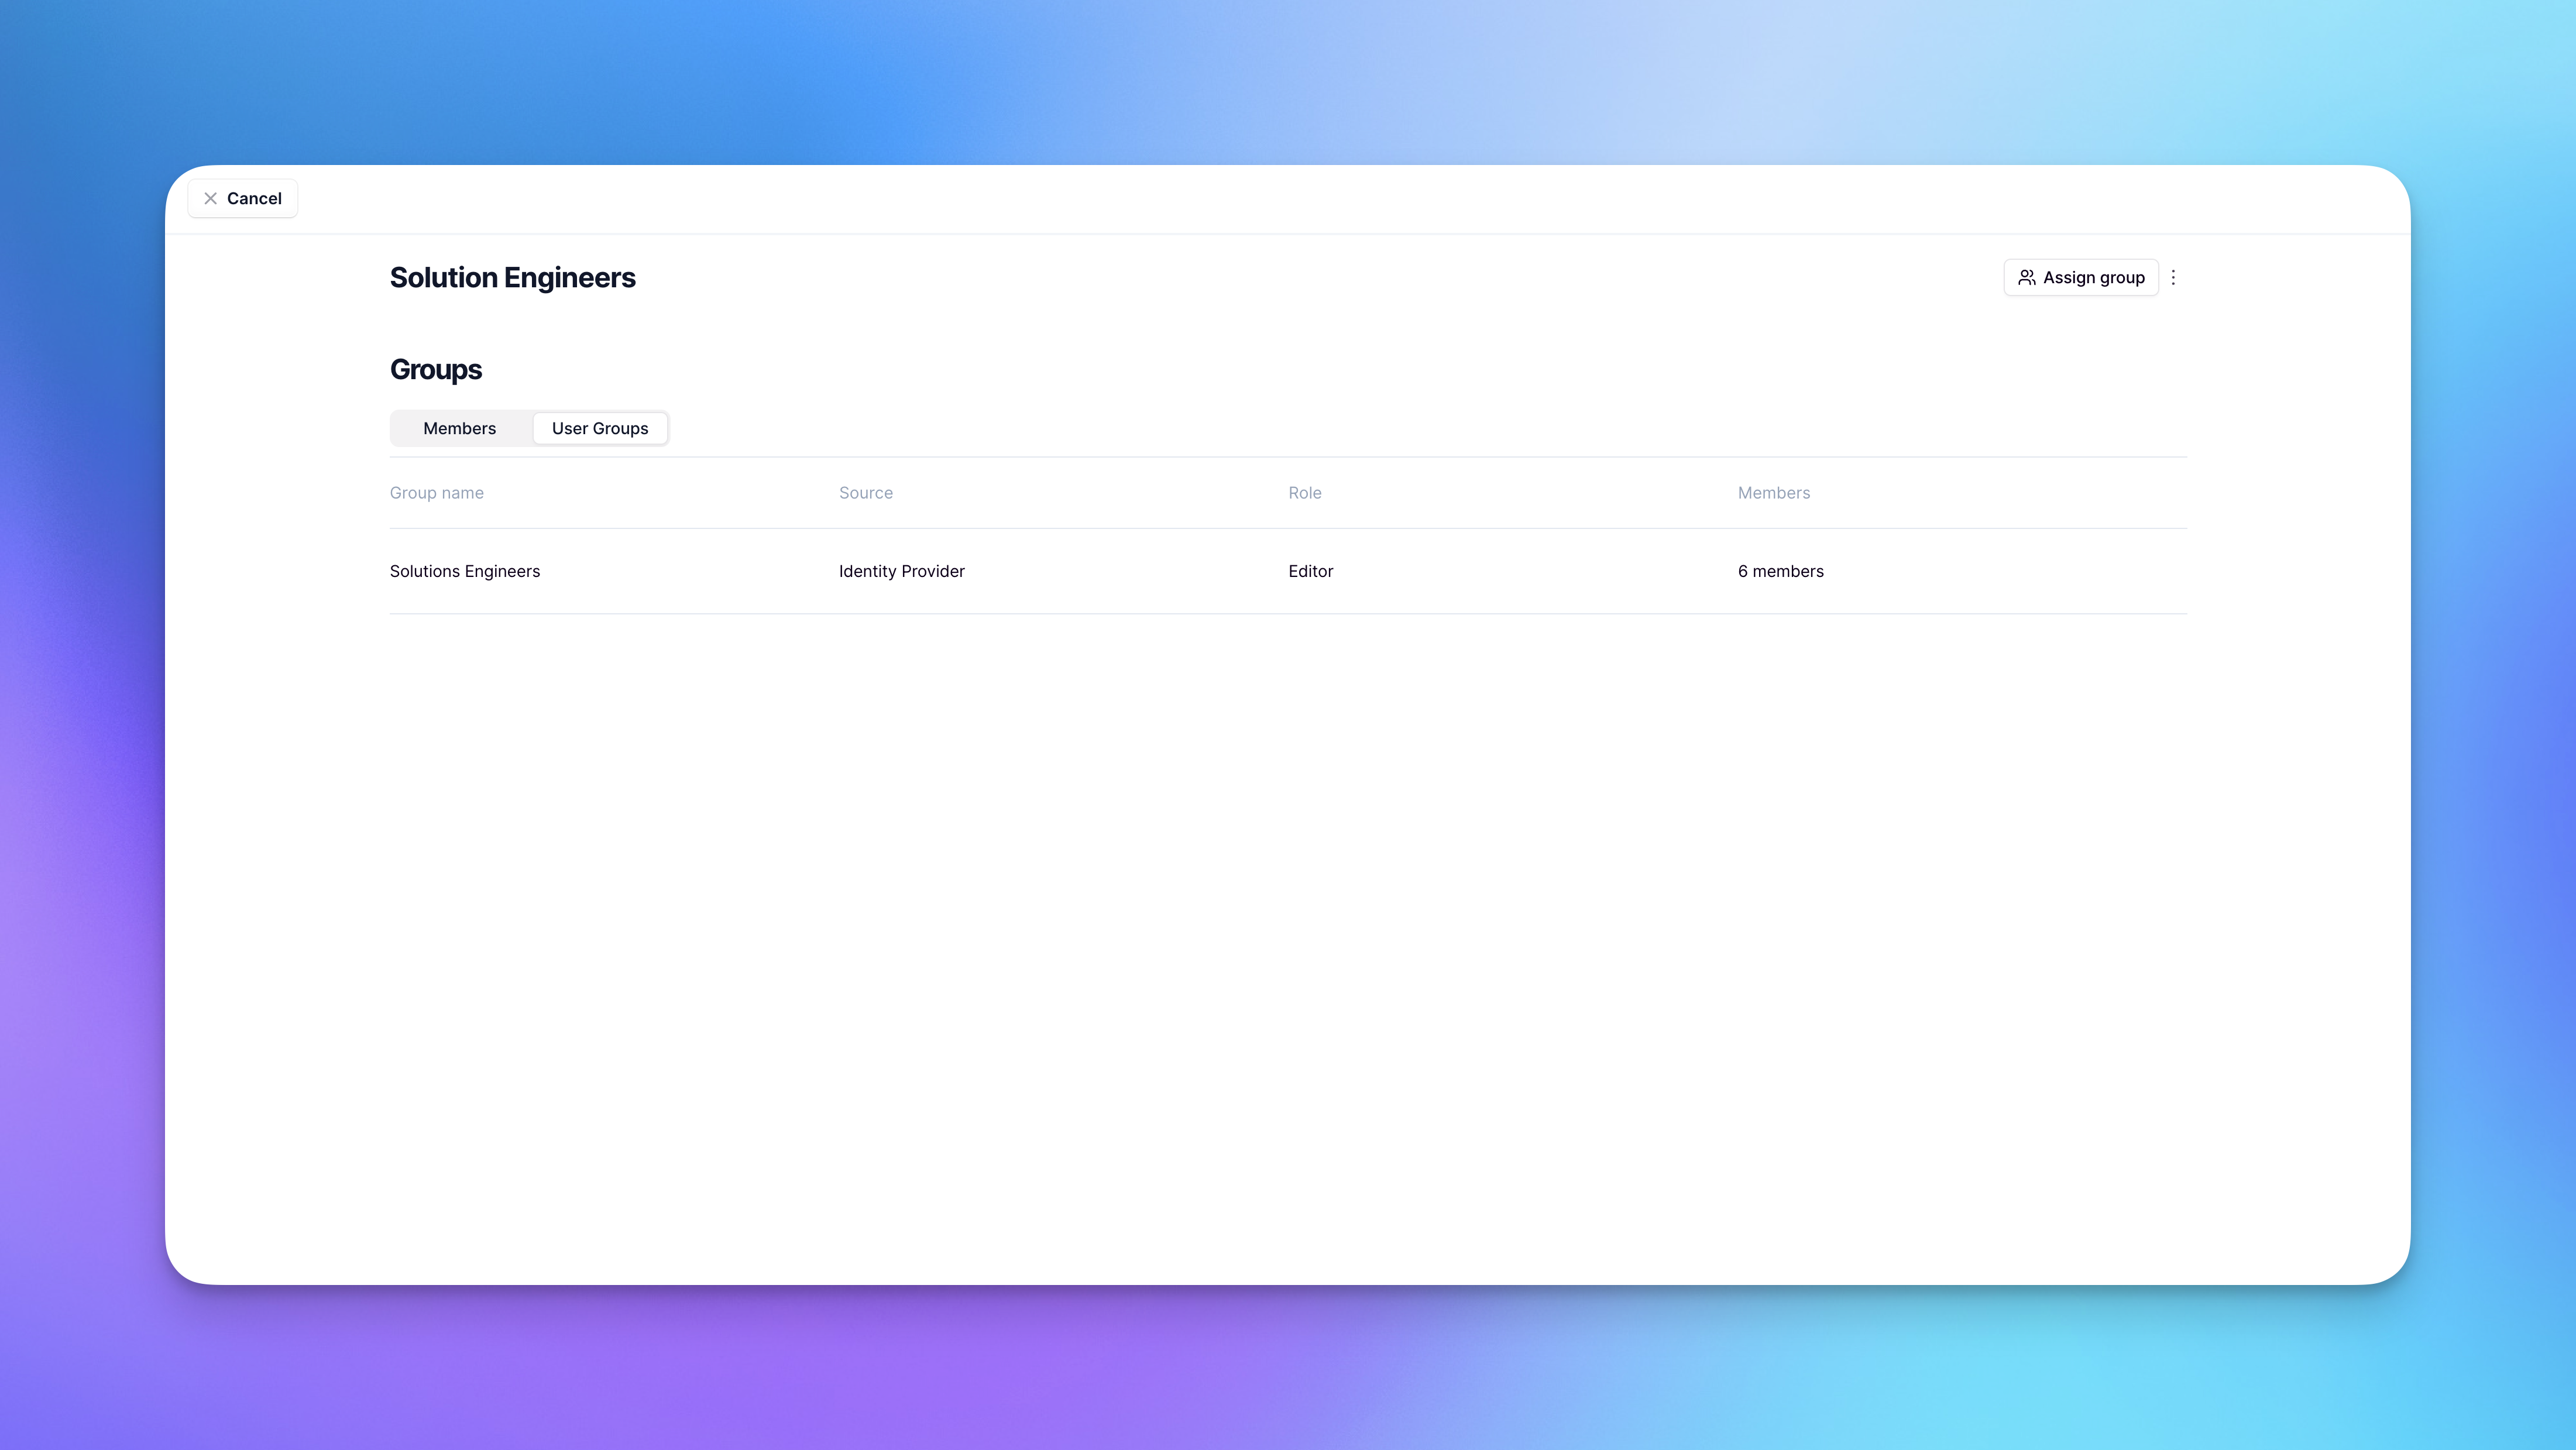 Groups can be assigned to projects to give all group members access to that project. This is particularly useful for onboarding entire teams or departments to specific projects.
When adding a group to a project, you'll assign them a [project-level role](/enterprise/rbac#project-level-controls) (Admin, Editor, Member, Chat, or Viewer) which determines what they can do within that project.
### Adding groups to projects
Groups can be assigned to projects to give all group members access to that project. This is particularly useful for onboarding entire teams or departments to specific projects.
When adding a group to a project, you'll assign them a [project-level role](/enterprise/rbac#project-level-controls) (Admin, Editor, Member, Chat, or Viewer) which determines what they can do within that project.
### Adding groups to projects
To add a group to a project:
1. Head to the **Invite to project** screen (either through Settings or by clicking your profile picture in Relevance AI)
2. Click **Assign Group**
3. Select the group(s) you want to add
4. Select the role you want the group to have (Admin, Editor, Member, Chat, or Viewer)
When you add a group to a project, all members of that group will be added to the project with the specified role. If any group members are not already part of the project, they will be automatically added.
## Asset-Level Groups
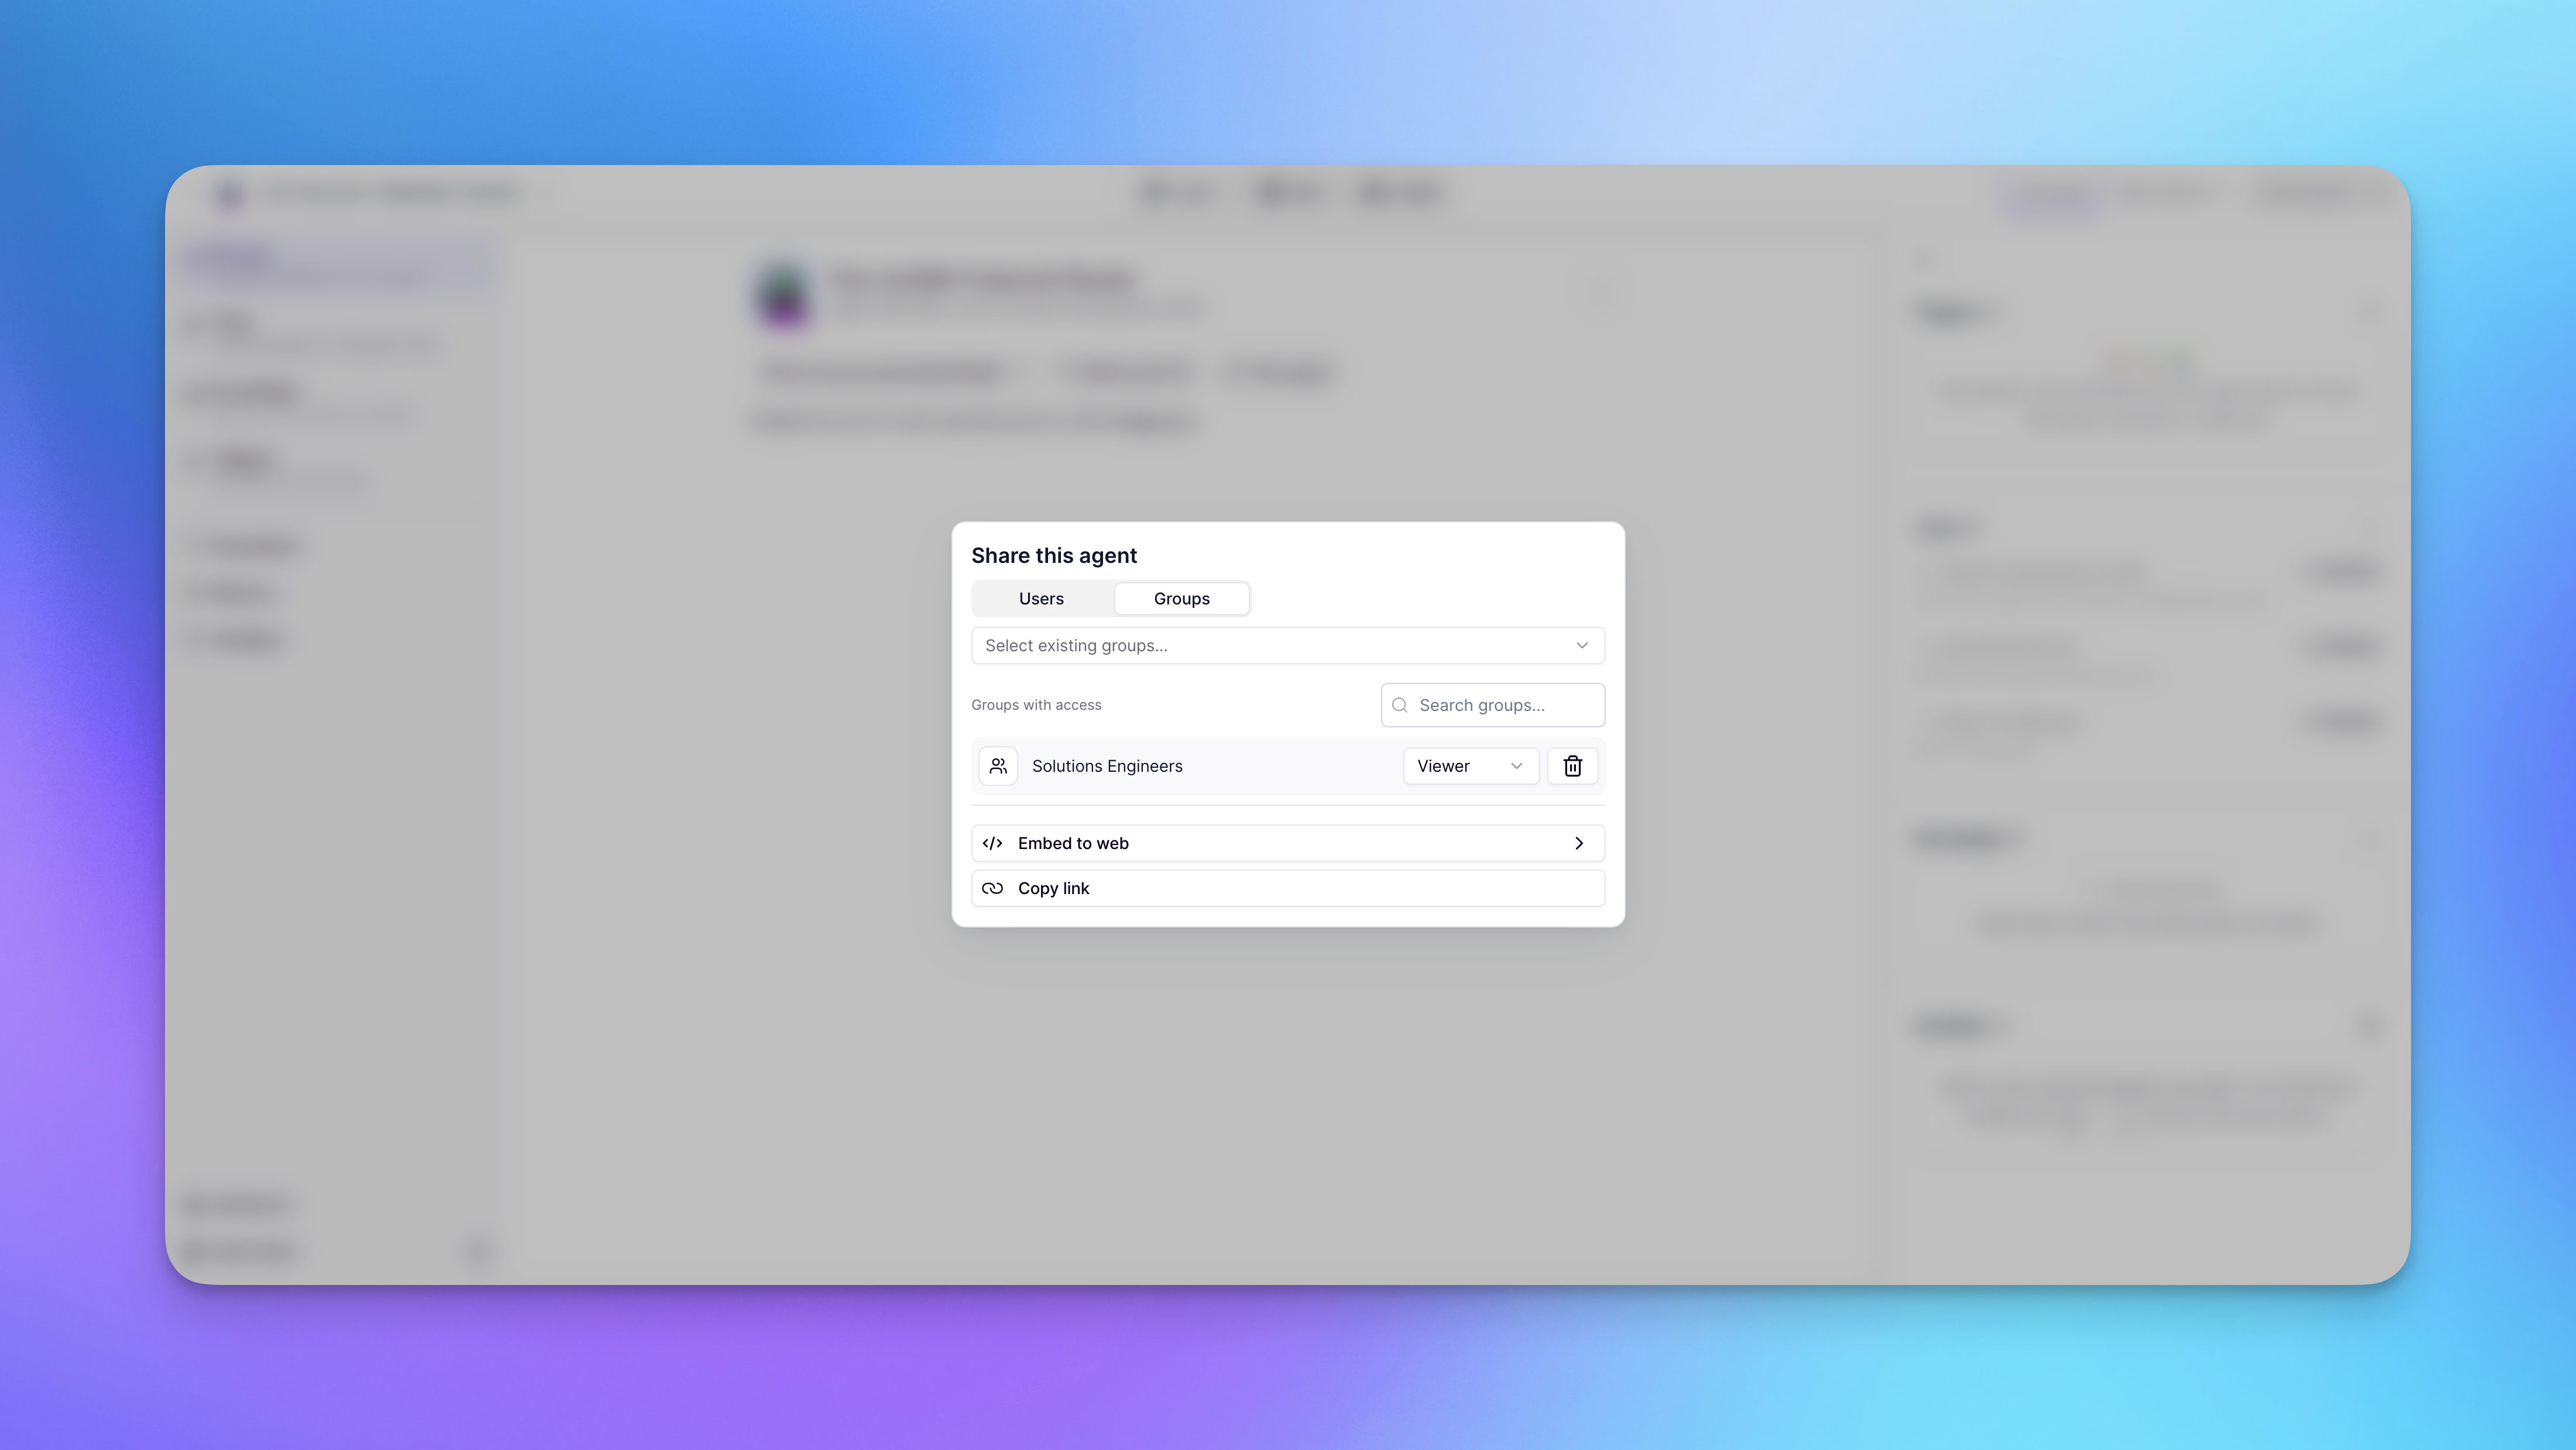 Groups can also be assigned directly to individual assets (agents, tools, knowledge bases, or workforces). This provides granular control over who can access and use specific resources.
When adding a group to an asset, you'll assign them an [asset-level role](/enterprise/rbac#asset-level-controls) (Admin, Member, or Viewer) which determines their permissions for that specific asset.
### Adding groups to assets
Groups can also be assigned directly to individual assets (agents, tools, knowledge bases, or workforces). This provides granular control over who can access and use specific resources.
When adding a group to an asset, you'll assign them an [asset-level role](/enterprise/rbac#asset-level-controls) (Admin, Member, or Viewer) which determines their permissions for that specific asset.
### Adding groups to assets
To add a group to an asset:
1. Open the asset you want to set permissions on
2. Click **Share**
3. Click **Groups**
4. Choose the group you want to add
5. Set the permission for the group (Admin, Member, or Viewer)
If a group is not already part of the asset's parent project, adding it to the asset will automatically add all group members to the project as well.
## How Group Synchronization Works
RBAC Groups maintains synchronization with your identity provider to ensure access control stays current with your organizational structure.
Groups automatically sync from your IDP approximately every 60 minutes
Group permissions are applied automatically during the sign-up process for new users
Syncs happen automatically without user intervention
### New User Sign-Up Process
When onboarding new users with Directory Sync and Groups enabled, follow this workflow:
Add the user to your identity provider and assign them access to the Relevance AI SSO application.
Ensure the user has the following required attributes correctly configured in your identity provider:
* First name
* Last name
* Email address
These attributes are required for successful SSO sign-up. See the [SSO Setup documentation](/enterprise/sso-setup) for more details.
Assign the user to the appropriate groups in your identity provider.
The sync worker runs approximately every 60 minutes (could be slightly longer). Wait for the next sync cycle to complete.
The user can now sign up to Relevance AI through SSO. Their group-based permissions will be automatically applied during the sign-up process.
Only after the user completes sign-up and is officially created in the Relevance AI platform will their email address appear in the users list within groups in Relevance AI.
**Important**: Users will not appear in your Relevance AI groups or user lists until they have completed their first SSO sign-up. Group membership and permissions are configured during the sign-up process, not before.
### Adding users to groups
When a user is added to an IDP group:
1. The change is detected during the next sync (approximately every 60 minutes)
2. The user automatically gains access to all projects and assets assigned to that group
3. The user inherits the group's role and permissions for each resource
4. No manual intervention is required in Relevance AI
For users not yet signed up to the platform, their group permissions will be applied during the sign-up process. Once they sign up, the user will be reflected as a member in the group.
### Removing users from groups
When a user is removed from an IDP group:
1. The change is detected during the next sync (approximately every 60 minutes)
2. The user's group-based access to projects and assets is revoked
3. If the user has individual (direct) permissions, those are retained
4. If the user only had group-based access, they lose access to the resource
Users removed from IDP groups lose their group-based permissions immediately upon sync. Ensure you understand the impact before removing users from groups in your identity provider.
## User Deprovisioning
User deprovisioning automatically removes user access when they are deprovisioned in your Identity Provider (IdP). This ensures that access control stays synchronized with your organization's user lifecycle management.
### When is a user deprovisioned?
Any of the following actions in your Identity Provider (IdP) will deprovision a user (they lose access via Directory Sync):
* Deprovisioning the user from the SCIM app in the IdP
* Removing the user from the group that grants access to the SCIM app (when that group controls provisioning to the app)
* Marking the user as inactive in the IdP
* Deleting the user in the IdP
If your app is assigned to only one group, removing a user from that group (or removing the group itself) will deprovision the user. **Best practice:** Assign the Relevance app to a dedicated group (e.g., "Relevance App Users") to ensure that removing users from other role-based groups like "Marketing" or "Engineering" does not accidentally deprovision them from the application.
## Email address updates for IdP-managed users
Email address changes are not currently supported for SSO/SCIM managed users. When a user's email address changes in your identity provider, Relevance AI treats it as a new user — the original account's permissions, group memberships, owned assets, and history are not transferred to the new email address.
### What happens when an email changes
If you rename an existing IdP user's email address, the Directory Sync process provisions a new Relevance AI account for the new email address. The original account remains active until deprovisioned separately, and no data or permissions are transferred between the two accounts.
Do not rename an existing IdP user to change their email address. This creates a new account rather than updating the existing one, and the original account's assets and history cannot be automatically transferred.
### Workaround for email address changes
To move a user to a new email address while preserving their access:
Create a new identity provider user with the new email address. Do not rename the existing user.
Add the new user to the Relevance AI SSO application and assign them to the appropriate Directory Sync groups in your identity provider.
The new user signs in to Relevance AI via SSO. Their group-based permissions are applied automatically during sign-up.
Deprovision the original user in your identity provider. This removes their access from Relevance AI automatically. See [User deprovisioning](#user-deprovisioning) for details.
Assets, agents, tools, or history owned by the original account are not automatically transferred to the new account. If you need to transfer ownership, do so manually before deprovisioning the old user.
## Setting Up Directory Sync
To use RBAC Groups, you need to configure directory sync between your identity provider and Relevance AI through WorkOS. This guide walks you through the complete setup process.
### Prerequisites
Before setting up Directory Sync, you must first configure [Single Sign-On (SSO)](/enterprise/sso-setup) for your organization. Directory Sync builds on top of SSO to enable automated user provisioning and group management.
### Setup Process
Contact your dedicated sales representative or reach out to our support team via your Slack channel or [other support methods](/get-started/support) to enable the "Groups" feature for your organization. Wait for confirmation before proceeding to the next step.
Follow the WorkOS integration guide for your specific identity provider:
* **Microsoft Entra ID (Azure AD)**: [Entra ID SCIM Integration](https://workos.com/docs/integrations/entra-id-scim)
* **Google Workspace**: [Google Directory Sync Integration](https://workos.com/docs/integrations/google-directory-sync)
* **Okta**: [Okta SCIM Integration](https://workos.com/docs/integrations/okta-scim)
* **JumpCloud**: [JumpCloud SCIM Integration](https://workos.com/docs/integrations/jumpcloud-scim)
Some UI elements in the WorkOS documentation may differ from their current interface.
**Important for Microsoft Entra ID users:** The provisioning service cannot read or provision users in nested groups—only immediate group members are supported. This limitation also affects single sign-on. **Best practice:** Directly assign users to groups rather than using nested group structures. [Learn more](https://learn.microsoft.com/en-us/entra/identity/app-provisioning/how-provisioning-works)
After completing the configuration in your identity provider, contact your dedicated sales representative or reach out to our support team via your Slack channel or [other support methods](/get-started/support) to confirm setup. We will monitor and validate that your sync is working correctly.
### Current Limitations
The following features are not yet supported in the current version of RBAC Groups:
Users who have access only through groups (with no direct access) will not appear in the project user list. They will still have access based on their group membership.
If you want to give a specific user a different role than their group, you must:
1. Invite them directly to the project (even if they already have access through a group)
2. Assign them the desired role
The user will always receive the **highest permission level** from all their sources. For example, if they have Admin access through a group and you assign them Viewer access directly, they will retain Admin permissions because the highest permission always prevails.
Group membership is only visible on the organization settings page (requires admin access), not on the project invite page.
Folders without accessible agents will still be visible to users, even if they cannot access any agents within them.
Users can downgrade their own group's permissions without warning or confirmation. Exercise caution when assigning admin permissions.
Changing a user's email address in your identity provider creates a new Relevance AI account rather than updating the existing one. Permissions, group memberships, and owned assets are not transferred automatically. See [Email address updates for IdP-managed users](#email-address-updates-for-idp-managed-users) for the recommended workaround.
For questions or assistance with directory sync setup, contact your dedicated sales representative or reach out to our support team via your Slack channel or [other support methods](/get-started/support).
***
## Frequently asked questions (FAQs)
No. RBAC Groups is available for Enterprise subscriptions only.
RBAC Groups supports major identity providers including Entra ID (formerly Azure AD) and Okta through WorkOS. For a complete list of supported providers, see the [WorkOS integrations documentation](https://workos.com/docs/integrations).
Yes. A group can have different roles at the project level versus the asset level. For example, a group could be Members at the project level but Admins on a specific agent within that project.
If a user belongs to multiple groups assigned to the same resource with different roles, they receive the highest permission level among all their group memberships and individual assignments.
RBAC Groups requires users to authenticate via SSO through your identity provider. Users who sign in with email/password or other non-SSO methods cannot be managed through IDP groups.
RBAC (Role-Based Access Control) provides the permission framework and roles at organization, project, and asset levels. RBAC Groups extends this by allowing you to assign those roles to entire groups of users at once, rather than individually.
Email address changes are not currently supported for IdP-managed users. Changing a user's email in your identity provider creates a new Relevance AI account rather than updating the existing one — permissions, group memberships, and owned assets are not transferred. See [Email address updates for IdP-managed users](#email-address-updates-for-idp-managed-users) for the step-by-step workaround.