> ## Documentation Index
> Fetch the complete documentation index at: https://relevanceai.com/docs/llms.txt
> Use this file to discover all available pages before exploring further.
# Slack
> Relevance AI's integration for Slack allows you to connect your Relevance AI Agents with Slack, enabling seamless communication between your AI Workforce and your team's Slack workspace.
The Relevance AI team are constantly making improvements to the Slack integrations. If a new Slack feature isn't showing on your account, try to reconnect your Slack integration. To see our changes, sometimes integrations need a reconnect or marketplace re-approval.
To add Slack as an integration, follow these simple steps:
1. Log into Relevance AI: [https://app.relevanceai.com](https://app.relevanceai.com)
2. Go to the **Integrations & API Keys** page in the sidebar of your Relevance AI dashboard.
3. Click on "Slack" from the available integrations.
4. Click on the "Add Integration" button.
5. In the pop-up window, sign into your Slack workspace and authorize Relevance AI to access your Slack account.
6. Select the channels you want to grant access to.
7. Click "Allow" to complete the connection.
This integration for Slack was developed by our team and is not affiliated with Slack. Please contact our Support for any questions/queries you may have.
## Linking your account via magic link
Both the magic link flow and the standard OAuth flow achieve the same outcome — your Slack account is linked to your Relevance AI account.
You may receive a magic link from Slack or via email inviting you to connect your accounts. This is an alternative to the standard OAuth flow above and achieves the same result.
1. Click the magic link in Slack or your email.
2. If you're not logged in to Relevance AI, you'll be redirected to sign in first. After signing in, you'll be returned to the consent page automatically.
3. On the consent page, review your Relevance AI account email and your Slack account details shown.
4. Click **Confirm** to link the accounts, or **Cancel** to abort the connection.
## Understanding Slack connections in Relevance AI
Relevance AI uses two distinct Slack authentication methods depending on which part of the platform you're using. They are independent of each other, and your Slack workspace admin can allow or block each type separately.
Uses a workspace-level bot token through the Relevance AI Slack app. Installed once for the whole workspace, it lets agents post messages, respond to triggers, and send notifications. Requires a Slack workspace admin to approve the Relevance AI app.
Each user connects their own Slack account individually through OAuth, granting Relevance AI access to act on that user's behalf in Slack.
If Slack works in one part of Relevance AI but not another, your workspace admin has likely approved one connection type but not the other. Ask your admin to check permissions for both the Relevance AI Slack app and per-user OAuth app installations.
Both connection types can coexist in the same workspace.
## Triggering Agents or Workforces from Slack
You can trigger your **Agents** or **Workforces** directly from Slack channels or your own DM. This will start your Agent or Workforce in Relevance AI based on a keyword of your choice, and then will reply to your message in Slack.
You can now trigger entire Workforces from Slack, not just individual Agents. This allows you to kick off complex multi-agent workflows directly from your Slack conversations. Learn more about [Workforce Triggers](/build/workforces/build-an-ai-workforce/add-triggers).
### Setting up triggers for channels
To trigger from a **channel**, first **invite Relevance AI to the Slack channel** by typing `/invite @Relevance AI` into the channel.
### Setting up triggers for DMs
To trigger from your **own DM**, open a DM with the Relevance AI bot in Slack and **send it any message**. This establishes the DM connection and makes your DM appear in the channel selection dropdown.
**Channel vs DM setup:**
1. **For channels:** Use `/invite @Relevance AI` in the channel
2. **For your DM:** Send a message to the Relevance AI bot (any message works)
Then, set up your Trigger from Relevance AI by following the steps below:
1. **To trigger your Agent:** enter your Triggers page in your Agent, and create a new Trigger. **To trigger your Workforce:** enter your Workforce page, select a Trigger.
2. Select Slack.
3. Connect or select your Slack account, then click 'Continue'.
4. Select the channel or DM you want your Agent to be triggered on.
5. Enter the keyword you want the Agent to be triggered on - if you want the Agent to be triggered on all messages that tag `@Relevance AI`, leave this blank.
6. Click 'Continue'.
7. Queue work hours if needed.
8. Click 'Setup trigger'.
Once setup, you can trigger your Agent from Slack by tagging `@Relevance AI` and mentioning the keyword you've set (if you set a keyword)! You can also keep the conversation rolling in threads - simply `@Relevance AI` in thread for your agent to respond, with full context of the conversation.
### Advanced Trigger Settings
#### Live Status Updates
When your Agent or Workforce is triggered from Slack, you'll receive live status updates as it progresses through tasks. These updates are automatically enabled and appear directly in the Slack thread, showing you what your Agent is doing in real-time.
#### Exclude Keywords
You can specify keywords that will prevent your Agent from triggering, even when messages mention your trigger keyword or tag `@Relevance AI`.
**To configure:**
1. In your Slack trigger settings, expand **Advanced Settings**
2. Find the **Exclude Keywords** field
3. Enter keywords or phrases (comma-separated)
4. Save your configuration
If a message contains any of your exclude keywords, the Agent will not trigger. Keywords are case-insensitive.
#### No Agent Reply
Enable this setting to have your Agent process Slack messages without posting a response back to the channel. This is useful for background processing, data collection, or triggering workflows that complete elsewhere.
**To enable:**
1. In your Slack trigger settings, expand **Advanced Settings**
2. Toggle on **"No Agent Reply"** or **"Disable Agent responses"**
3. Save your configuration
When "No Agent Reply" is enabled, you won't receive confirmation in Slack that your Agent processed the message. Monitor your Agent's task history in Relevance AI to verify it's working correctly.
### Customize Message Formatting
When using the Send Message (advanced) tool step, you can send messages through Slack with enhanced formatting. This includes:
1. **Emojis:** Add emojis to make your messages more engaging and expressive.
2. **Bolded text:** Use bold formatting to highlight important information.
3. **Images:** Include images to provide visual context or instructions.
## Escalate your Agent to Slack
This feature may be deprecated in the future and an Agent Notification feature will be added instead.
To escalate your agent to Slack, follow these steps:
1. Go to the "Agents" page in the sidebar of your Relevance AI dashboard.
2. Select the agent you want to escalate.
3. Navigate to the Build tab of your agent (top center)
4. Click on "Escalations" in the left sidebar.
## Agent Notifications
This feature is currently in beta for some users
1. Under "Agent Notifications", click "Add agent notification"
2. Configure your notification settings:
* Select "Slack" as the platform
* Choose the specific task statuses you want to trigger the notifications with (e.g., "Running" to trigger whenever the agent runs)
* Select a Slack account that you have previously authed or add a new Slack account
* Select a Slack channel you want to notify with new agent messages
3. Invite the Relevance AI agent to the Slack channel you want to notify by typing "/invite @RelevanceAI" in the channel.
4. Publish changes to your agent by clicking "Publish changes"
5. Run your agent by selecting "Run" at the top of the page.
6. Prompt the agent with some text, e.g. "Give me a summary of what Slack does".
7. You can reply to the agent's notification directly in Slack, or if you'd prefer you can click on "View task" to navigate back to the task in Relevance AI and perform further actions.
Once connected, your integration for Slack will be available for use with your Agents and Tools.
## Making API calls with Slack using Tool steps
You can configure your Slack agent to make API calls to Slack via Relevance AI's tool builder. This allows you to perform actions such as posting Slack messages to channels, or reading messages from channels. These are just a few examples of the many Slack actions available. Your agents can combine these actions with their reasoning capabilities to create sophisticated workflows that enhance team communication and productivity.
Type in "Slack" in the search bar to see all the available Slack actions.
### All Slack Tool steps
You can learn more about each of the Slack Tool steps on the following pages.
## Remove integration for Slack
If you need to remove the integration for Slack:
1. Go to the **Integrations & API Keys** page from the sidebar.
2. Search for Slack from the list.
3. Click "..." on the account you want to remove.
4. Click "Remove" and confirm your choice.
This will disconnect your Slack workspace from Relevance AI, and your agents will no longer be able to interact with Slack until you reconnect the integration for Slack.
## Troubleshooting
Magic links are time-limited and may expire before you click them. If your magic link no longer works, connect your Slack account directly through the standard OAuth flow: go to **Integrations & API Keys** in the sidebar, find Slack, and click **Add Integration**.
The consent page shows two email addresses: your Relevance AI account email and your Slack account email. If either address looks incorrect, click **Cancel** and verify that you're logged in to the correct Relevance AI account before trying again. To switch accounts, sign out of Relevance AI and sign in with the correct account, then click the magic link again.
## Frequently asked questions (FAQs)
Yes! You can use your own Slack DM as a trigger source. Here's how to set it up:
1. Open a DM with the Relevance AI bot in Slack
2. Send the bot any message (this establishes the DM connection)
3. Your DM will then appear in the channel selection dropdown when setting up triggers in Relevance AI
**Note:** For DMs, you don't use the `/invite` command. Simply sending a message to the bot is enough to establish the connection. If your DM doesn't appear in the channel list, make sure you've sent at least one message to the Relevance AI bot first.
To trigger an agent via direct message (DM) in Slack, you must have Editor permissions or higher on that specific agent.
If you want to be able to send a message to a specific person in Slack, that person will first need to send a message to the Relevance AI bot in Slack. Once they do this, their name will appear as a destination option when sending Slack messages.
The most common reason Slack isn't working as expected is that your integration needs to be updated. We occasionally release improvements to our Slack app, and older installations don't pick these up automatically. Updating only takes a moment - go to your project's integrations page, find your Slack connection and click 'Reconnect'.
This usually happens for one of two reasons. First, the email address you use in Slack may not match the email you used when signing up to Relevance - we require these to be the same. Second, the Relevance AI app might not have been invited to the channel yet. To fix this, open the channel and run `/invite @RelevanceAI`, and it should appear.
The easiest and most reliable method is to install Slack directly through Relevance. Start the Slack integration connection flow in Relevance and a request will automatically be sent to your Slack admin for approval. In some cases, admins install the Relevance AI app in Slack before the integration is set up in Relevance, which can create sync issues. Installing via Relevance avoids this.
Yes! Live status updates are automatically enabled for all Slack triggers. You'll see real-time progress updates posted in the Slack thread as your Agent works through its tasks.
Use the **Exclude Keywords** feature in your Slack trigger's advanced settings. Add keywords or phrases that should prevent your Agent from triggering, even if the message mentions your trigger keyword or tags `@Relevance AI`.
Yes! Enable the **"No Agent Reply"** setting in your trigger's advanced settings. This allows your Agent to process messages without posting a response back to Slack.
Agent triggers start a single AI Agent, while Workforce triggers kick off an entire multi-agent workflow with multiple Agents working together. Use Workforce triggers for complex, multi-step processes that require different specialized Agents to collaborate.
A magic link is an alternative way to connect your Slack account to Relevance AI. When you click the link, you're taken to a consent page in Relevance AI that shows your Relevance AI account email and your Slack account details. Click **Confirm** to complete the connection or **Cancel** to abort it. The magic link method achieves the same result as connecting via the standard OAuth flow on the Integrations page.
Both methods work and achieve the same result. You can connect your Slack account through the standard OAuth flow on the **Integrations & API Keys** page, or by clicking a magic link you received from Slack or via email. Use whichever is more convenient.
If you're not logged in to Relevance AI when you click the magic link, you'll be redirected to the sign-in page. After signing in, you'll be automatically returned to the consent page to complete the account linking.
Relevance AI uses two different Slack authentication methods. Builder features (Agents, Tools, Triggers, Workforces) use a workspace-level bot token through the Relevance AI Slack app, which requires a workspace admin to approve the app installation. The other method uses per-user OAuth, where each user connects their own Slack account individually.
If Slack works in one area but not the other, your workspace admin has likely approved one connection type without the other. Ask your admin to check the app permission settings for both the Relevance AI Slack app and per-user OAuth app installations. Both connection types can coexist once both are approved.
## Disclaimer
Relevance AI enables users to access verified and genuine generative models from secure and trusted vendors. However, generative AI technologies still leave the potential for hallucinations leading to potentially inaccurate responses. Please review and verify the agent's output and use a combination of deterministic and agentic behaviour to achieve the most reliable results.
## Privacy Policy
To find out more about how Relevance AI handles your data, please see our [Privacy Policy](https://relevanceai.com/privacy-policy).
## Follow along on YouTube
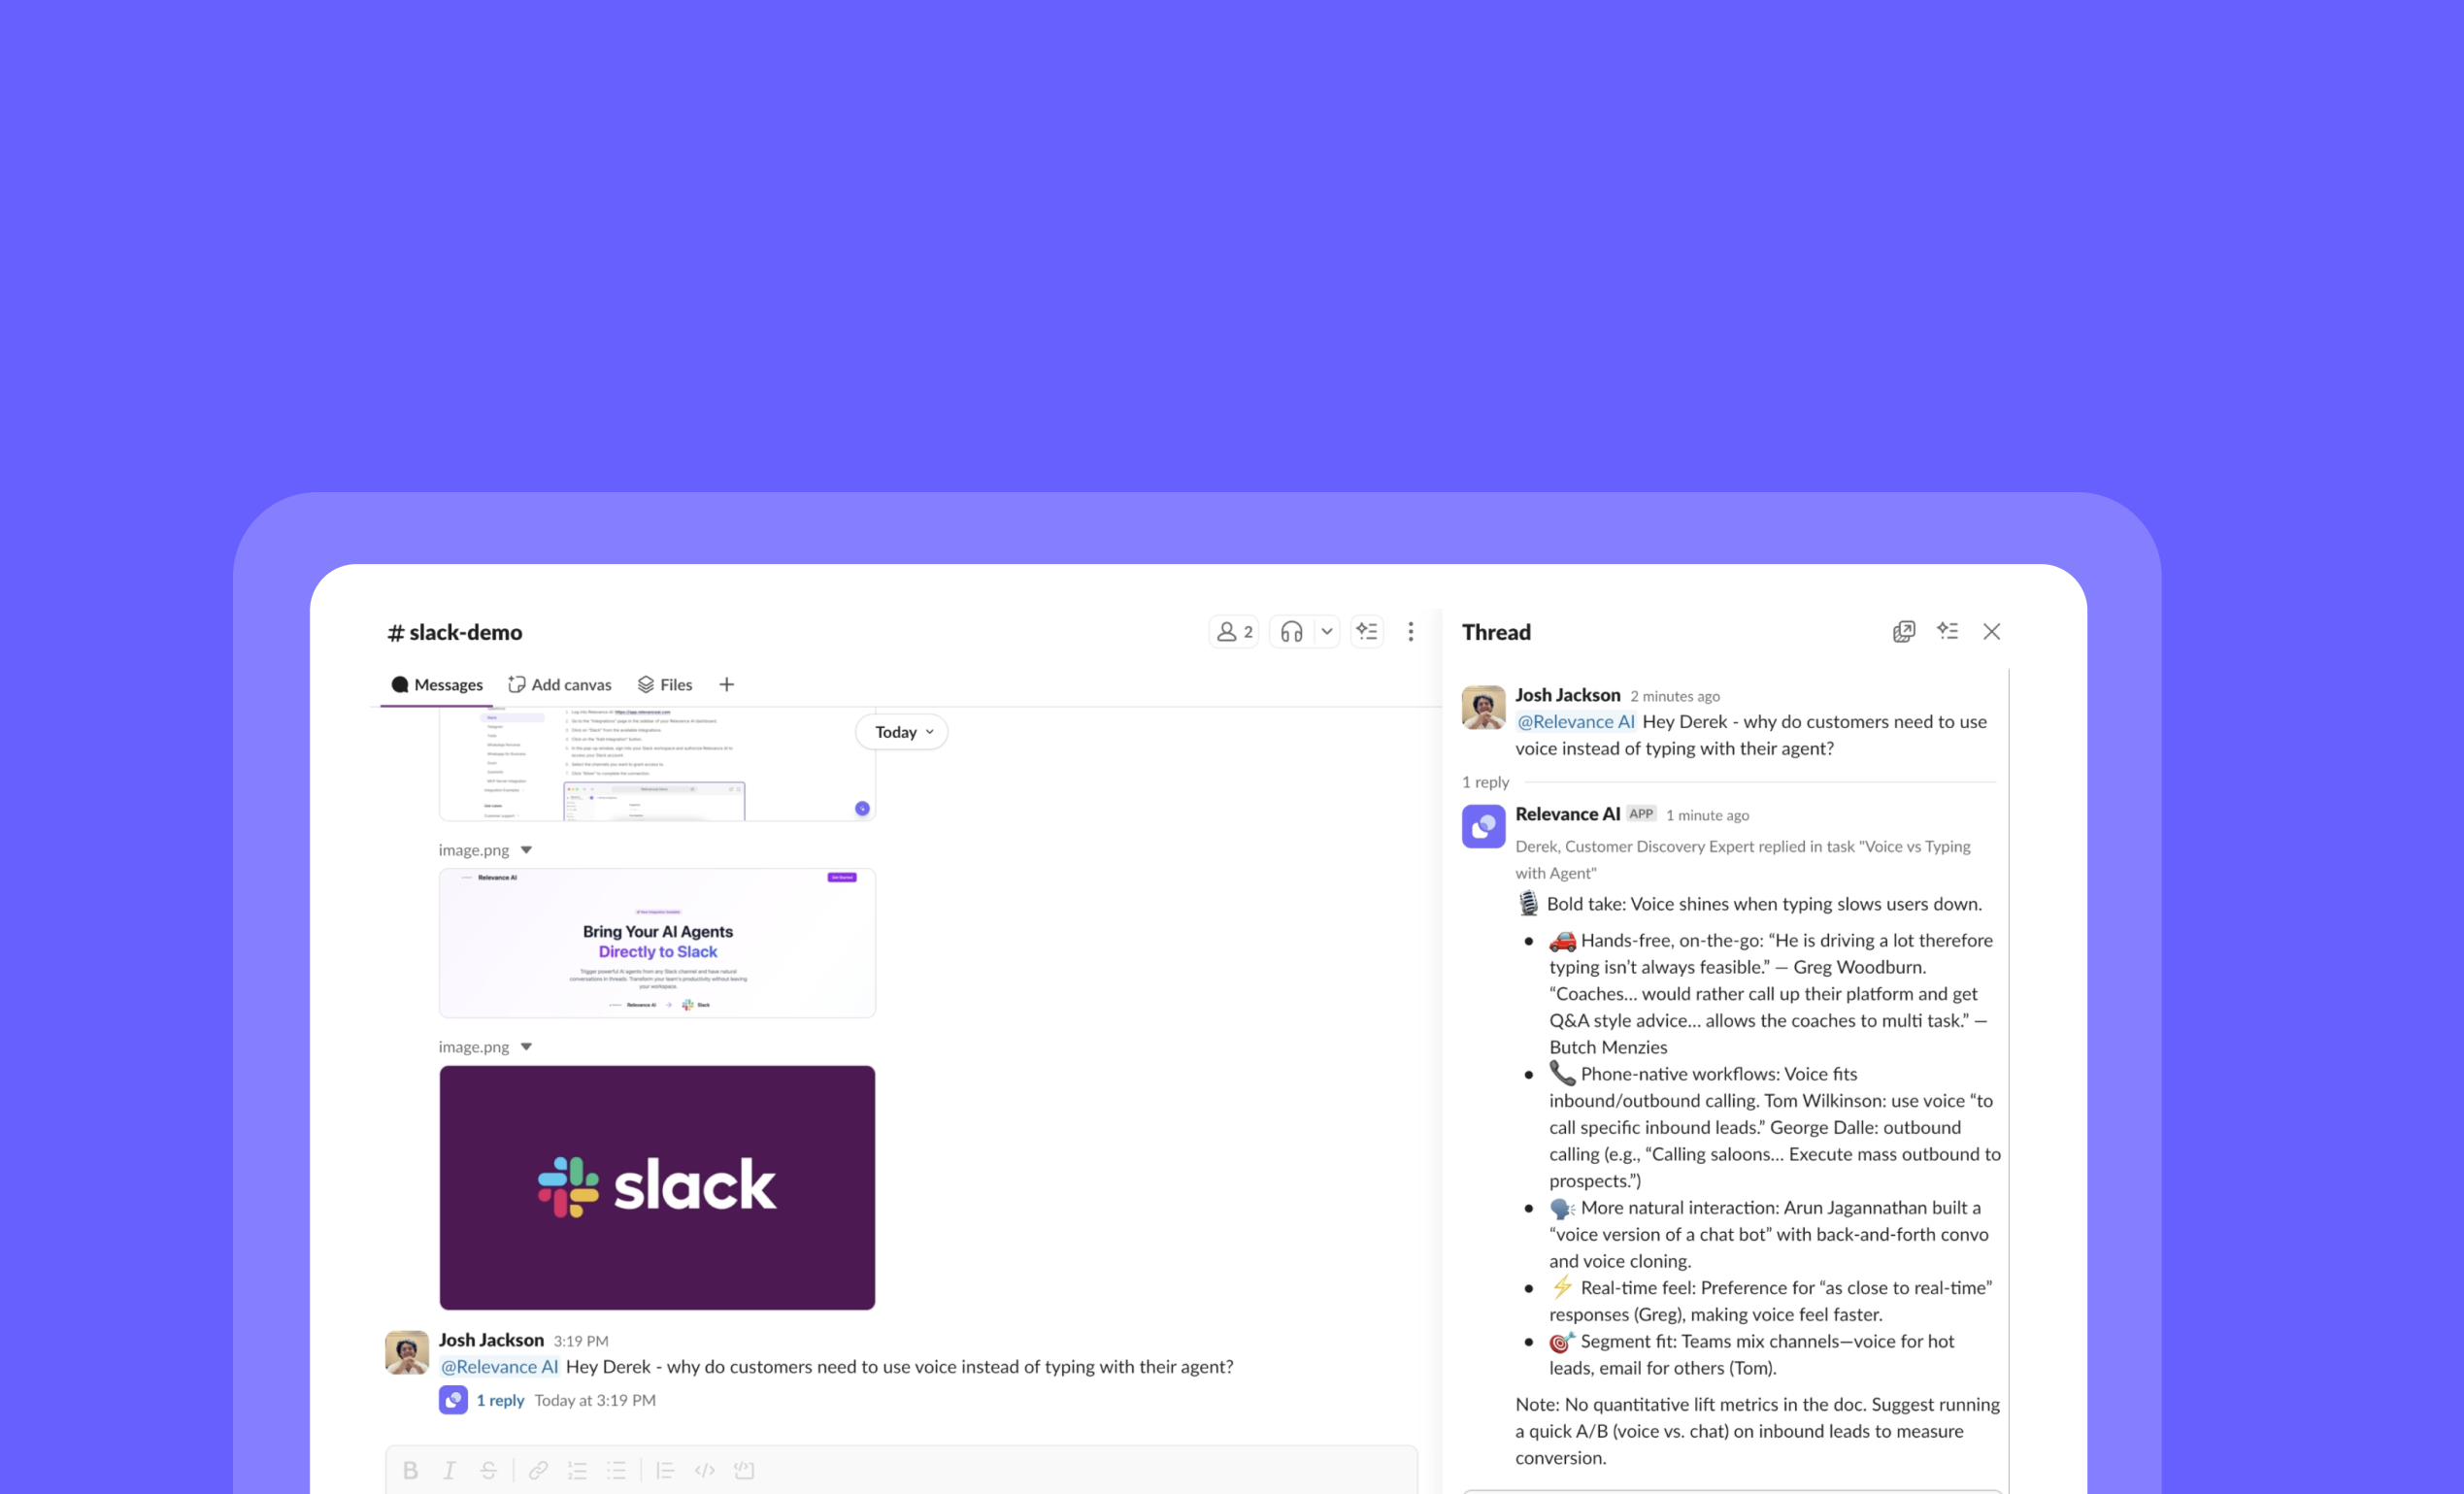 You can trigger your **Agents** or **Workforces** directly from Slack channels or your own DM. This will start your Agent or Workforce in Relevance AI based on a keyword of your choice, and then will reply to your message in Slack.
You can now trigger entire Workforces from Slack, not just individual Agents. This allows you to kick off complex multi-agent workflows directly from your Slack conversations. Learn more about [Workforce Triggers](/build/workforces/build-an-ai-workforce/add-triggers).
### Setting up triggers for channels
To trigger from a **channel**, first **invite Relevance AI to the Slack channel** by typing `/invite @Relevance AI` into the channel.
### Setting up triggers for DMs
To trigger from your **own DM**, open a DM with the Relevance AI bot in Slack and **send it any message**. This establishes the DM connection and makes your DM appear in the channel selection dropdown.
You can trigger your **Agents** or **Workforces** directly from Slack channels or your own DM. This will start your Agent or Workforce in Relevance AI based on a keyword of your choice, and then will reply to your message in Slack.
You can now trigger entire Workforces from Slack, not just individual Agents. This allows you to kick off complex multi-agent workflows directly from your Slack conversations. Learn more about [Workforce Triggers](/build/workforces/build-an-ai-workforce/add-triggers).
### Setting up triggers for channels
To trigger from a **channel**, first **invite Relevance AI to the Slack channel** by typing `/invite @Relevance AI` into the channel.
### Setting up triggers for DMs
To trigger from your **own DM**, open a DM with the Relevance AI bot in Slack and **send it any message**. This establishes the DM connection and makes your DM appear in the channel selection dropdown.