This is one of our flagship agent templates, BDR Bosh (enterprise only).
# Add Agents
Source: https://relevanceai.com/docs/ai-workforce/build-an-ai-workforce/add-agents
Adding agents to your Workforce allows you to create powerful multi-agent systems where specialized AI agents work together to accomplish complex tasks.
## Adding Agents to Your Workforce
### Prerequisites
Before adding agents to your workforce, ensure you have:
* Created at least two agents in your project
* Access to Workforce
### Step-by-Step Instructions
1. **Access Workforce**
* Select your workforce or create a new one
* Navigate to the "Build" section in your workforce
2. **Add Your First Agent**
* When you first open your workforce, you'll see a manual trigger already in place
* Connect an agent to this trigger by dragging an agent from the sidebar onto the workspace
* This initial connection allows you to message that particular agent (similar to the existing agent flow in Agents)
3. **Add Additional Agents**
* Drag additional agents from the sidebar onto the workspace
* Position them strategically based on your workflow requirements
4. **Connect Agents Together**
* Click and drag from one agent to create a connection line to another agent
* When connecting agents, you'll be prompted to select a connection type:
* **Agent Decide**: The agent makes its own decision on whether to talk to another agent
* **Forced Handover**: An agent will always hand over what it was doing to the next agent, regardless of its finished state
5. **Configure Connection Settings**
* After creating a connection, click on the connecting line to configure edge settings
* For "Let agent decide" connections:
* Complete the "When to call this agent" box with natural language instructions
* Set behavior settings (auto run, approval required, or let agent decide)
* Configure max auto runs as a guardrail
* Choose between 'always start a new task' or 'always continue with one task'
* For "Forced handover" connections:
* Choose between 'always start a new task' or 'always continue with one task'
6. **Save Your Configuration**
* Click the "Save" button to preserve your workforce configuration
## Communication Settings
When connecting agents, you can configure how they communicate with each other:
### Let Agent Decide
Use natural language to explain how the agent should behave. The agent will follow your instructions but will escalate if it needs help or clarification.
* **Communication Settings**: Explain in natural language when this agent should be called. For example, if a manager agent is delegating to another agent, explain the logic for when to delegate to that specific agent.
* **Behavior Settings**:
* **Auto run**: The agent will complete the task without approval
* **Approval required**: The agent will draft the task but ask for approval before completing
* **Let agent decide**: The agent will complete the task if confident, otherwise will ask for approval
* **Max auto runs**: Set a limit on the number of times the agent auto runs
### Forced Handover
This setting forces one agent to pass the task to another agent. The handover must happen regardless of the first agent's state.
## Best Practices for Adding Agents
1. **Define Clear Roles**
* Give each agent a specific role and responsibility within your workforce
* Avoid overlapping responsibilities that could cause confusion
2. **Create Logical Workflows**
* Arrange agents in a way that follows a natural progression of tasks
* Consider the information flow between agents when designing your workforce
3. **Use Descriptive Connection Instructions**
* When using "Let agent decide" connections, provide clear, detailed instructions about when to delegate
* Include specific criteria or conditions that should trigger the handover
4. **Test Incrementally**
* Add and test agents one at a time to ensure each connection works as expected
* Use the Task View to monitor how agents interact with each other
5. **Set Appropriate Approval Levels**
* For critical tasks, use "Approval required" to maintain human oversight
* For routine tasks, consider "Auto run" to maximize efficiency
## Monitoring Your Multi-Agent Workforce
After adding agents to your workforce:
1. Go to the "Task" view to see your workforce in action
2. Here you can trigger your workforce via manual messages/conversation
3. Monitor when specific agents need approvals
4. Observe how agents communicate and hand off tasks to each other
## Related Features
[Workforce Task View](https://relevanceai.com/docs/workforce/task-view) - Learn how to monitor and interact with your multi-agent workforce after it's built.
[Edge Settings](https://relevanceai.com/docs/workforce/edge-settings) - Discover more about configuring the connections between nodes in your workforce.
[Add Tools](https://relevanceai.com/docs/workforce/add-tools) - Explore how to enhance your workforce by adding tools that agents can use.
## Troubleshooting
**Issue**: Agents aren't communicating as expected\
**Solution**: Check the connection settings between agents and ensure the instructions are clear and specific.
**Issue**: Workflow stops unexpectedly\
**Solution**: Check if an agent is waiting for approval in the Task View.
**Issue**: Agent makes incorrect decisions about when to delegate\
**Solution**: Refine the natural language instructions in the "When to call this agent" field.
# Add Conditions
Source: https://relevanceai.com/docs/ai-workforce/build-an-ai-workforce/add-conditions
Conditions in Workforce act as powerful decision-making components that allow you to create intelligent workflows with conditional logic.
## Overview
Conditions enable you to build dynamic, responsive workflows by creating branching paths based on specific criteria. Rather than having a linear workflow where every step always executes in the same order, conditions let you implement decision points that determine which path your workflow should take.
## When to Use Conditions
Conditions are particularly valuable when you need to:
* Process data differently based on specific values or states
* Create branching workflows with different paths for different scenarios
* Implement quality control checks before proceeding to critical steps
* Filter out certain items from further processing
* Execute tools only on specific days, times, or under certain circumstances
## Adding a Condition to Your Workforce
To add a condition to your workforce:
1. Navigate to the "Build" section of your Workforce
2. Locate the "Conditions" option in the node selection panel
3. Drag a condition node onto your workspace
4. Connect the condition to the appropriate tools or agents
## Configuring Conditions
Setting up conditions in Workforce is simple thanks to natural language configuration. Instead of complex technical settings, you can simply describe your condition in plain English:
1. Click on your condition node to open its settings
2. Enter a natural language description of your condition, such as:
* "Go down this path if the day is a weekday"
* "Follow this route if the customer score is above 80"
* "Use this path if the email contains the word 'urgent'"
# Add Tools
Source: https://relevanceai.com/docs/ai-workforce/build-an-ai-workforce/add-tools
Tools are essential components in your AI Workforce that enable agents to perform specific actions and complete tasks.
## What Are Tools in Workforce?
In the Workforce, tools function as independent nodes that can be connected to agents, triggers, and even other tools. Unlike the traditional approach where tools are tightly coupled to specific agents, Workforce allows for a more flexible and modular design:
* Tools exist as standalone components on the workspace
* Multiple agents can access the same tool
* Tools can be connected to other tools to create sequential workflows
* Tools can be easily substituted without having to reconfigure each agent
## How to Add Tools to Your Workforce
Adding tools to your Workforce is a straightforward process:
1. Open your Workforce and navigate to the "Build" section
2. Locate the tools panel in the Workforce interface
3. Drag any tool from your project onto the workspace
4. Position the tool where you want it on the canvas
## Connecting Tools in Your Workforce
Once you've added tools to your workspace, you can create powerful connections:
### Agent to Tool Connections
To connect an agent to a tool:
1. Click on the agent node to reveal connection points
2. Drag a connection line from the agent to your desired tool
3. Configure the connection settings:
* **Let agent decide**: The agent will determine when to use the tool based on natural language instructions
* **Forced handover**: The agent will always use the tool when the connection is triggered
### Tool to Tool Connections
One of the most powerful features of the Workforce Builder is the ability to connect tools to other tools:
1. Click on the source tool to reveal connection points
2. Drag a connection line to the destination tool
3. This creates a workflow where the output of one tool becomes the input for the next
For example, you might connect a tool that sends an email to another tool that summarizes responses, creating an automated follow-up workflow.
## Edge Settings for Tool Connections
When connecting tools in your Workforce, you can configure the following edge settings:
### Communication Style
* **Let agent decide**: Use natural language to explain when the tool should be used
* **Forced handover**: Always execute the tool when the connection is triggered
### Behavior Settings
* **Auto run**: The tool will execute without requiring approval
* **Approval required**: The tool will draft the action but ask for human approval before executing
* **Let agent decide**: The agent will determine whether to auto-run or request approval based on context
* **Max auto runs**: Set limits on how many times a tool can auto-run as a safety guardrail
## Tool to Tool Workflows
The ability to connect tools directly to other tools is what makes the Workforce Builder so powerful. This workflow-style approach allows you to:
1. Create sequential processes where each tool performs a specific function
2. Build complex automations without writing code
3. Easily modify or replace individual components without disrupting the entire workflow
4. Maintain a visual representation of your business processes
For example, after sending an email with one tool, you could automatically hand over to another tool that monitors for responses, and then to a third tool that generates appropriate follow-ups.
## Using Conditions with Tools
For more advanced workflows, you can add conditions to your tool connections:
1. Add a condition node to your workspace
2. Connect a tool to the condition
3. Connect the condition to other tools
4. Configure the condition logic (e.g., "only send email if day of week is weekday")
Conditions act as IF statements in your workflow, allowing for branching logic and more sophisticated automations.
## Best Practices for Tools in Workforce Builder
To get the most out of tools in your Workforce:
1. **Keep tools focused**: Each tool should perform a specific, well-defined function
2. **Use descriptive names**: Name your tools clearly to understand their purpose at a glance
3. **Document connections**: Use the description fields to explain how tools should work together
4. **Test thoroughly**: Before deploying, test your tool connections with various inputs
5. **Monitor performance**: Regularly review how your tools are performing and refine as needed
## Related Features
* [Workforce Task View](https://relevanceai.com/docs/workforce-features-and-capabilities/workforce-task-view): Monitor and manage your workforce tasks and tool executions
* [Edge Settings](https://relevanceai.com/docs/build-an-ai-workforce/edge-settings): Configure how nodes connect and communicate in your workforce
* [Add Conditions](https://relevanceai.com/docs/build-an-ai-workforce/add-conditions): Learn how to add conditional logic to your workforce flows
By effectively utilizing tools in the Workforce Builder, you can create sophisticated, autonomous workflows that handle complex business processes with minimal human intervention.
# Add Triggers
Source: https://relevanceai.com/docs/ai-workforce/build-an-ai-workforce/add-triggers
Triggers are the starting points that initiate workflows in your AI Workforce. They determine when and how your agents begin their work, serving as the entry points to your entire workflow system.
## Understanding Triggers
Triggers are specialized nodes in the Workforce that activate your agents based on specific events or conditions. They function as the initial connection point in your workflow, determining when your AI agents should start performing their tasks.
### Types of Triggers
#### Manual Triggers
When you first create a workforce, a manual trigger is automatically added to your workspace. This allows you to directly initiate your workflow by sending a message to your agent, similar to how you would interact with a standalone agent in Relevance AI.
Manual triggers are ideal for:
* Testing your workflow during development
* On-demand tasks that require human initiation
* Workflows that need to begin with specific human input or context
#### Integration Triggers
Integration triggers connect your workforce to external systems, allowing your agents to automatically respond to events from those systems. These triggers enable your AI Workforce to monitor and react to activities in your connected tools and platforms.
Common integration triggers include:
* Email triggers that activate when new messages arrive
* Calendar triggers that respond to meeting invitations or reminders
* CRM triggers that react to new lead creation or status changes
* Webhook triggers that respond to custom events from any system
## Adding Triggers to Your Workforce
### Adding Your First Trigger
1. When you open your workforce, you'll see a manual trigger already available in your workspace.
2. Connect this trigger to an agent by dragging a line from the trigger to your chosen agent.
3. This connection establishes the entry point for your workflow.
### Adding Additional Triggers
To add more triggers to your workforce:
1. Navigate to the Workforce interface.
2. Locate the "Triggers" section in the node palette.
3. Drag your desired trigger type onto the workspace.
4. Position it appropriately in your workflow diagram.
5. Connect the trigger to the agent that should respond first when the trigger activates.
## Configuring Triggers
Each trigger type has specific configuration options that determine its behavior:
### Manual Trigger Configuration
To trigger your workforce manually:
1. Switch to the "Task" tab in the Relevance AI interface.
2. Use the message input field to send a manual message to your workforce.
3. Provide natural language instructions that will initiate your workflow.
4. Your connected agent will receive this message and begin processing according to your workflow configuration.
This manual interaction allows you to start your workflow with specific context and instructions whenever needed.
### Integration Trigger Configuration
Integration triggers require specific setup to connect with external systems:
1. Select the integration trigger in your workspace.
2. Complete the authentication process for the connected service.
3. Configure trigger conditions (e.g., specific email subjects, calendar event types).
4. Set any filters to ensure the trigger only activates for relevant events.
5. Test the connection to verify proper setup.
## Best Practices for Using Triggers
### Strategic Trigger Placement
* **Start with clarity**: Position triggers at the logical beginning points of your workflows.
* **Minimize redundancy**: Avoid having multiple triggers that serve the same purpose.
* **Consider user experience**: For manual triggers, ensure they're intuitive and provide clear guidance.
### Trigger Maintenance
* Regularly test triggers to ensure they're functioning correctly.
* Monitor trigger activity to identify any performance issues.
* Update trigger configurations when connected systems change.
### Security Considerations
* Review authentication settings for integration triggers regularly.
* Implement appropriate access controls for manual triggers.
* Consider data privacy implications when configuring trigger conditions.
## Troubleshooting Triggers
### Common Issues
* **Trigger not activating**: Verify connection settings and authentication.
* **Duplicate activations**: Check for overlapping trigger conditions.
* **Delayed responses**: Examine workflow complexity and agent configuration.
### Diagnostic Steps
1. Test the trigger in isolation to confirm it's working properly.
2. Verify that connected agents have appropriate permissions.
3. Check system logs for any error messages related to the trigger.
4. Ensure all necessary API keys and credentials are current.
## Related Features
The "Add Triggers" functionality works closely with other components of the Workforce Builder:
* **Edge Settings**: After connecting a trigger to an agent, you can configure how information flows between them using Edge Settings.
* **Agent Configuration**: Ensure your agents are properly configured to handle the input they'll receive from triggers.
* **Conditions**: Use conditions alongside triggers to create more sophisticated workflow logic.
By effectively utilizing triggers in your Workforce, you create the foundation for responsive, event-driven AI systems that can work autonomously while integrating seamlessly with your existing tools and processes.
# Edge Settings
Source: https://relevanceai.com/docs/ai-workforce/build-an-ai-workforce/edge-settings
Edge Settings control how nodes are connected to each other in your AI Workforce.
## Communication Styles
When connecting nodes in your workforce, you can choose between two primary communication styles:
### Let Agent Decide
This option gives your agent autonomy to determine when to use a connection based on natural language instructions.
**Configuration Options:**
* **Communication Settings**: Provide natural language instructions explaining when and how the agent should use this connection. For example, if you're connecting a manager agent to a specialist agent, you might write: "Delegate to this agent when a customer inquiry requires technical expertise about our enterprise product features."
* **Behavior Settings**: Control how the agent executes tasks through this connection:
* **Auto run**: The agent will automatically execute the task without requiring approval.
* **Approval required**: The agent will draft the task but wait for your approval before completing it.
* **Let agent decide**: The agent will complete the task if it has sufficient context and confidence; otherwise, it will ask for human approval or clarification.
* **Max auto runs**: Set a limit on the number of times the agent can automatically execute this connection without human intervention:
* **No limit**: The agent can use this connection as many times as needed.
* **Custom limit**: Specify a maximum number of automatic executions as a guardrail.
* **Task Handling**: Choose how tasks flow through this connection:
* **Always start a new task**: Each time this connection is used, it creates a separate task instance.
* **Always continue with one task**: Maintain continuity by keeping all work within the same task context.
### Forced Handover
This option creates a mandatory connection where one node always passes control to another node when triggered.
**Configuration Options:**
* **Task Handling**: Choose how tasks flow through this forced connection:
* **Always start a new task**: Each handover creates a separate task instance.
* **Always continue with one task**: Maintain continuity by keeping all work within the same task context.
## Practical Applications
### Agent-to-Agent Communication
When connecting agents, edge settings determine how they collaborate:
* **Manager-Specialist Relationship**: Configure a manager agent to delegate specific types of inquiries to specialist agents using "Let agent decide" with clear instructions about when to delegate.
* **Sequential Processing**: Use "Forced handover" to create a workflow where one agent always passes work to another after completing its part, such as having a research agent always pass findings to a content creation agent.
### Agent-to-Tool Communication
Edge settings control how agents interact with tools:
* **Conditional Tool Usage**: With "Let agent decide," an agent can determine when a particular tool is appropriate based on the context.
* **Approval Workflows**: For sensitive operations like sending emails or making purchases, configure "Approval required" to ensure human oversight.
* **Automated Sequences**: Use "Forced handover" to ensure an agent always follows a specific process, such as always logging customer interactions after completing a support conversation.
### Tool-to-Tool Communication
Create sophisticated automation workflows:
* **Data Processing Pipelines**: Connect tools in sequence to transform, analyze, and act on data without requiring agent intervention at each step.
* **Conditional Branching**: Use conditions between tools to create decision trees that process information differently based on specific criteria.
## Best Practices
1. **Start Simple**: Begin with basic connections and gradually increase complexity as you understand how your workforce operates.
2. **Use Clear Instructions**: When using "Let agent decide," provide specific, unambiguous instructions about when and how to use connections.
3. **Implement Guardrails**: Use approval requirements and auto-run limits for critical operations to maintain control while allowing automation.
4. **Test Thoroughly**: Verify that your edge settings produce the expected behavior across different scenarios before deploying to production.
5. **Monitor Performance**: Regularly review how your connections are being used and refine edge settings based on actual performance.
## Limitations
* **One-way Communication**: Currently, connections in the Workforce Builder are limited to one-way communication. Bidirectional communication between nodes is not supported.
* **Decision Complexity**: While conditions can create branching workflows, complex decision trees may require careful planning and potentially multiple condition nodes.
## Related Features
The Edge Settings functionality works closely with other Workforce Builder components:
* **Nodes**: The building blocks (triggers, agents, tools, conditions) that are connected using edges.
* **Configurations**: The specific relationship types between nodes that determine workflow possibilities.
* **Workforce Task View**: Where you can monitor your workforce's operations and approve tasks when required.
## FAQs
**Q: Can I change edge settings after creating a connection?**\
A: Yes, you can modify edge settings at any time by selecting the connection in the Workforce Builder interface.
**Q: How do I know if I should use "Let agent decide" or "Forced handover"?**\
A: Use "Let agent decide" when you want contextual, intelligent routing based on content. Use "Forced handover" when a connection should always occur regardless of context.
**Q: What happens if I set a limit on auto runs and the limit is reached?**\
A: Once the auto run limit is reached, the agent will request human approval before using that connection again.
**Q: Can I create conditional connections based on specific data values?**\
A: Yes, you can use condition nodes to create branches in your workflow based on specific criteria or data values.
# Introduction to Nodes
Source: https://relevanceai.com/docs/ai-workforce/build-an-ai-workforce/introduction-to-nodes
Nodes are the fundamental building blocks of a workforce in Relevance AI. They represent all the components you can place on your workspace to create automated workflows.
## What Are Nodes?
Nodes are the technical term for all the elements you can place and connect in the Workforce interface. They come from graph theory, where a graph consists of nodes (points) and edges (connections between points). In Workforce Builder:
* **Nodes** are the individual components you place on the workspace
* **Edges** are the connections between nodes that define how they interact
## Types of Nodes
There are four main types of nodes in Workforce:
### 1. Triggers
Triggers are the starting points of your workflows. They initiate the execution of your workforce when specific conditions are met.
**Examples of triggers include:**
* Manual triggers (allowing you to message an agent directly)
* Integration triggers (such as when an email is received)
* Scheduled triggers (running at specific times)
Triggers are essential because they determine when and how your workforce begins its work.
### 2. Agents
Agents are AI-powered entities that can reason, make decisions, and complete tasks. In Workforce, agents are the same as those you've configured elsewhere in Relevance AI, but now they can be visually connected to other components.
Agents can:
* Process information from triggers
* Make decisions about next steps
* Use tools to accomplish tasks
* Hand over work to other agents
### 3. Tools
Tools are specific capabilities that perform defined actions. Unlike in the previous system where tools were tightly coupled to specific agents, in Workforce, tools exist independently and can be connected to multiple agents or other tools.
This modular approach offers several advantages:
* One tool can be used by multiple agents
* Tools can be connected to other tools in sequence
* Tools can be easily substituted (e.g., changing from Notion to Confluence) without having to reconfigure each agent
### 4. Conditions
Conditions act as decision points in your workflow, similar to IF statements in programming. They evaluate specific criteria and direct the flow based on whether those criteria are met.
**For example:**
* A condition might check if the current day is a weekday
* If true, it might trigger an email tool
* If false, the workflow might end or take a different path
Conditions help create more sophisticated, branching workflows that respond dynamically to different situations.
## Working with Nodes in Workforce
### Placing Nodes
To add nodes to your workspace:
1. Open your workforce and navigating to "Build"
2. Drag the desired node type (trigger, agent, tool, or condition) from the sidebar onto the workspace
3. Position it where you want it to appear in your workflow
### Connecting Nodes
To establish relationships between nodes:
1. Click on the source node
2. Drag a connection line to the target node
3. Configure the connection settings (such as communication style)
### Node Configuration
Each node type has specific settings that can be configured:
* **Triggers**: Configure when and how they activate
* **Agents**: Set communication preferences, approval requirements, and behavior settings
* **Tools**: Define inputs, steps, and outputs
* **Conditions**: Specify the criteria to evaluate and the paths to take based on results
## Best Practices for Working with Nodes
1. **Start Simple**: Begin with a manual trigger connected to a single agent to test functionality
2. **Plan Your Workflow**: Before adding many nodes, sketch out the desired workflow to understand the necessary components
3. **Use Meaningful Names**: Give your nodes descriptive names that indicate their purpose
4. **Test Incrementally**: Add and test nodes in small batches rather than building the entire workflow at once
5. **Consider Approval Settings**: For critical actions, configure nodes to require human approval before proceeding
## Common Node Configurations
### Trigger → Agent
This is the most basic configuration, where a trigger initiates an agent. For example, a manual trigger allows you to message an agent directly.
### Agent → Agent
This configuration enables one agent to communicate with another. There are two communication styles:
* **Let agent decide**: The agent determines when to involve another agent based on natural language instructions
* **Forced handover**: The first agent always passes the task to the second agent
### Agent → Tool
This allows an agent to use a specific tool to complete a task, such as sending a message in a Slack channel.
### Tool → Tool
This creates a workflow-like sequence where one tool's output becomes another tool's input, without requiring agent intervention between steps.
### Condition → Tool
This setup evaluates a condition before deciding whether to execute a tool, adding logic to your workflows.
## Limitations and Considerations
* Currently, communication between agents is limited to one-way communication. Bidirectional communication is not yet supported.
* When designing complex workflows, consider the approval settings carefully to maintain appropriate human oversight.
* The more nodes in a workflow, the more important it becomes to monitor performance in the Task View.
## Related Features
For more information on how to use nodes effectively in your workforce, refer to these related features:
* [Edge Settings](https://relevanceai.com/docs/) - Configure how nodes connect to each other
* [Workforce Task View](https://relevanceai.com/docs/) - Monitor and manage your workforce's activities
* [Approvals and Escalations](https://relevanceai.com/docs/) - Set up human oversight for your automated workflows
By understanding and effectively utilizing nodes, you can create powerful, flexible workflows that automate complex tasks while maintaining appropriate control and oversight.
# Quick Start Guide
Source: https://relevanceai.com/docs/ai-workforce/introduction/quick-start-guide
Workforce transforms how your agents collaborate by providing a visual canvas where you can design, connect, and monitor teams of specialized agents.
## Creating Visual Workflows
Workforce provides a clear flowchart view of your entire agent ecosystem, eliminating the complexity of nested agent relationships. With the visual workflow builder, you can:
* Design agent teams with intuitive drag-and-drop connections
* Enable specialized agents to work as peers rather than in hierarchies
* Create workflows that are easy to understand, modify, and monitor
## Connection Types
When building your agent workflows, you can choose between different connection types:
### Let Agent Decide
This connection type gives your agent autonomy to determine when to pass control to another agent. The agent evaluates the context and decides if another agent's expertise is needed to complete the task.
### Forced Handover
This connection type creates a mandatory transition between agents. When one agent completes its task, control automatically passes to the next agent in the workflow, ensuring a predictable process flow.
## Tool Integration
Workforce allows you to connect tools directly within your workflow:
* Connect tools directly to agents to enhance their capabilities
* Link tools to other tools to create sophisticated processing chains
* Build complex workflows that combine agent intelligence with specialized tool functionality
## Conditional Logic
Make your workflows smarter with conditional logic:
* Create "if this, then that" rules to determine workflow paths
* Set up decision points that route tasks based on specific criteria
* Build adaptive workflows that respond differently depending on inputs or outcomes
## Getting Started with Workforce
To create your first Workforce:
1. Click on “Workforce” on the left side bar
2. Click on “+ New Workforce” to open the visual canvas
3. Add your agents to the canvas by dragging them from the sidebar
4. Connect your agents by drawing lines between them
5. Configure each connection by selecting the connection type
6. Add tools to your workflow as needed
7. Set up any conditional logic for routing
8. Save your workflow
## Best Practices
For optimal results with Workforce:
* Start with a clear workflow diagram before building in the interface
* Group related agents together visually to improve readability
* Use descriptive names for your connections to document their purpose
* Test your workflow with various inputs to ensure proper routing
* Monitor agent handovers to identify any communication gaps
* Regularly review and optimize your workflow based on performance
## Related Features
[Agent Configuration](https://relevanceai.com/docs/agent/agent-configuration) - Learn how to configure individual agents before adding them to your Workforce.
[Tools](https://relevanceai.com/docs/tool/introduction) - Discover the tools you can integrate into your Workforce workflows.
# Agent to Agent Configuration
Source: https://relevanceai.com/docs/ai-workforce/workforce-features-and-capabilities/agent-to-agent-configuration
Agent to Agent configuration is a powerful capability within Workforce that enables you to create sophisticated multi-agent systems where agents can collaborate, delegate tasks, and work together to solve complex problems.
## How Agent to Agent Configuration Works
When you connect one agent to another in your workforce, you're establishing a relationship that determines how these agents will interact. This connection creates a pathway for information to flow from one agent to another, allowing for specialized handling of different aspects of a task.
## Setting Up Agent to Agent Connections
To create an Agent to Agent connection in your workforce:
1. Navigate to the "Build" section of your workforce
2. Ensure you have at least two agents added to your workspace
3. Click and drag from the output node of the first agent to the input node of the second agent
4. A connection line will appear, and the edge settings panel will open
## Communication Style Options
When configuring Agent to Agent connections, you have two primary communication style options:
### Let Agent Decide
This option gives the first agent autonomy to determine when it should involve the second agent. The agent uses natural language understanding to follow your instructions about when to delegate.
To configure this option:
1. Select "Let agent decide" in the edge settings
2. Complete the "When to call this agent" field with clear instructions
3. For example: "Call this agent when you need specialized knowledge about financial regulations" or "Delegate to this agent when the customer asks about technical product specifications"
#### Behavior Settings
When using "Let agent decide," you can further refine the behavior:
* **Auto run**: The second agent will automatically execute its task without approval
* **Approval required**: The second agent will draft its response but wait for human approval before proceeding
* **Let agent decide**: The second agent will determine whether it has sufficient context to proceed or needs human input
You can also set **Max auto runs** as a guardrail to limit automatic executions.
### Forced Handover
This option creates a mandatory transition from one agent to another. When the first agent completes its work, it will always pass control to the second agent.
To configure this option:
1. Select "Forced handover" in the edge settings
2. Choose between "Always start a new task" or "Always continue with one task"
## Task Continuity Options
For both communication styles, you can specify how the task should be handled:
* **Always start a new task**: The second agent begins a fresh task with its own context
* **Always continue with one task**: The second agent continues within the same task, maintaining context and history
## Best Practices for Agent to Agent Configuration
### When to Use "Let Agent Decide"
* For complex workflows where conditional routing is needed
* When you want the first agent to make intelligent decisions about escalation
* In scenarios where not every interaction requires the specialized knowledge of the second agent
### When to Use "Forced Handover"
* For linear workflows with clear handoff points
* When you want to ensure every interaction passes through a specific sequence of agents
* For quality control processes where a second agent should always review the work
### Creating Effective Agent Instructions
When using "Let agent decide," the quality of your instructions in the "When to call this agent" field is crucial:
* Be specific about the conditions that should trigger delegation
* Include examples of scenarios where the second agent should be involved
* Define clear boundaries of responsibility between agents
## Limitations
* Currently, only one-way communication is supported between agents
* Bidirectional communication (where agents can have back-and-forth conversations) is not yet available
## Example Use Cases
### Customer Support Triage
Connect a general support agent to specialized agents for technical, billing, or account issues. The first agent handles basic inquiries and delegates complex issues to specialists.
### Content Creation Pipeline
Connect a content planning agent to a content writing agent, and then to a content editing agent, creating a streamlined production workflow.
### Research and Analysis
Connect a data collection agent to an analysis agent, where the first agent gathers information and the second performs in-depth analysis of the collected data.
## Troubleshooting
If your Agent to Agent configuration isn't working as expected:
* Verify that the connection line is properly established between agents
* Check that your "When to call this agent" instructions are clear and specific
* Ensure that both agents have the necessary tools and permissions to complete their tasks
* Review the task history in the Workforce Task View to identify where the workflow might be breaking down
By effectively configuring Agent to Agent connections, you can create sophisticated AI workflows that leverage the specialized capabilities of different agents, resulting in more powerful and flexible automation solutions.
# Agent to Tool Configuration
Source: https://relevanceai.com/docs/ai-workforce/workforce-features-and-capabilities/agent-to-tool-configuration
Agent to Tool configuration is a powerful feature within Workforce that enables you to establish connections between your AI agents and the tools they need to complete tasks.
## Understanding Agent to Tool Connections
When you connect an agent to a tool in Workforce, you're creating a pathway for your agent to access specific functionality. This connection allows your agent to:
* Make decisions about when to use particular tools
* Pass relevant information to tools for processing
* Receive and interpret results from tool operations
* Continue workflows based on tool outputs
## Setting Up Agent to Tool Configurations
To configure an Agent to Tool connection in your workforce:
1. Open your workforce in the Workforce interface
2. Locate the agent node you want to connect to a tool
3. Click and drag from the agent's output connector to the input connector of your desired tool
4. Once connected, click on the connecting line (edge) to access configuration settings
## Configuration Options
### Communication Style
When configuring an Agent to Tool connection, you have two primary communication style options:
#### Let Agent Decide
This option gives your agent autonomy to determine when to use the connected tool based on context and need.
* **Communication Settings**: Provide natural language instructions explaining when and how the agent should use this tool. For example: "Use this email tool when you need to send important updates to clients or when follow-up communication is required."
* **Behavior Settings**: Configure how the agent makes decisions about tool usage:
* **Auto run**: The agent will use the tool without requiring approval
* **Approval required**: The agent will draft the tool request but wait for human approval before execution
* **Let agent decide**: The agent will determine whether to auto-run or request approval based on confidence level
* **Max auto runs**: Set limits on how many times the agent can automatically use the tool without intervention
#### Forced Handover
This option creates a mandatory connection where the agent must pass information to the tool as part of the workflow.
* **Task Continuity**: Choose between:
* **Always start a new task**: Each tool execution begins a fresh task instance
* **Always continue with one task**: The tool execution remains part of the original task flow
## Best Practices for Agent to Tool Configuration
### 1. Clear Instructions
When using "Let agent decide" mode, provide specific, unambiguous instructions about when the tool should be used. For example:
> Use this data analysis tool when:
>
> * The user requests statistical insights
> * Raw data needs to be transformed into visualizations
> * Patterns or trends need to be identified in datasets
### 2. Appropriate Permission Levels
Match permission settings to the sensitivity and impact of the tool:
* Use "Approval required" for tools that:
* Make external communications
* Modify important data
* Incur costs or use credits
* Make decisions with business impact
* Use "Auto run" for tools that:
* Perform internal data retrieval
* Execute low-risk, repetitive tasks
* Enhance the agent's knowledge without external effects
### 3. Workflow Optimization
Consider how tool connections affect the overall workflow:
* **Sequential Processing**: Connect tools in a logical sequence when tasks need to follow a specific order
* **Conditional Branching**: Use agent decision points before tools when different scenarios require different tool selections
* **Feedback Loops**: Create connections from tools back to agents when results need evaluation before proceeding
## Troubleshooting Agent to Tool Connections
### Common Issues and Solutions
1. **Agent not using connected tool**
* Check that the connection line is properly established
* Review the communication instructions for clarity
* Ensure the agent has the necessary context to recognize when to use the tool
2. **Tool execution failing**
* Verify the tool's configuration and required inputs
* Check that the agent is passing data in the expected format
* Review tool logs for specific error messages
3. **Excessive tool usage**
* Set appropriate "Max auto runs" limits
* Make instructions more specific about when to use the tool
* Consider changing to "Approval required" mode temporarily
## Advanced Agent to Tool Configurations
### Chaining Multiple Tools
You can create sophisticated workflows by connecting an agent to multiple tools in sequence:
1. Connect your agent to the first tool
2. Connect the output of the first tool to a second agent or directly to another tool
3. Configure each connection with appropriate settings
This approach allows for complex multi-step processes where each tool performs a specific function in the overall workflow.
### Dynamic Tool Selection
When an agent needs to choose between multiple tools based on context:
1. Connect the agent to each potential tool
2. Use "Let agent decide" mode for all connections
3. Provide clear, distinctive instructions for when to use each tool
The agent will evaluate the situation and select the appropriate tool based on your instructions.
## Related Features
* [Trigger to Agent Configuration](https://relevanceai.com/docs/workforce-builder/configurations/trigger-to-agent): Learn how to configure the initial triggers that activate your agents
* [Tool to Tool Configuration](https://relevanceai.com/docs/workforce-builder/configurations/tool-to-tool): Discover how to connect tools directly to other tools for automated workflows
* [Condition to Tool Configuration](https://relevanceai.com/docs/workforce-builder/configurations/condition-to-tool): Explore how to add conditional logic to your tool executions
## Conclusion
Agent to Tool configuration is a fundamental aspect of building effective AI workforces. By thoughtfully designing these connections, you can create intelligent workflows where agents leverage tools appropriately to accomplish complex tasks. Whether you prefer giving your agents autonomy with "Let agent decide" or creating structured processes with "Forced handover," the configuration options in Workforce Builder provide the flexibility to match your specific business needs.
# Approvals and Escalations
Source: https://relevanceai.com/docs/ai-workforce/workforce-features-and-capabilities/approvals-and-escalations
Approvals and escalations are essential components of Workforce that ensure your AI agents operate with appropriate oversight and can effectively handle situations requiring human intervention.
## Overview
The approvals and escalations system in Workforce allows you to:
* Configure when and how agents should seek approval before taking actions
* Establish clear escalation paths when agents encounter situations beyond their scope
* Monitor approval requests through the Workforce Task View
* Set up automated alerts for escalations requiring human attention
By implementing proper approval and escalation processes, you can maintain quality control while allowing your AI workforce to operate with appropriate autonomy.
## Setting Up Approval Modes
When connecting agents to tools or other agents in your workforce, you can configure different approval modes that determine how actions are authorized:
### Auto Run
In this mode, the agent will execute actions automatically without requiring approval. This is ideal for:
* Low-risk, routine tasks
* Well-defined processes with predictable outcomes
* Situations where speed is prioritized over verification
To configure auto run:
1. Select the edge connecting an agent to a tool or another agent
2. In the Edge Settings panel, select "Auto run" under Behavior Settings
3. Optionally, set "Max auto runs" to limit the number of automatic executions
### Approval Required
This mode forces the agent to seek explicit approval before executing an action. Use this for:
* High-stakes decisions
* Actions that commit resources or make external communications
* New workflows that need monitoring before being fully automated
To set up approval required:
1. Select the edge connecting an agent to a tool or another agent
2. In the Edge Settings panel, select "Approval required" under Behavior Settings
3. The agent will now draft its intended action and wait for human approval before proceeding
### Let Agent Decide
This balanced approach allows the agent to determine whether approval is needed based on its confidence and context. The agent will:
* Complete tasks autonomously when it has sufficient context and confidence
* Request approval when facing uncertainty or high-risk situations
* Escalate to humans when it needs clarification or additional information
To implement this mode:
1. Select the edge connecting an agent to a tool or another agent
2. In the Edge Settings panel, select "Let agent decide" under Behavior Settings
3. Complete the "When to call this agent" box with natural language instructions explaining the decision logic
## Monitoring Approvals in Workforce Task View
The Workforce Task View serves as your central dashboard for monitoring and managing approval requests:
1. Navigate to the "Task" view to see your workforce
2. Review pending approval requests from your agents
3. Examine the agent's proposed action and supporting reasoning
4. Choose to approve, reject, or provide additional guidance
5. Track the history of approvals and their outcomes
This interface provides complete visibility into your approval workflow, allowing you to maintain oversight while empowering your AI workforce.
## Implementing Escalation Strategies
Escalations occur when an agent encounters a situation it cannot handle independently. Effective escalation strategies ensure these situations are properly addressed:
### Agent-Initiated Escalations
Agents can be configured to recognize their limitations and escalate appropriately:
1. Configure agent settings under Agent Settings > Abilities
2. Define clear criteria for when an agent should escalate issues
3. Specify the escalation path (to specific human roles or other agents)
4. Provide templates for how the agent should format escalation requests
### Escalation Tools
You can connect agents to specific tools designed for escalation:
1. Create dedicated escalation tools (e.g., Slack notifications, email alerts)
2. Connect these tools to your agents in the Workforce Builder
3. Configure the tools to route escalations to the appropriate team members
4. Include relevant context and information in the escalation
### Escalation Monitoring
Track and manage escalations through:
1. The Workforce Task View, which displays all active escalations
2. Notification systems that alert relevant team members
3. Escalation logs that maintain a history of issues and resolutions
## Best Practices for Approvals and Escalations
To maximize the effectiveness of your approval and escalation processes:
### For Approvals:
* Start with more restrictive approval requirements and gradually relax them as confidence in the agent grows
* Use "Max auto runs" settings as guardrails when transitioning to more autonomous operation
* Provide clear criteria for what constitutes an approvable action
* Review approval patterns regularly to identify opportunities for process improvement
### For Escalations:
* Define clear escalation thresholds based on risk, complexity, and agent capabilities
* Create detailed documentation for human responders to handle escalated issues
* Implement a feedback loop where escalation resolutions inform agent improvements
* Establish service level agreements (SLAs) for responding to different types of escalations
## Related Features
* [Edge Settings](https://relevanceai.com/docs/workforce-builder/edge-settings) - Configure the connections between nodes in your workforce, including approval settings
* [Workforce Task View](https://relevanceai.com/docs/workforce-builder/workforce-task-view) - Monitor and manage your workforce's activities, including approvals and escalations
* [Agent Abilities](https://relevanceai.com/docs/agent/customise-agent/escalate) - Configure how agents handle situations requiring escalation
## FAQs
**Q: Can I set different approval requirements for different tools?**\
A: Yes, approval settings are configured on a per-edge basis, allowing you to require approval for sensitive tools while allowing automatic execution for routine ones.
**Q: What happens if an approval request isn't addressed?**\
A: The task will remain in a pending state until approved or rejected. You can configure timeout actions or notifications for approval requests that remain unaddressed for a specified period.
**Q: Can escalations be routed to specific team members?**\
A: Yes, you can configure escalation tools to direct issues to specific individuals or teams based on the nature of the escalation, time of day, or other factors.
**Q: How do I balance autonomy with oversight?**\
A: Start with higher oversight (approval required) for new workflows, then gradually transition to "let agent decide" and eventually "auto run" as you build confidence in the agent's performance for specific tasks.
# Communication
Source: https://relevanceai.com/docs/ai-workforce/workforce-features-and-capabilities/communication
Communication is a fundamental aspect of Workforce that defines how agents interact with each other within your AI workforce.
## One-way Communication
Currently, Workforce supports one-way communication between agents. This means that when one agent communicates with another, the information flows in a single direction. Bidirectional communication is not yet available in the current version.
### How One-way Communication Works
When you connect two agents in your workforce, the communication follows a unidirectional path:
* The source agent sends information, instructions, or requests to the target agent
* The target agent receives this information and acts upon it
* The target agent cannot automatically send information back to the source agent through the same connection
This one-way communication model creates clear workflows and responsibility chains within your workforce, making it easier to track how information and tasks flow through your system.
## Setting Up Communication Between Agents
When connecting agents in your workforce, you have two communication style options that determine how agents interact with each other:
### Let Agent Decide
This option gives the agent autonomy to determine when to communicate with another agent based on natural language instructions.
**Configuration Steps:**
1. Connect two agents in your workforce
2. Select "Let agent decide" as the communication style
3. Complete the "When to call this agent" field with natural language instructions
4. Configure behavior settings:
**Communication Settings:**
In the "When to call this agent" field, provide clear instructions about when the source agent should delegate to the target agent. For example:
> Call this agent when you need to analyze customer sentiment data or when you need to summarize large volumes of customer feedback. This agent specializes in data analysis and can provide insights that will help with decision-making.
**Behavior Settings:**
Choose one of the following approval modes:
* **Auto run**: The target agent will complete the task without requiring approval
* **Approval required**: The target agent will draft the task but ask for human approval before completing it
* **Let agent decide**: The target agent will complete the task if it has sufficient context and confidence; otherwise, it will ask for human approval or clarification
**Additional Settings:**
* **Max auto runs**: Set a limit on the number of times the agent can auto-run (no limit or a specific number)
* **Task continuation**: Choose between 'always start a new task' or 'always continue with one task'
### Forced Handover
This option creates a mandatory connection where the source agent must pass the task to the target agent.
**Configuration Steps:**
1. Connect two agents in your workforce
2. Select "Forced handover" as the communication style
3. Configure task continuation:
* Choose between 'always start a new task' or 'always continue with one task'
With forced handover, the source agent will always transfer control to the target agent when the connection is triggered, regardless of the context or the agent's assessment of the situation.
## Best Practices for Agent Communication
To maximize the effectiveness of agent communication in your workforce:
1. **Define Clear Responsibilities**: Ensure each agent has well-defined roles and responsibilities to avoid confusion about which agent should handle specific tasks.
2. **Use Descriptive Instructions**: When using "Let agent decide," provide detailed instructions about when and why the source agent should communicate with the target agent.
3. **Create Logical Workflows**: Design your communication paths to follow natural workflows, where information and tasks flow in a logical sequence from one agent to the next.
4. **Balance Autonomy and Control**: Use "Let agent decide" for situations requiring judgment and "Forced handover" for mandatory steps in a process.
5. **Monitor Communication Patterns**: Regularly review how agents are communicating to identify any bottlenecks or inefficiencies in your workforce.
6. **Implement Appropriate Approval Mechanisms**: Use approval settings to maintain quality control while allowing agents to work autonomously when appropriate.
## Related Features
[Edge Settings](https://relevanceai.com/docs/workforce-builder/edge-settings) - Configure the connections between nodes in your workforce, including communication styles and behavior settings.
[Configurations](https://relevanceai.com/docs/workforce-builder/configurations) - Learn about the different types of connections you can create between nodes in your workforce.
[Workforce Task View](https://relevanceai.com/docs/workforce-builder/task-view) - Monitor your workforce's activities, including communication between agents and approval requests.
## FAQs
**Q: Can agents communicate bidirectionally?**\
A: Currently, Workforce Builder only supports one-way communication between agents. Bidirectional communication is planned for future updates.
**Q: How do I know if an agent has communicated with another agent?**\
A: You can monitor agent communication in the Workforce Task View, which shows the timeline of activities and interactions between agents.
**Q: Can I set conditions for when an agent should communicate with another agent?**\
A: Yes, when using the "Let agent decide" communication style, you can provide natural language instructions in the "When to call this agent" field to guide the source agent's decision-making.
**Q: What happens if an agent tries to communicate with another agent but lacks necessary information?**\
A: Depending on your behavior settings, the agent may ask for human approval or clarification before proceeding with the communication.
**Q: Can I create complex communication chains involving multiple agents?**\
A: Yes, you can connect multiple agents in sequence or in parallel to create sophisticated workflows where information passes through several agents.
# Condition to Tool Configuration
Source: https://relevanceai.com/docs/ai-workforce/workforce-features-and-capabilities/condition-to-tool-configuration
Condition to Tool connections in Workforce allow you to create intelligent workflows that execute tools only when specific conditions are met.
## How Condition to Tool Works
A Condition to Tool connection acts as an IF statement in your workforce flow. When a condition evaluates to true, the connected tool executes; when false, the tool is skipped. This creates branching logic in your workflows, making your AI workforce more adaptable and responsive to different scenarios.
## Setting Up a Condition to Tool Connection
To create a Condition to Tool connection in your workforce:
1. Navigate to Workforce and "Build" in the main navigation
2. Add a condition node to your workspace by dragging it from the node palette
3. Write your condition using natural language (e.g., "Go down this path if it's a weekday" or "Follow this route if the customer priority is high")
4. Add a tool node to your workspace
5. Connect the condition node to the tool node by clicking and dragging from the condition's output connector to the tool's input connector
## Condition Examples Using Natural Language
You can create various types of conditions using simple, natural language instructions:
### Time-Based Conditions
* "Go down this path if today is Monday or Tuesday"
* "Follow this route if the current time is between 9 AM and 5 PM"
* "Use this tool if it's a weekday"
### Data-Based Conditions
* "Go down this path if the customer priority is high"
* "Follow this route if the email contains the word 'urgent'"
* "Use this tool if the sentiment score is greater than 0.7"
### Tool Output Conditions
* "Go down this path if the previous tool completed successfully"
* "Follow this route if the data validation passed"
* "Use this tool if we received a response from the API"
## Best Practices for Condition to Tool Connections
1. **Use clear, descriptive language**: Make your conditions easy to understand at a glance
2. **Keep conditions focused**: Each condition should evaluate a single concept for clarity
3. **Be specific**: Provide clear criteria for when the condition should be true
4. **Test thoroughly**: Verify your conditions work as expected with different inputs
5. **Consider edge cases**: Think about unusual scenarios that might affect your condition
## Advanced Condition to Tool Patterns
### Chaining Multiple Conditions
You can create sophisticated decision trees by chaining multiple conditions together:
1. Create several condition nodes that evaluate different aspects of your data
2. Connect each condition to the appropriate tool
3. Tools will only execute when their specific conditions are met
### Parallel Condition Evaluation
For more complex scenarios, you can have multiple conditions evaluating the same data simultaneously:
1. Create several condition nodes that check different aspects of the same data
2. Connect each condition to different tools
3. Multiple tools may execute in parallel depending on which conditions are met
## Practical Use Cases
### Email Routing Based on Content
Create conditions like "Go down this path if the email contains a support request" or "Follow this route if the message mentions billing issues."
### Time-Sensitive Workflows
Build conditions such as "Use this tool only during business hours" or "Go down this path if it's the first day of the month."
### Data Quality Control
Implement conditions like "Follow this route if all required fields are filled" or "Use this tool if the data passes validation."
### Approval Workflows
Design conditions such as "Go down this path if the request has been approved" or "Use this tool if the manager has given permission."
## Troubleshooting Condition to Tool Connections
If your condition to tool connections aren't working as expected:
1. **Review your condition language**: Make sure your natural language condition is clear and specific
2. **Check the flow**: Confirm the connections between nodes are correctly established
3. **Test with simpler conditions**: Try a very basic condition to verify the connection works
4. **Monitor execution**: Watch how the workflow behaves when the condition is evaluated
5. **Refine your language**: If needed, make your condition more explicit or detailed
## Related Features
* **Agent to Tool connections**: Direct connections from agents to tools without conditional logic
* **Tool to Tool connections**: Sequential execution of tools in a workflow
* **Trigger to Agent connections**: Starting points for your workforce flows
By using Condition to Tool connections with natural language in the Workforce Builder, you can create intelligent, adaptive workflows that respond dynamically to changing circumstances, making your AI workforce more efficient and effective.
# Tool to Tool Configuration
Source: https://relevanceai.com/docs/ai-workforce/workforce-features-and-capabilities/tool-to-tool-configuration
Tool to Tool configuration is a powerful feature in Workforce that allows you to connect tools directly to other tools, creating automated workflows without requiring agent intervention.
## How Tool to Tool Connections Work
When you connect tools directly to each other in Workforce, you're establishing a direct pathway for data to flow from one tool to the next. This creates a streamlined process where:
1. The first tool completes its operation
2. Its output is automatically passed to the connected tool
3. The second tool processes this data without requiring human or agent approval (unless configured otherwise)
This approach is particularly valuable for creating multi-step automations that handle routine processes efficiently.
## Setting Up Tool to Tool Connections
### Prerequisites
* At least two tools added to your Workforce Builder canvas
* Understanding of the input/output requirements for each tool
### Step-by-Step Configuration
1. **Add Tools to Your Workspace**: Drag the tools you want to connect from your project onto the Workforce Builder canvas.
2. **Create the Connection**:
* Click on the first tool (source)
* Look for the connection point (usually appears as a dot or node on the edge of the tool)
* Click and drag to create a line to the second tool (destination)
* Release to establish the connection
3. **Configure Connection Settings**:
* After creating the connection, click on the connecting line to access the edge settings
* Choose between "Auto run" or "Approval required" modes:
* **Auto run**: The second tool will automatically execute when it receives data from the first tool
* **Approval required**: The system will wait for human approval before the second tool processes the data
4. **Map Data Fields** (if applicable):
* Some tools may require you to specify how data from the first tool maps to the input fields of the second tool
* Use the mapping interface to connect output fields from the first tool to input fields of the second tool
5. **Save Your Configuration**: Click "Save changes" to apply your Tool to Tool configuration
## Use Cases for Tool to Tool Configuration
### Email Processing Workflow
Connect an "Email Receiver" tool to an "Email Classifier" tool, then to either a "Customer Support" tool or "Sales Lead" tool based on classification results.
### Data Enrichment Chain
Link a "Data Extraction" tool to a "Data Enrichment" tool, followed by a "Database Update" tool to automatically enhance and store information.
### Document Processing Pipeline
Connect a "Document Analyzer" tool to a "Summary Generator" tool, then to a "Notification" tool to alert team members about important documents.
### Conditional Workflows
When combined with condition nodes, Tool to Tool connections can create branching workflows that take different paths based on specific criteria.
## Best Practices
1. **Start Simple**: Begin with straightforward two-tool connections before building more complex chains.
2. **Test Thoroughly**: Always test your Tool to Tool configurations with sample data before deploying them in production.
3. **Consider Approval Points**: For critical operations, insert approval requirements at key points in the workflow.
4. **Document Your Flows**: Create documentation for your Tool to Tool configurations to help team members understand the automated processes.
5. **Monitor Performance**: Regularly check the execution logs to ensure your Tool to Tool connections are functioning as expected.
6. **Error Handling**: Plan for potential failures by considering what should happen if a tool in the chain encounters an error.
## Limitations and Considerations
* **Data Compatibility**: Ensure that the output format of the first tool is compatible with the input requirements of the second tool.
* **Execution Time**: Be aware that complex Tool to Tool chains may take longer to execute, especially if tools perform resource-intensive operations.
* **Debugging Challenges**: Troubleshooting issues in Tool to Tool connections can be more complex than single-tool setups.
* **Versioning Impact**: Updating a tool in a chain may affect downstream tools if the output format changes.
## Related Features
Tool to Tool configuration works seamlessly with other Workforce Builder features:
* **Conditions**: Add conditional logic to determine whether a tool connection should be followed
* **Agent to Tool**: Combine agent decision-making with automated tool chains
* **Triggers**: Initiate Tool to Tool workflows based on external events
## Conclusion
Tool to Tool configuration in the Workforce Builder represents a significant advancement in workflow automation capabilities. By connecting tools directly to each other, you can create sophisticated process chains that handle routine tasks efficiently while maintaining the flexibility to incorporate human oversight where needed. This feature empowers you to build more autonomous, intelligent workflows that save time and reduce the need for manual intervention.
# Trigger to Agent Configuration
Source: https://relevanceai.com/docs/ai-workforce/workforce-features-and-capabilities/trigger-to-agent-configuration
Connecting triggers to agents is a fundamental aspect of building effective AI workforces in Relevance AI.
## Overview
Trigger to Agent configurations define the relationship between a trigger event and the agent that responds to it. This connection is the starting point of any workflow in Workforce, allowing you to specify exactly how your agents are activated and what information they receive.
## Types of Triggers
When connecting triggers to agents, you can utilize several trigger types:
* **Manual Triggers**: Allow you to manually initiate an agent through the Task View interface
* **Scheduled Triggers**: Activate agents at predetermined times or intervals
* **Integration Triggers**: Connect external services (like email, Slack, or CRM systems) to automatically activate agents when specific events occur
## Setting Up a Trigger to Agent Connection
### Basic Setup
1. Open your workforce in the Build section
2. Locate the trigger node you want to connect (or add a new one by dragging it from the sidebar)
3. Click and drag from the trigger node's output point to connect it to your desired agent
4. Configure the connection settings in the panel that appears
### Configuration Options
When establishing a Trigger to Agent connection, you'll need to configure these important settings:
#### Communication Settings
In the connection settings panel, you can specify:
* **Message Format**: Define how the trigger information is formatted before being sent to the agent
* **Context Passing**: Choose what contextual information from the trigger should be included
* **Variable Mapping**: Map specific trigger data fields to variables the agent can use
#### Behavior Settings
Control how the agent responds to the trigger:
* **Auto Run**: Enable the agent to automatically process the trigger without human approval
* **Approval Required**: Require human approval before the agent acts on the trigger
* **Let Agent Decide**: Allow the agent to determine whether it needs approval based on confidence level
#### Task Management
Configure how tasks are created and managed:
* **Always Start New Task**: Each trigger creates a new, separate task
* **Continue with One Task**: Multiple triggers can feed into a single ongoing task
* **Max Auto Runs**: Set limits on how many times an agent can auto-run to prevent infinite loops
## Best Practices
### Effective Trigger to Agent Design
* **Clear Trigger Definition**: Ensure your triggers have well-defined conditions to avoid unintended activations
* **Appropriate Agent Selection**: Match triggers with agents that have the right skills and tools for the triggered task
* **Contextual Information**: Configure triggers to provide sufficient context for the agent to understand the task
* **Error Handling**: Include fallback paths for when triggers fail or agents cannot process the request
### Common Patterns
* **Filtering Triggers**: Use conditions before triggers to filter out unnecessary activations
* **Multi-Agent Dispatch**: Connect a trigger to a dispatcher agent that routes tasks to specialized agents
* **Escalation Paths**: Configure triggers to activate different agents based on priority or complexity
## Example: Email Response Workflow
Here's how a typical email response workflow might be configured:
1. Create an email integration trigger that activates when new emails arrive
2. Connect this trigger to a triage agent
3. Configure the connection to:
* Pass the email subject, body, and sender information
* Allow auto-run for initial triage
* Create a new task for each email
4. The triage agent can then analyze the email and route it to the appropriate specialized agent
## Troubleshooting
### Common Issues
* **Trigger Not Activating**: Verify the trigger conditions and integration settings
* **Agent Not Receiving Context**: Check the connection configuration to ensure proper data mapping
* **Multiple Unintended Activations**: Review trigger conditions and consider adding filters
### Debugging Tips
* Use the Task View to monitor trigger activations and agent responses
* Check connection logs to identify any data transmission issues
* Test triggers manually before enabling auto-run
## Related Features
The Trigger to Agent configuration works seamlessly with other Workforce Builder components:
* [Agent to Agent Configuration](https://relevanceai.com/docs/workforce-builder/configurations/agent-to-agent): Connect agents to create multi-step workflows
* [Agent to Tool Configuration](https://relevanceai.com/docs/workforce-builder/configurations/agent-to-tool): Enable agents to use tools to complete tasks
* [Workforce Task View](https://relevanceai.com/docs/workforce-builder/workforce-task-view): Monitor and manage tasks initiated by triggers
# Workforce Task View
Source: https://relevanceai.com/docs/ai-workforce/workforce-features-and-capabilities/workforce-task-view
The Workforce Task View provides a centralized interface for monitoring, managing, and interacting with your AI workforce.
## Accessing the Workforce Task View
To access the Workforce Task View:
1. Navigate to the "Task" section in your selected Workforce
2. The Task View interface will display all current and recent activities for your selected workforce
## Key Features
### Real-Time Task Monitoring
Track the status and progress of all tasks being handled by your workforce in real time. The Task View provides a comprehensive overview of:
* Active tasks currently being processed
* Completed tasks with timestamps and outcomes
* Tasks awaiting approval or human intervention
* Failed tasks that require attention
### Manual Trigger Activation
Initiate workflows directly from the Task View interface:
1. Locate the manual trigger you want to activate
2. Enter your message or prompt to start the workflow
3. Submit the trigger to activate the associated agent or process
4. Monitor the task's progress as it moves through your workforce
This functionality allows you to test workflows, handle one-off requests, or manually start scheduled processes when needed.
### Approval Management
The Task View serves as your central hub for managing approvals within your workforce:
1. Receive notifications when agents require approval to proceed
2. Review the agent's proposed actions or responses
3. Approve, reject, or modify the agent's work
4. Provide additional context or instructions if needed
This approval system ensures quality control while allowing your workforce to operate autonomously when appropriate.
### Conversation History
Access complete conversation histories and task logs for comprehensive tracking:
* View the full thread of interactions between agents and users
* Examine decision points and tool usage throughout a task
* Reference previous tasks for context or troubleshooting
* Export conversation logs for reporting or analysis
### Task Timeline
The Task View provides a chronological timeline of all activities, giving you visibility into:
* When tasks were initiated
* How long each step in the process took
* Which agents or tools were involved at each stage
* When human intervention occurred
* Final resolution and completion times
## Working with the Task View
### Monitoring Multiple Tasks
The Task View allows you to monitor multiple concurrent tasks across your workforce:
1. Tasks are organized chronologically with the most recent at the top
2. Use filters to focus on specific task types, agents, or statuses
3. Expand individual tasks to see detailed information
4. Toggle between different workforces if you have multiple configured
### Handling Escalations
When agents escalate issues requiring human attention:
1. You'll receive a notification in the Task View
2. The escalated task will be highlighted for visibility
3. Review the agent's reason for escalation and the current task state
4. Provide guidance, additional information, or take over the task as needed
5. Once resolved, the agent can continue processing or the task can be marked complete
### Approval Workflows
For tasks configured to require human approval:
1. The agent will complete its work and submit it for review
2. The task will appear in your approval queue within the Task View
3. Review the agent's work, including any generated content or proposed actions
4. Approve the work to allow the agent to proceed or continue to the next step
5. Reject or request modifications if changes are needed
6. Provide feedback to help improve future performance
## Best Practices
### Organizing Your Task View
* Use clear naming conventions for your triggers and agents to easily identify tasks
* Configure appropriate approval thresholds to balance autonomy and oversight
* Set up notification preferences to stay informed of critical tasks
* Archive completed tasks regularly to maintain a clean interface
### Effective Monitoring
* Check the Task View regularly for items requiring attention
* Use filters to focus on high-priority tasks or specific workflows
* Review completed tasks periodically to identify optimization opportunities
* Monitor task completion times to identify bottlenecks or inefficiencies
### Troubleshooting
If you encounter issues with tasks in the Task View:
1. Check the task's history to identify where the process stalled
2. Review any error messages or agent notes
3. Verify that all connected tools and resources are functioning properly
4. Test the workflow with a manual trigger to reproduce the issue
5. Adjust agent settings or tool configurations as needed
## Related Features
* [Edge Settings](https://relevanceai.com/docs/agent/customise-agent/flowbuilder): Configure how agents communicate and interact with each other in your workforce
* [Approvals and Escalations](https://relevanceai.com/docs/agent/customise-agent/escalate): Set up detailed approval workflows and escalation paths for your agents
* [Workforce Builder](https://relevanceai.com/docs/agent/customise-agent/subagents): Design and configure your multi-agent workforce with visual tools
# Get started
Source: https://relevanceai.com/docs/get-started/introduction
Relevance AI is the home of your AI Workforce.
Relevance AI is a no-code platform where you can build AI agents and multi-agent teams that autonomously complete tasks, much like human employees.
Agents are powered by Large Language Models (LLMs) and equipped with tools. They can reason, make decisions, and follow instructions to get work done.
## Create an account and add members
Once you've [signed-up](http://app.relevanceai.com/) and created a Relevance account, you can add other members to your organisation.
1. Go to Relevance AI and click **[Sign Up](http://app.relevanceai.com/)**.
2. Enter your email and password to create an account, or sign up with your Google account.
3. Follow the sign-up wizard, which includes choosing the [region you want to store you data](https://relevanceai.com/docs/security#regions) in.
4. Click on `Settings` in the hamburger menu.
5. In **Projects**, select the default project, or create a new one for your team.
6. Click on `+ Invite user` and enter the email of the member you want to add to your organisation.
7. Send invite!
Here's a quick demo of how you create an account and invite team members:
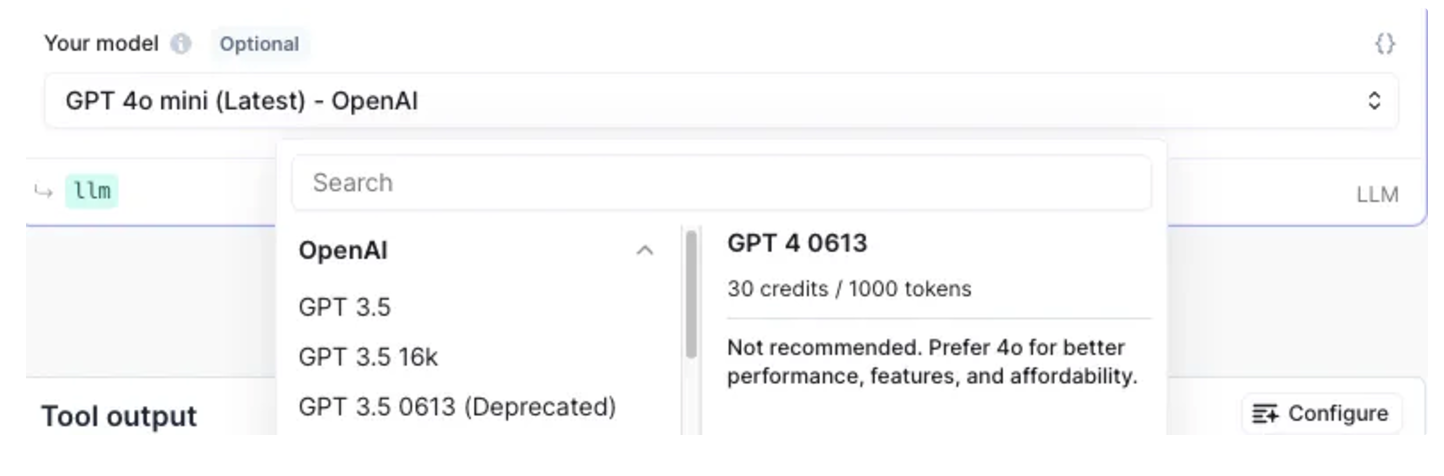 #### Knowledge sync
* Knowledge is our RAG (Retrieval-Augmented Generation) solution that enables you to provide additional context to your agents and tools.
* When syncing knowledge, yourdata is vectorized to enable search capabilities.
* Knowledge sync operations have the same base credit cost as a tool run.
## Credit allocation and reset
### Reset schedule
* **Free Plan:** Credits reset daily.
* **Paid Plans:** Credits reset monthly.
### Purchasing additional credits
* Only available for paid plan users (because on a free plan credits reset daily).
* Extra credits do not roll over to the next billing cycle.
* When a new cycle begins, credits reset to your plan's default amount.
* Pricing: 1000 credits = \$2USD
* Minimum purchase: 4000 credits (\$4USD)
* This minimum exists due to Stripe transaction fees.
Here is how you can manage your plan and purchase credits:
#### Knowledge sync
* Knowledge is our RAG (Retrieval-Augmented Generation) solution that enables you to provide additional context to your agents and tools.
* When syncing knowledge, yourdata is vectorized to enable search capabilities.
* Knowledge sync operations have the same base credit cost as a tool run.
## Credit allocation and reset
### Reset schedule
* **Free Plan:** Credits reset daily.
* **Paid Plans:** Credits reset monthly.
### Purchasing additional credits
* Only available for paid plan users (because on a free plan credits reset daily).
* Extra credits do not roll over to the next billing cycle.
* When a new cycle begins, credits reset to your plan's default amount.
* Pricing: 1000 credits = \$2USD
* Minimum purchase: 4000 credits (\$4USD)
* This minimum exists due to Stripe transaction fees.
Here is how you can manage your plan and purchase credits:
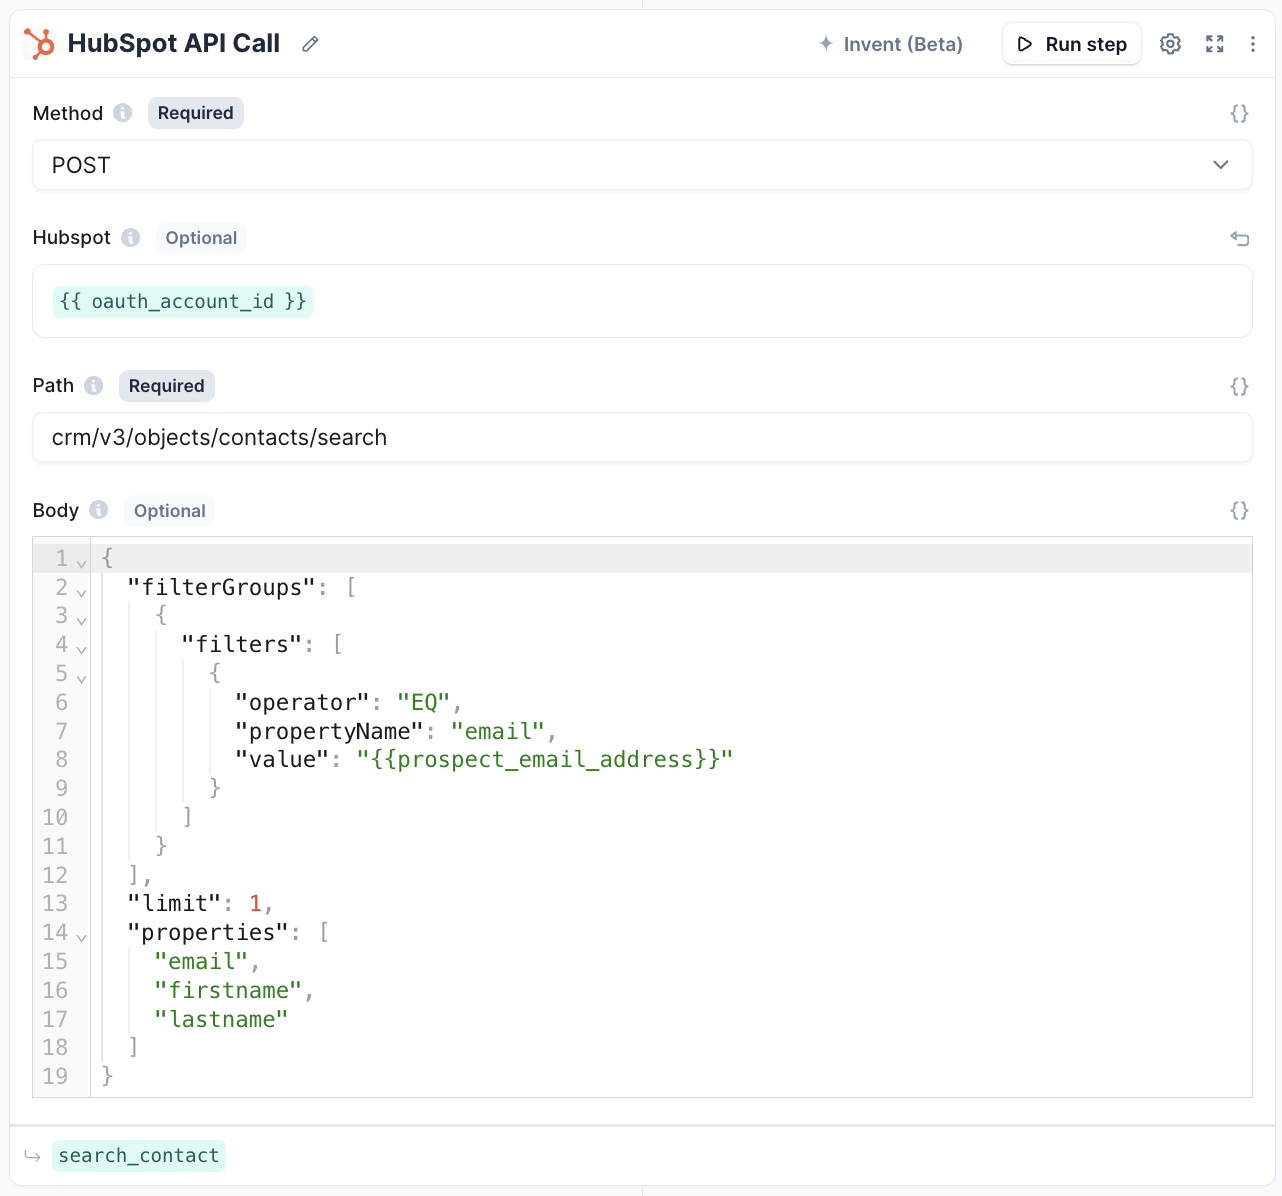 ### 3.2. Update a contact's properties.
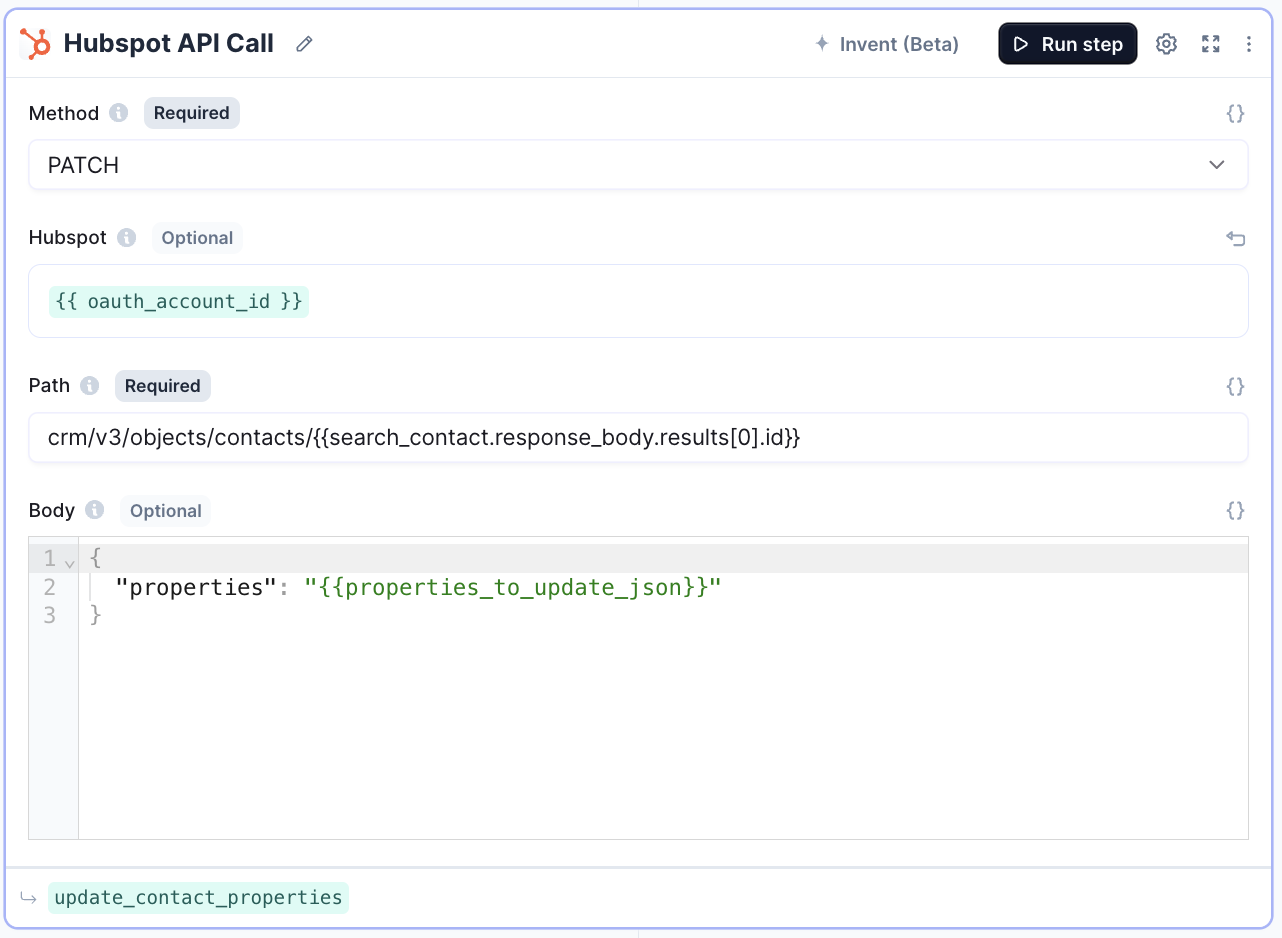 ### 3.4. Create a note (e.g. lead qual research).
 ### 3.5. Create a task
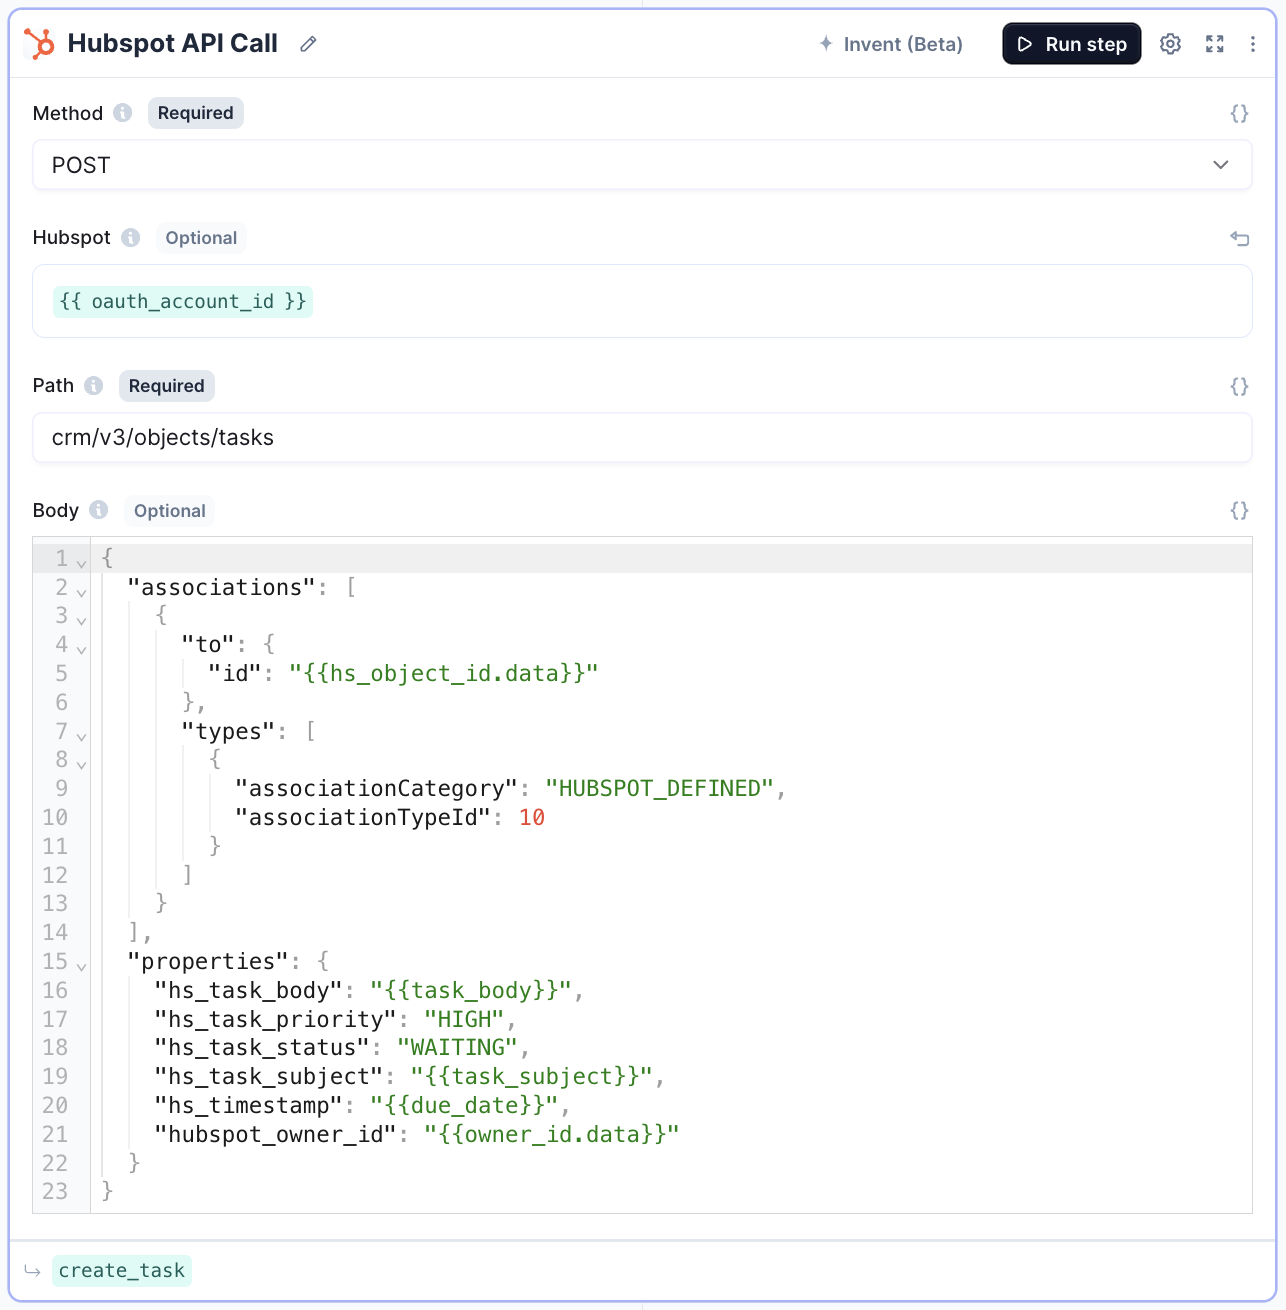 ### 3.6. Mark a task as complete
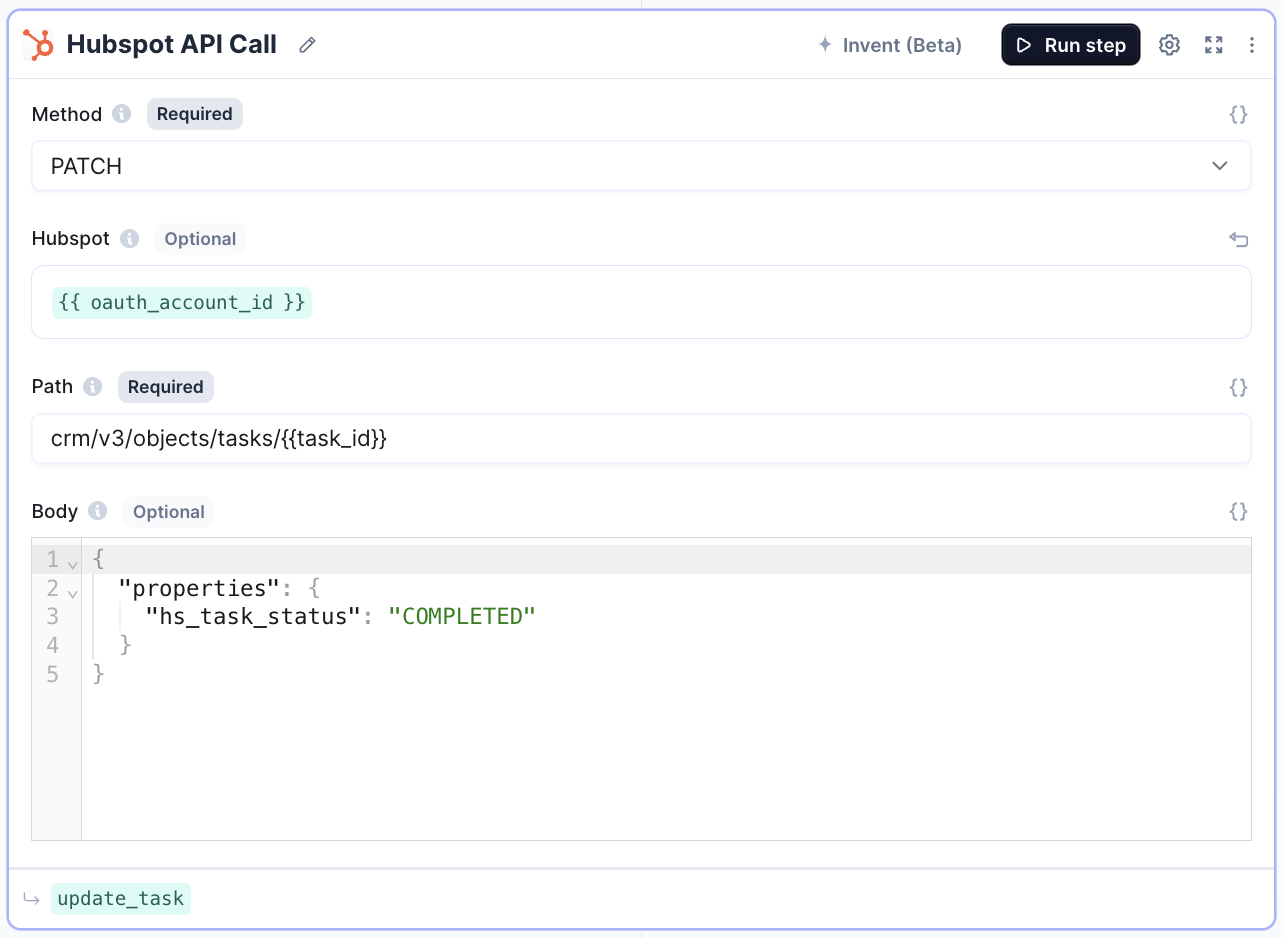 ### 3.7. Retrieve HubSpot engagements (all activities a customer has performed)
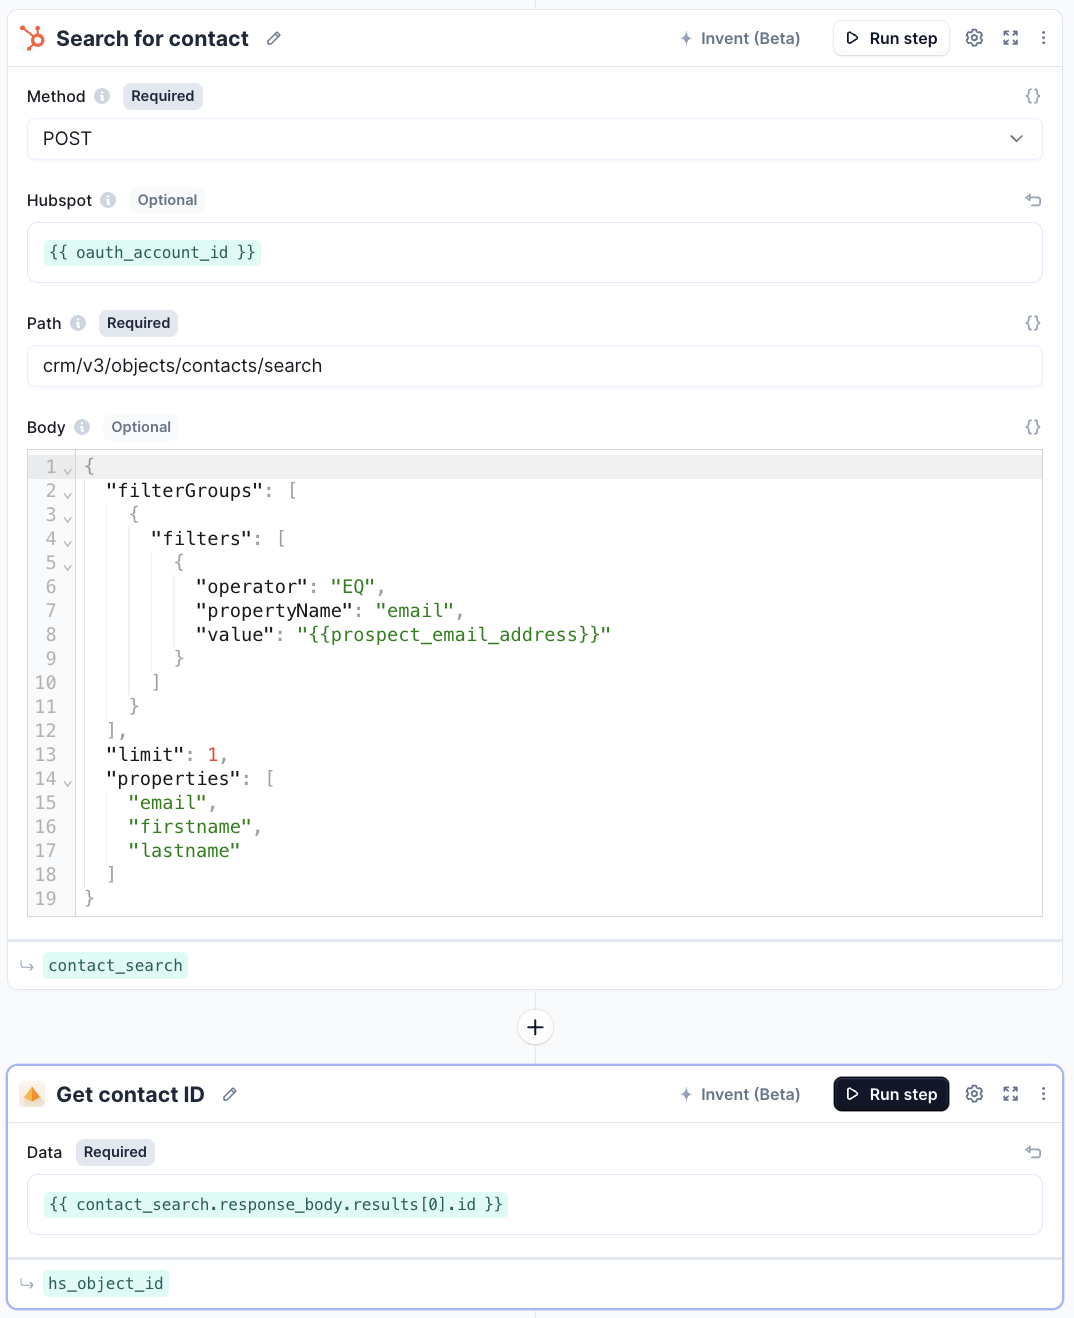
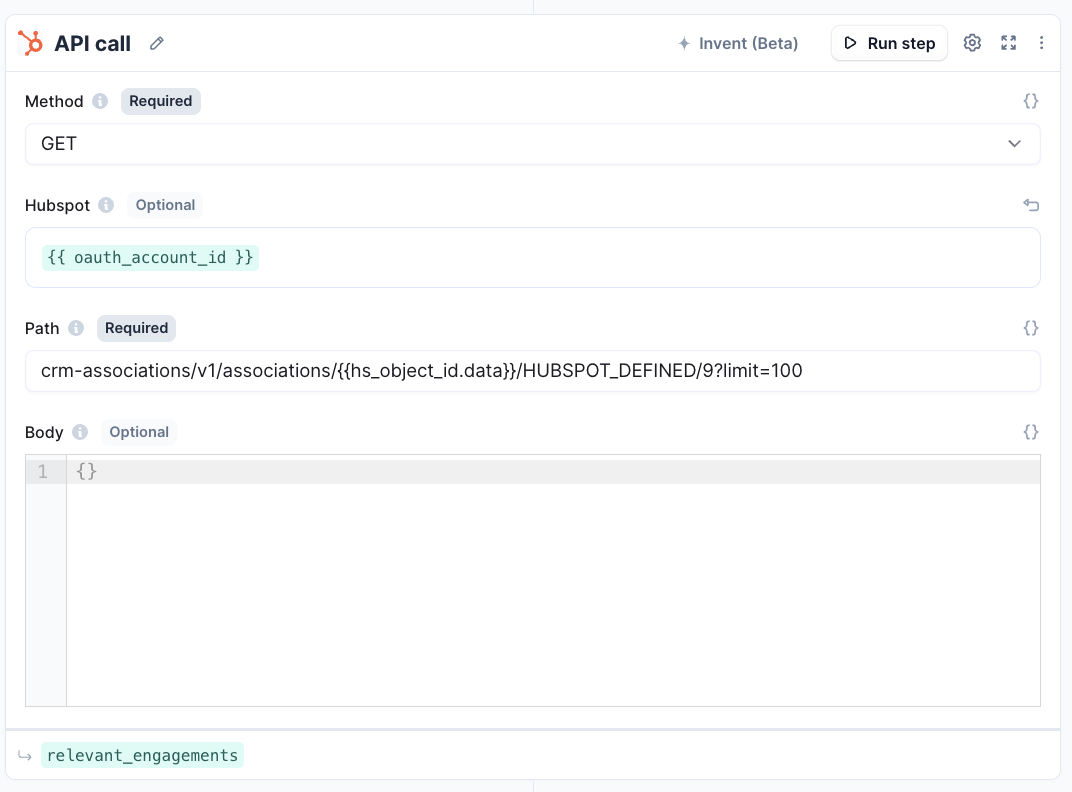 ## 4. Remove HubSpot integration
You can remove HubSpot as a Trigger in your agent settings, by clicking the three dots next to your connected account, and then "Remove".
If you want to remove the HubSpot integration completely, you can:
1. Go to the "Integrations" page from the sidebar.
2. Select Zoom from the list.
3. Click "..." on the account you want to remove.
4. Click remove.
# Outlook
Source: https://relevanceai.com/docs/integrations/agent-integrations/outlook
Adding support for recieving and responding to Outlook emails.
## Overview
The Outlook integration allows your agent to emails that are received to a specific Outlook account. For customer support agents that handle email equiries, we recommend setting up a dedicated email account for them, much like you would for a human employee.
## How to connect your agent to Outlook?
In the agent settings page, you can add Outlook as a trigger by clicking on the Outlook button under "Integrations > Triggers", and following the process to connect your Outlook account.
After that, you can choose whether or not you want to filter emails that are sent to your agent from your Outlook account. Without a search filter, your agent will receive every single email that is sent to your connected account.
## 4. Remove HubSpot integration
You can remove HubSpot as a Trigger in your agent settings, by clicking the three dots next to your connected account, and then "Remove".
If you want to remove the HubSpot integration completely, you can:
1. Go to the "Integrations" page from the sidebar.
2. Select Zoom from the list.
3. Click "..." on the account you want to remove.
4. Click remove.
# Outlook
Source: https://relevanceai.com/docs/integrations/agent-integrations/outlook
Adding support for recieving and responding to Outlook emails.
## Overview
The Outlook integration allows your agent to emails that are received to a specific Outlook account. For customer support agents that handle email equiries, we recommend setting up a dedicated email account for them, much like you would for a human employee.
## How to connect your agent to Outlook?
In the agent settings page, you can add Outlook as a trigger by clicking on the Outlook button under "Integrations > Triggers", and following the process to connect your Outlook account.
After that, you can choose whether or not you want to filter emails that are sent to your agent from your Outlook account. Without a search filter, your agent will receive every single email that is sent to your connected account.
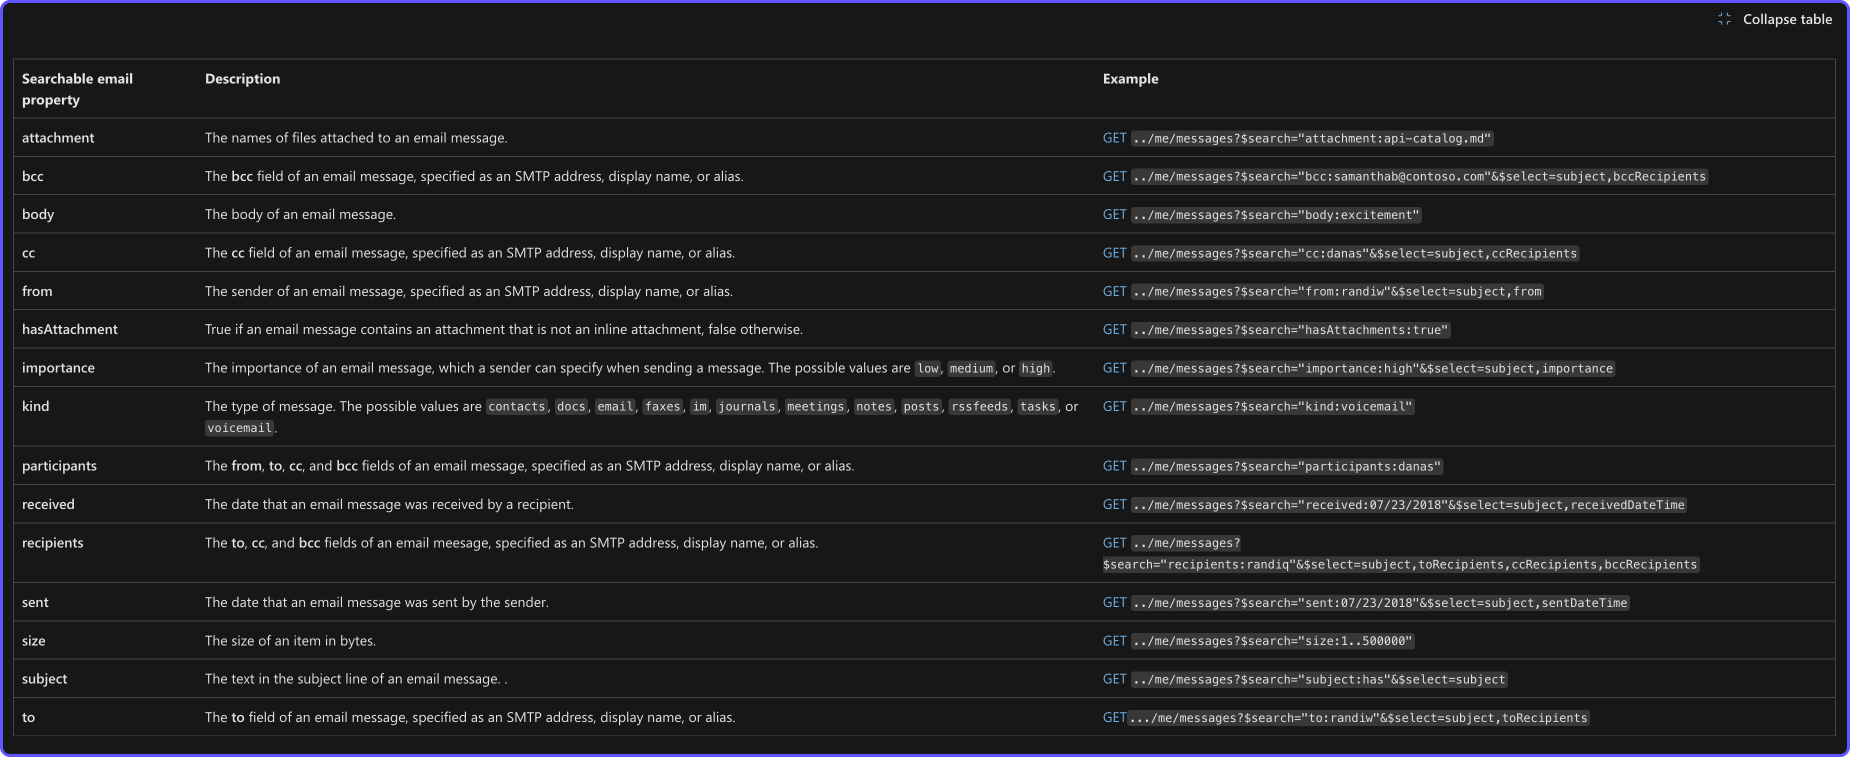 This is how you would use them in the Relevance Filter emails by search field:
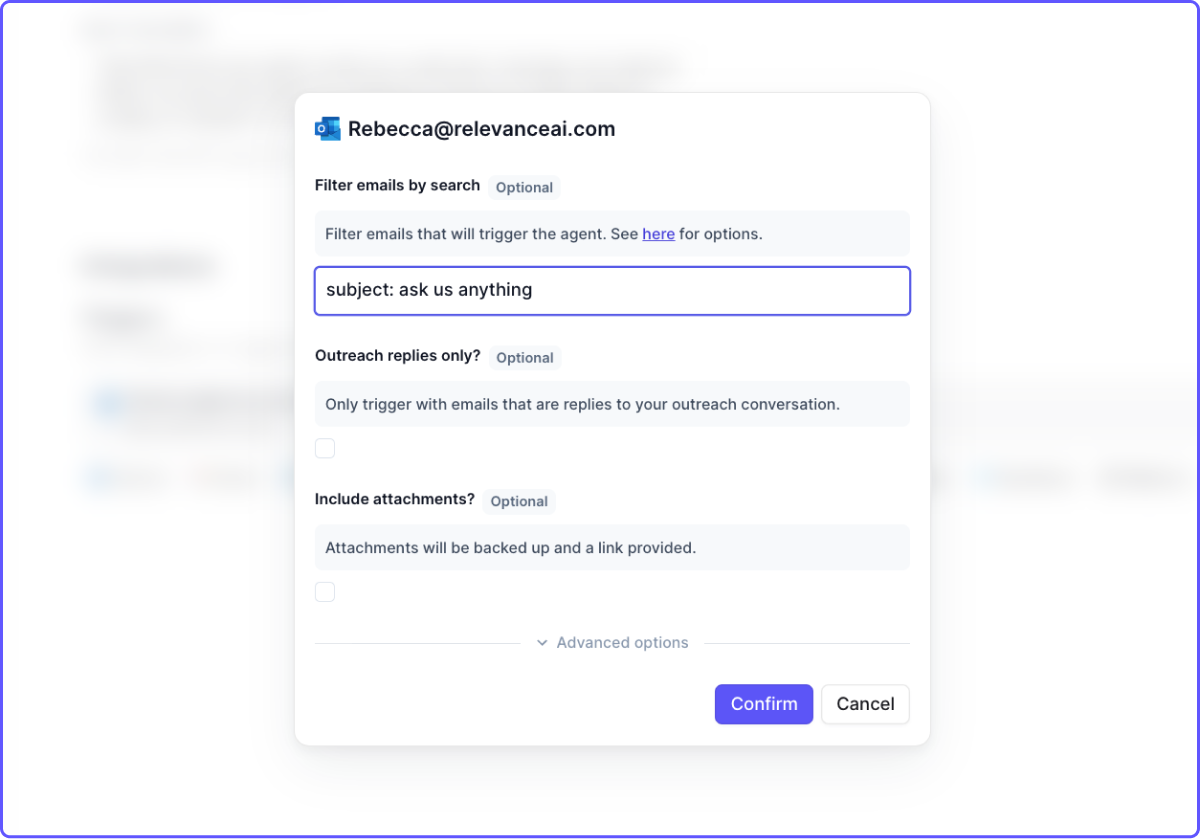 * "subject: ask us anything" - The subject line contains the phrase "ask us anything".
* "body: book a demo" - The body of the email contains the phrase "book a demo".
* "from:\*apple.com" - Only emails sent from the apple.com domain.
* "hasAttachments: true" - Only emails that have attachments.
* "received: 07/23/2018" - Only emails received on this date.
## How to respond to emails received from Outlook?
Once your agent has started receiving emails (it can take up to half an hour for the first one to come through), you can build a tool that uses the built-in "Send Email (Outlook)" tool to get your agent to start responding to them.
* "subject: ask us anything" - The subject line contains the phrase "ask us anything".
* "body: book a demo" - The body of the email contains the phrase "book a demo".
* "from:\*apple.com" - Only emails sent from the apple.com domain.
* "hasAttachments: true" - Only emails that have attachments.
* "received: 07/23/2018" - Only emails received on this date.
## How to respond to emails received from Outlook?
Once your agent has started receiving emails (it can take up to half an hour for the first one to come through), you can build a tool that uses the built-in "Send Email (Outlook)" tool to get your agent to start responding to them.
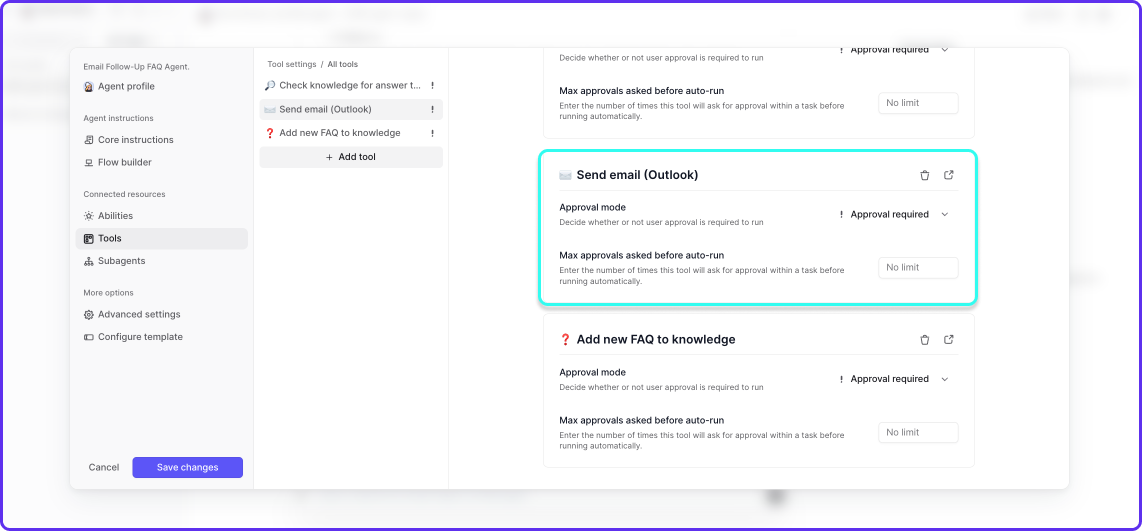 ### Tell your agent how it should respond
Once your agent is receiving emails, and has been equipped with your custom "Send email" tool, it's time for you to tell your agent how you want it to respond. You can do this by writing a prompt in the "core instructions" section of your agent settings.
This is an example of a prompt that guides our agent to handle customer questions over email, using four custom tools we built:
### Tell your agent how it should respond
Once your agent is receiving emails, and has been equipped with your custom "Send email" tool, it's time for you to tell your agent how you want it to respond. You can do this by writing a prompt in the "core instructions" section of your agent settings.
This is an example of a prompt that guides our agent to handle customer questions over email, using four custom tools we built:
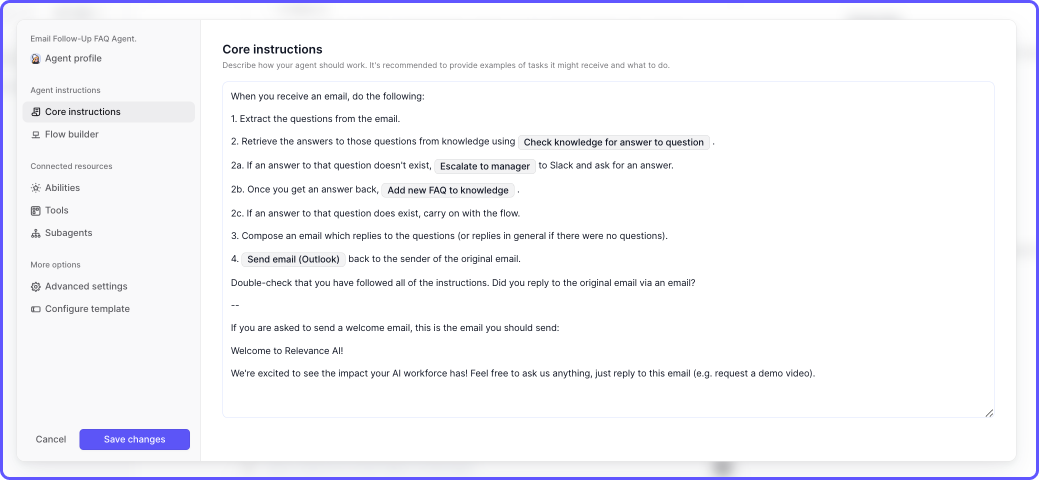
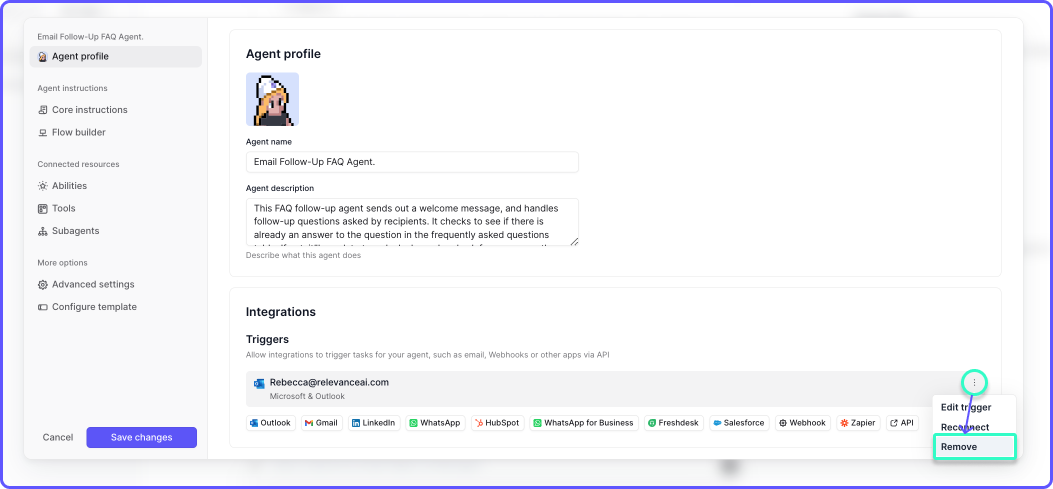 # LinkedIn
Source: https://relevanceai.com/docs/integrations/agent-integrations/premium-triggers/linkedin
Interact with your LinkedIn account with Relevance.
# LinkedIn Integration
Connect your LinkedIn account to Relevance AI and supercharge your networking, prospecting, and engagement capabilities with AI-powered automation. The LinkedIn Integration enables your agents to interact with LinkedIn much like a human team member would, creating a seamless bridge between your AI workforce and one of the world's most valuable professional networks.
## Connect the integration
Getting started with the LinkedIn Integration is straightforward:
1. Navigate to the "Integrations" page in the sidebar of your Relevance AI dashboard
2. Click on "LinkedIn" from the available integrations
3. Click the "Add Integration" button
4. In the pop-up window, sign into your LinkedIn account and authorize the connection
5. Once authorized, your LinkedIn account will appear in the connected accounts list
## Setting up triggers
The LinkedIn Integration offers powerful trigger capabilities that can initiate your AI agents based on specific LinkedIn events. This allows your agents to respond automatically to important network activities.
### Available LinkedIn triggers
Set up your agents to start working when:
* **New connection request received** - Your agent can automatically evaluate and respond to connection requests
* **New message received** - Trigger your agent when someone sends you a direct message on LinkedIn
* **New post engagement** - Activate your agent when someone comments on or reacts to your posts
* **New profile view** - Have your agent respond when someone views your LinkedIn profile
* **New job posting match** - Trigger workflows when jobs matching specific criteria are posted
### How to set up a LinkedIn trigger
1. Create or edit an agent in Relevance AI
2. Navigate to the "Agent Profile" and select "LinkedIn" from the available trigger options
3. Choose your connected LinkedIn account
4. Select the specific trigger event (e.g., "New message received")
# Telegram
Source: https://relevanceai.com/docs/integrations/agent-integrations/premium-triggers/telegram
Interact with your Telegram account with Relevance.
# Telegram Integration
Connect your AI agents with Telegram to automate conversations and workflows directly through the popular messaging platform. The Telegram integration allows your agents to receive messages, respond intelligently, and execute actions based on user interactions.
## Connect the integration
Setting up the Telegram integration with Relevance AI is straightforward:
1. Go to the "Integrations" page in the sidebar of your Relevance AI dashboard
2. Click on "Telegram" from the available integrations
3. Click the "Add Integration" button
4. You'll be prompted to authenticate with your Telegram account
5. Follow the on-screen instructions to authorize the connection
6. Once connected, you'll see your Telegram account listed under connected accounts
## Setting up triggers
The Telegram integration can be configured as a trigger for your AI agents, allowing them to automatically respond when messages are received.
### Create a Telegram trigger
1. Navigate to your agent's profile page and "Triggers"
2. Choose "Telegram" from the list of available triggers
3. Select your connected Telegram account
4. Configure the trigger settings:
* **Chat Type**: Choose between private chats, group chats, or both
* **Message Filter**: Optionally set up filters to only trigger on specific message types or content
* **Response Mode**: Select whether your agent should respond automatically or require approval
### Common trigger use cases
* **Customer Support**: Automatically respond to customer inquiries received via Telegram
* **Lead Qualification**: Trigger an agent to qualify leads that reach out through Telegram
* **Information Requests**: Set up an agent to provide information when users ask specific questions
* **Appointment Scheduling**: Allow users to schedule appointments through Telegram conversations
* **Order Processing**: Process orders and transactions initiated through Telegram messages
## Tools & Tool Steps
The Telegram integration provides several powerful actions that your agents can use as part of their workflows. These actions enable your agents to interact with Telegram in various ways.
### Available Telegram actions
* **Send Message**: Send a text message to a specific chat or user
* **Send Photo**: Share images with optional captions
* **Send Document**: Share files and documents of various formats
* **Send Location**: Share geographical locations
* **Create Poll**: Create and send polls to gather feedback
* **Get Chat Information**: Retrieve details about a specific chat
* **Get User Profile**: Retrieve information about a Telegram user
* **Pin Message**: Pin important messages in a chat
* **Delete Message**: Remove messages from a conversation
* **Forward Message**: Forward messages between chats
* **Create Chat Invite Link**: Generate invitation links for groups or channels
These are just some of the many actions available. The Telegram integration offers a comprehensive set of tools that allow your agents to leverage the full functionality of the Telegram platform.
### Example workflow
Here's an example of how you might use Telegram actions in a customer support workflow:
1. **Trigger**: Agent is triggered by an incoming Telegram message
2. **Analysis**: Agent analyzes the message content to determine the customer's intent
3. **Response**: Agent uses the "Send Message" action to respond with an appropriate greeting
4. **Information Gathering**: If additional information is needed, agent asks follow-up questions
5. **Resolution**: Once the issue is understood, agent provides a solution
6. **Documentation**: Agent uses "Send Document" action to share relevant documentation if needed
7. **Follow-up**: Agent schedules a follow-up message for later if the issue requires monitoring
## Use the integration's API tool step (advanced)
In addition to the pre-built actions, advanced users can access the full Telegram API for custom functionality:
1. Create a new tool
2. Scroll down to Tool-steps
3. Add Telegram API tool-step
4. Select your connected Telegram account in the dropdown
5. Configure the API endpoint and parameters according to your needs
The Telegram API tool step gives you access to all Telegram Bot API methods, allowing for highly customized interactions beyond the standard actions.
### Example API usage
```json
{
"method": "sendMessage",
"chat_id": "{{chatId}}",
"text": "This is a custom formatted message with *bold* and _italic_ text",
"parse_mode": "Markdown"
}
```
## Premium Trigger Information
Telegram Integration is available as a **Premium Trigger** exclusively for Teams and Business plan users. As a premium integration:
* This trigger is only accessible on Teams and Business plans
* Each connected Telegram account in your organization incurs an additional 5000 credits per month
## Related Features
* [Outlook Integration](https://relevanceai.com/docs/integrations/outlook): Connect your agents with email communications for a comprehensive messaging strategy that spans both email and instant messaging platforms.
* [WhatsApp Personal Integration](https://relevanceai.com/docs/integrations/whatsapp-personal): Extend your messaging capabilities to WhatsApp alongside Telegram for a multi-channel communication approach.
* [Knowledge Base Access](https://relevanceai.com/docs/knowledge/access-knowledge): Enhance your Telegram-connected agents by giving them access to your organization's knowledge base for more informed responses.
## FAQs
**Q: Can I connect multiple Telegram accounts to Relevance AI?**\
A: Yes, you can connect multiple Telegram accounts, but each connection will incur additional credits as per the premium trigger pricing.
**Q: Does the Telegram integration work with both personal and business Telegram accounts?**
A: Yes, the integration works with both personal accounts and business accounts on Telegram.
**Q: Can my agent respond to messages in Telegram groups?**\
A: Yes, your agent can be configured to respond to messages in private chats, groups, or both, depending on your trigger settings.
**Q: Is there a limit to how many messages my agent can process through Telegram?**\
A: Message processing is counted against your overall credit usage. The specific limits depend on your subscription plan.
**Q: Can I customize how my agent appears in Telegram conversations?**\
A: Yes, you can customize the name and profile picture of your Telegram bot that represents your agent in conversations.
# WhatsApp Personal
Source: https://relevanceai.com/docs/integrations/agent-integrations/premium-triggers/whatsapp
Connect your WhatsApp account to Relevance AI and enable your agents to communicate directly with customers through one of the world's most popular messaging platforms.
## Connect the integration
Connecting your WhatsApp account to Relevance AI is a straightforward process:
1. Go to the "Integrations" page in the sidebar.
2. Click on "WhatsApp".
3. Click on the "Add Integration" button.
4. In the pop-up window, add your phone number.
5. Once connected, you'll see your WhatsApp phone number account listed under active integrations.
## Setting up triggers
WhatsApp Integration can be configured as a trigger for your AI agents, allowing them to automatically respond when messages are received through WhatsApp.
To set up WhatsApp as a trigger:
1. Create a new agent or edit an existing one.
2. Navigate to the "Triggers" section in "Agent Profile".
3. Select "WhatsApp" from the available triggers.
4. Choose the WhatsApp account you want to connect to this agent.
5. Configure trigger conditions (optional):
* Respond to all incoming messages
* Respond only to specific contacts or groups
* Respond based on message content filters
6. Save your trigger configuration.
Once set up, your agent will automatically activate when new WhatsApp messages that match your trigger conditions are received, enabling real-time customer engagement.
## Tools & Tool Steps
WhatsApp integration provides powerful tools and actions that your agents can use to engage with customers. These actions can be incorporated into your agent's workflow at any point, not just as triggers.
Here are some of the key WhatsApp actions available:
### Send WhatsApp Message
Send text messages to individual contacts or groups.
Input parameters:
* Recipient phone number or group ID
* Message content
* Optional: Attachments
### Send WhatsApp Media
Share images, documents, or other media files with your contacts.
Input parameters:
* Recipient phone number or group ID
* Media type (image, document, audio, video)
* Media URL or file
* Optional: Caption
### Send WhatsApp Template Message
Use pre-approved message templates for business communications.
Input parameters:
* Recipient phone number
* Template name
* Template parameters
### Get WhatsApp Conversation History
Retrieve previous messages from a specific conversation.
Input parameters:
* Contact phone number
* Optional: Time range
### Mark WhatsApp Message as Read
Update the read status of messages.
Input parameters:
* Message ID
These are just a few examples of the many WhatsApp actions available. Your agents can leverage these tools to create sophisticated customer engagement workflows, from automated support responses to personalized marketing campaigns.
## Use the integration's API tool step (advanced)
In addition to the tools and actions available in the directory, you can build custom tools that perform WhatsApp activities by using the WhatsApp API Call tool step:
1. Create a new tool.
2. Scroll down to Tool-steps.
3. Add WhatsApp API tool-step.
4. Select your connected WhatsApp account in the dropdown.
This advanced approach gives you direct access to the WhatsApp Business API, allowing for more complex and customized interactions:
### Example API call:
```json
{
"endpoint": "/messages",
"method": "POST",
"body": {
"to": "{{recipient_number}}",
"type": "text",
"text": {
"body": "{{message_content}}"
}
}
}
```
## Premium Trigger Information
WhatsApp Integration is available as a **Premium Trigger** exclusively for Teams and Business plan users. As a premium integration:
* This trigger is only accessible on Teams and Business plans
* Each connected WhatsApp account in your organization incurs an additional 5000 credits per month
## Related Features
[Outlook Integration](https://relevanceai.com/docs/integrations/outlook) - Use WhatsApp alongside email communications for a comprehensive customer engagement strategy. Coordinate messaging across both channels for consistent customer experiences.
[HubSpot Integration](https://relevanceai.com/docs/integrations/hubspot) - Connect your WhatsApp conversations with your CRM to maintain customer context across all touchpoints. Track WhatsApp interactions in your customer records for better relationship management.
## FAQs
### What types of WhatsApp accounts are supported?
Relevance AI supports WhatsApp Business accounts. Personal WhatsApp accounts are not supported for this integration.
### Are there message volume limitations?
Message volumes are subject to WhatsApp's own policies and rate limits. The Relevance AI platform itself doesn't impose additional limits beyond your plan's credit allocation.
### Can I use WhatsApp for bulk messaging?
Yes, but you must comply with WhatsApp's business policies regarding bulk messaging and ensure you have proper opt-ins from recipients.
### How secure are WhatsApp conversations through Relevance AI?
All WhatsApp communications maintain end-to-end encryption. Relevance AI adheres to strict security protocols to ensure your conversation data remains protected.
### Can multiple agents use the same WhatsApp account?
Yes, you can connect multiple agents to the same WhatsApp account, but you should configure triggers carefully to avoid conflicts.
# Salesforce
Source: https://relevanceai.com/docs/integrations/agent-integrations/salesforce
Interact with your Salesforce CRM with Relevance.
Salesforce is designed to help businesses manage their sales pipeline, primarily through customer relationship tracking activities. With Relevance AI, your agents can interact with Salesforce much like your human sales team would.
Below, we'll show you how to get started with the Salesforce integration, including how to connect your Salesforce account, how to trigger agentic workflows based on Salesforce events, and how to complete common CRM activities with your agents.
## 1. How to connect your Salesforce account
To add Salesforce as an integration, all you need to do is sign-into your Salesforce account via the integrations page:
1. Go to the "Integrations" page in the sidebar.
2. Click on "Salesforce".
3. Click on the Add Integration button.
4. Sign-in to your Salesforce account.
5. Click "Allow access" to Relevance AI.
## 2. Setup Salesforce as an Agent Trigger
A trigger is an event that triggers your agent to start working. In the case of Salesforce, a trigger might be new leads added to your CRM, demos have been booked, a lead has moved down the sales funnel (e.g. Prospect -> Qualified lead) or other events unique to your sales workflows.
### Add a Salesforce trigger to your agent.
After you have created a new agent, you can add Salesforce as a trigger:
1. Open your agent settings (Agent profile tab).
2. Scroll down to Integrations > Triggers.
3. Click on Salesforce.
4. Select your connected Salesforce account, or sign-in if not already added via the integrations page (previous section).
5. Click "Allow access" to Relevance AI.
6. Write an SOQL query to retrieve the data you want to pull in from your Salesforce account.
Here is an example on an SOQL query that pulls in new leads:
**Pull in New Leads**
The following SOQL query pulls in Lead objects with the selected properties, where the "Relevance\_Outreached\_\_c" custom object has been set to "true".
```SOQL
SELECT Id, Name, Email, Phone, AccountId, Account.Name, Title
FROM Lead
WHERE Relevance_Outreached__c = true
```
Now, any new Leads that are added to the CRM since the last time we checked that meet the query conditions, will be sent to the agent.
# LinkedIn
Source: https://relevanceai.com/docs/integrations/agent-integrations/premium-triggers/linkedin
Interact with your LinkedIn account with Relevance.
# LinkedIn Integration
Connect your LinkedIn account to Relevance AI and supercharge your networking, prospecting, and engagement capabilities with AI-powered automation. The LinkedIn Integration enables your agents to interact with LinkedIn much like a human team member would, creating a seamless bridge between your AI workforce and one of the world's most valuable professional networks.
## Connect the integration
Getting started with the LinkedIn Integration is straightforward:
1. Navigate to the "Integrations" page in the sidebar of your Relevance AI dashboard
2. Click on "LinkedIn" from the available integrations
3. Click the "Add Integration" button
4. In the pop-up window, sign into your LinkedIn account and authorize the connection
5. Once authorized, your LinkedIn account will appear in the connected accounts list
## Setting up triggers
The LinkedIn Integration offers powerful trigger capabilities that can initiate your AI agents based on specific LinkedIn events. This allows your agents to respond automatically to important network activities.
### Available LinkedIn triggers
Set up your agents to start working when:
* **New connection request received** - Your agent can automatically evaluate and respond to connection requests
* **New message received** - Trigger your agent when someone sends you a direct message on LinkedIn
* **New post engagement** - Activate your agent when someone comments on or reacts to your posts
* **New profile view** - Have your agent respond when someone views your LinkedIn profile
* **New job posting match** - Trigger workflows when jobs matching specific criteria are posted
### How to set up a LinkedIn trigger
1. Create or edit an agent in Relevance AI
2. Navigate to the "Agent Profile" and select "LinkedIn" from the available trigger options
3. Choose your connected LinkedIn account
4. Select the specific trigger event (e.g., "New message received")
# Telegram
Source: https://relevanceai.com/docs/integrations/agent-integrations/premium-triggers/telegram
Interact with your Telegram account with Relevance.
# Telegram Integration
Connect your AI agents with Telegram to automate conversations and workflows directly through the popular messaging platform. The Telegram integration allows your agents to receive messages, respond intelligently, and execute actions based on user interactions.
## Connect the integration
Setting up the Telegram integration with Relevance AI is straightforward:
1. Go to the "Integrations" page in the sidebar of your Relevance AI dashboard
2. Click on "Telegram" from the available integrations
3. Click the "Add Integration" button
4. You'll be prompted to authenticate with your Telegram account
5. Follow the on-screen instructions to authorize the connection
6. Once connected, you'll see your Telegram account listed under connected accounts
## Setting up triggers
The Telegram integration can be configured as a trigger for your AI agents, allowing them to automatically respond when messages are received.
### Create a Telegram trigger
1. Navigate to your agent's profile page and "Triggers"
2. Choose "Telegram" from the list of available triggers
3. Select your connected Telegram account
4. Configure the trigger settings:
* **Chat Type**: Choose between private chats, group chats, or both
* **Message Filter**: Optionally set up filters to only trigger on specific message types or content
* **Response Mode**: Select whether your agent should respond automatically or require approval
### Common trigger use cases
* **Customer Support**: Automatically respond to customer inquiries received via Telegram
* **Lead Qualification**: Trigger an agent to qualify leads that reach out through Telegram
* **Information Requests**: Set up an agent to provide information when users ask specific questions
* **Appointment Scheduling**: Allow users to schedule appointments through Telegram conversations
* **Order Processing**: Process orders and transactions initiated through Telegram messages
## Tools & Tool Steps
The Telegram integration provides several powerful actions that your agents can use as part of their workflows. These actions enable your agents to interact with Telegram in various ways.
### Available Telegram actions
* **Send Message**: Send a text message to a specific chat or user
* **Send Photo**: Share images with optional captions
* **Send Document**: Share files and documents of various formats
* **Send Location**: Share geographical locations
* **Create Poll**: Create and send polls to gather feedback
* **Get Chat Information**: Retrieve details about a specific chat
* **Get User Profile**: Retrieve information about a Telegram user
* **Pin Message**: Pin important messages in a chat
* **Delete Message**: Remove messages from a conversation
* **Forward Message**: Forward messages between chats
* **Create Chat Invite Link**: Generate invitation links for groups or channels
These are just some of the many actions available. The Telegram integration offers a comprehensive set of tools that allow your agents to leverage the full functionality of the Telegram platform.
### Example workflow
Here's an example of how you might use Telegram actions in a customer support workflow:
1. **Trigger**: Agent is triggered by an incoming Telegram message
2. **Analysis**: Agent analyzes the message content to determine the customer's intent
3. **Response**: Agent uses the "Send Message" action to respond with an appropriate greeting
4. **Information Gathering**: If additional information is needed, agent asks follow-up questions
5. **Resolution**: Once the issue is understood, agent provides a solution
6. **Documentation**: Agent uses "Send Document" action to share relevant documentation if needed
7. **Follow-up**: Agent schedules a follow-up message for later if the issue requires monitoring
## Use the integration's API tool step (advanced)
In addition to the pre-built actions, advanced users can access the full Telegram API for custom functionality:
1. Create a new tool
2. Scroll down to Tool-steps
3. Add Telegram API tool-step
4. Select your connected Telegram account in the dropdown
5. Configure the API endpoint and parameters according to your needs
The Telegram API tool step gives you access to all Telegram Bot API methods, allowing for highly customized interactions beyond the standard actions.
### Example API usage
```json
{
"method": "sendMessage",
"chat_id": "{{chatId}}",
"text": "This is a custom formatted message with *bold* and _italic_ text",
"parse_mode": "Markdown"
}
```
## Premium Trigger Information
Telegram Integration is available as a **Premium Trigger** exclusively for Teams and Business plan users. As a premium integration:
* This trigger is only accessible on Teams and Business plans
* Each connected Telegram account in your organization incurs an additional 5000 credits per month
## Related Features
* [Outlook Integration](https://relevanceai.com/docs/integrations/outlook): Connect your agents with email communications for a comprehensive messaging strategy that spans both email and instant messaging platforms.
* [WhatsApp Personal Integration](https://relevanceai.com/docs/integrations/whatsapp-personal): Extend your messaging capabilities to WhatsApp alongside Telegram for a multi-channel communication approach.
* [Knowledge Base Access](https://relevanceai.com/docs/knowledge/access-knowledge): Enhance your Telegram-connected agents by giving them access to your organization's knowledge base for more informed responses.
## FAQs
**Q: Can I connect multiple Telegram accounts to Relevance AI?**\
A: Yes, you can connect multiple Telegram accounts, but each connection will incur additional credits as per the premium trigger pricing.
**Q: Does the Telegram integration work with both personal and business Telegram accounts?**
A: Yes, the integration works with both personal accounts and business accounts on Telegram.
**Q: Can my agent respond to messages in Telegram groups?**\
A: Yes, your agent can be configured to respond to messages in private chats, groups, or both, depending on your trigger settings.
**Q: Is there a limit to how many messages my agent can process through Telegram?**\
A: Message processing is counted against your overall credit usage. The specific limits depend on your subscription plan.
**Q: Can I customize how my agent appears in Telegram conversations?**\
A: Yes, you can customize the name and profile picture of your Telegram bot that represents your agent in conversations.
# WhatsApp Personal
Source: https://relevanceai.com/docs/integrations/agent-integrations/premium-triggers/whatsapp
Connect your WhatsApp account to Relevance AI and enable your agents to communicate directly with customers through one of the world's most popular messaging platforms.
## Connect the integration
Connecting your WhatsApp account to Relevance AI is a straightforward process:
1. Go to the "Integrations" page in the sidebar.
2. Click on "WhatsApp".
3. Click on the "Add Integration" button.
4. In the pop-up window, add your phone number.
5. Once connected, you'll see your WhatsApp phone number account listed under active integrations.
## Setting up triggers
WhatsApp Integration can be configured as a trigger for your AI agents, allowing them to automatically respond when messages are received through WhatsApp.
To set up WhatsApp as a trigger:
1. Create a new agent or edit an existing one.
2. Navigate to the "Triggers" section in "Agent Profile".
3. Select "WhatsApp" from the available triggers.
4. Choose the WhatsApp account you want to connect to this agent.
5. Configure trigger conditions (optional):
* Respond to all incoming messages
* Respond only to specific contacts or groups
* Respond based on message content filters
6. Save your trigger configuration.
Once set up, your agent will automatically activate when new WhatsApp messages that match your trigger conditions are received, enabling real-time customer engagement.
## Tools & Tool Steps
WhatsApp integration provides powerful tools and actions that your agents can use to engage with customers. These actions can be incorporated into your agent's workflow at any point, not just as triggers.
Here are some of the key WhatsApp actions available:
### Send WhatsApp Message
Send text messages to individual contacts or groups.
Input parameters:
* Recipient phone number or group ID
* Message content
* Optional: Attachments
### Send WhatsApp Media
Share images, documents, or other media files with your contacts.
Input parameters:
* Recipient phone number or group ID
* Media type (image, document, audio, video)
* Media URL or file
* Optional: Caption
### Send WhatsApp Template Message
Use pre-approved message templates for business communications.
Input parameters:
* Recipient phone number
* Template name
* Template parameters
### Get WhatsApp Conversation History
Retrieve previous messages from a specific conversation.
Input parameters:
* Contact phone number
* Optional: Time range
### Mark WhatsApp Message as Read
Update the read status of messages.
Input parameters:
* Message ID
These are just a few examples of the many WhatsApp actions available. Your agents can leverage these tools to create sophisticated customer engagement workflows, from automated support responses to personalized marketing campaigns.
## Use the integration's API tool step (advanced)
In addition to the tools and actions available in the directory, you can build custom tools that perform WhatsApp activities by using the WhatsApp API Call tool step:
1. Create a new tool.
2. Scroll down to Tool-steps.
3. Add WhatsApp API tool-step.
4. Select your connected WhatsApp account in the dropdown.
This advanced approach gives you direct access to the WhatsApp Business API, allowing for more complex and customized interactions:
### Example API call:
```json
{
"endpoint": "/messages",
"method": "POST",
"body": {
"to": "{{recipient_number}}",
"type": "text",
"text": {
"body": "{{message_content}}"
}
}
}
```
## Premium Trigger Information
WhatsApp Integration is available as a **Premium Trigger** exclusively for Teams and Business plan users. As a premium integration:
* This trigger is only accessible on Teams and Business plans
* Each connected WhatsApp account in your organization incurs an additional 5000 credits per month
## Related Features
[Outlook Integration](https://relevanceai.com/docs/integrations/outlook) - Use WhatsApp alongside email communications for a comprehensive customer engagement strategy. Coordinate messaging across both channels for consistent customer experiences.
[HubSpot Integration](https://relevanceai.com/docs/integrations/hubspot) - Connect your WhatsApp conversations with your CRM to maintain customer context across all touchpoints. Track WhatsApp interactions in your customer records for better relationship management.
## FAQs
### What types of WhatsApp accounts are supported?
Relevance AI supports WhatsApp Business accounts. Personal WhatsApp accounts are not supported for this integration.
### Are there message volume limitations?
Message volumes are subject to WhatsApp's own policies and rate limits. The Relevance AI platform itself doesn't impose additional limits beyond your plan's credit allocation.
### Can I use WhatsApp for bulk messaging?
Yes, but you must comply with WhatsApp's business policies regarding bulk messaging and ensure you have proper opt-ins from recipients.
### How secure are WhatsApp conversations through Relevance AI?
All WhatsApp communications maintain end-to-end encryption. Relevance AI adheres to strict security protocols to ensure your conversation data remains protected.
### Can multiple agents use the same WhatsApp account?
Yes, you can connect multiple agents to the same WhatsApp account, but you should configure triggers carefully to avoid conflicts.
# Salesforce
Source: https://relevanceai.com/docs/integrations/agent-integrations/salesforce
Interact with your Salesforce CRM with Relevance.
Salesforce is designed to help businesses manage their sales pipeline, primarily through customer relationship tracking activities. With Relevance AI, your agents can interact with Salesforce much like your human sales team would.
Below, we'll show you how to get started with the Salesforce integration, including how to connect your Salesforce account, how to trigger agentic workflows based on Salesforce events, and how to complete common CRM activities with your agents.
## 1. How to connect your Salesforce account
To add Salesforce as an integration, all you need to do is sign-into your Salesforce account via the integrations page:
1. Go to the "Integrations" page in the sidebar.
2. Click on "Salesforce".
3. Click on the Add Integration button.
4. Sign-in to your Salesforce account.
5. Click "Allow access" to Relevance AI.
## 2. Setup Salesforce as an Agent Trigger
A trigger is an event that triggers your agent to start working. In the case of Salesforce, a trigger might be new leads added to your CRM, demos have been booked, a lead has moved down the sales funnel (e.g. Prospect -> Qualified lead) or other events unique to your sales workflows.
### Add a Salesforce trigger to your agent.
After you have created a new agent, you can add Salesforce as a trigger:
1. Open your agent settings (Agent profile tab).
2. Scroll down to Integrations > Triggers.
3. Click on Salesforce.
4. Select your connected Salesforce account, or sign-in if not already added via the integrations page (previous section).
5. Click "Allow access" to Relevance AI.
6. Write an SOQL query to retrieve the data you want to pull in from your Salesforce account.
Here is an example on an SOQL query that pulls in new leads:
**Pull in New Leads**
The following SOQL query pulls in Lead objects with the selected properties, where the "Relevance\_Outreached\_\_c" custom object has been set to "true".
```SOQL
SELECT Id, Name, Email, Phone, AccountId, Account.Name, Title
FROM Lead
WHERE Relevance_Outreached__c = true
```
Now, any new Leads that are added to the CRM since the last time we checked that meet the query conditions, will be sent to the agent.
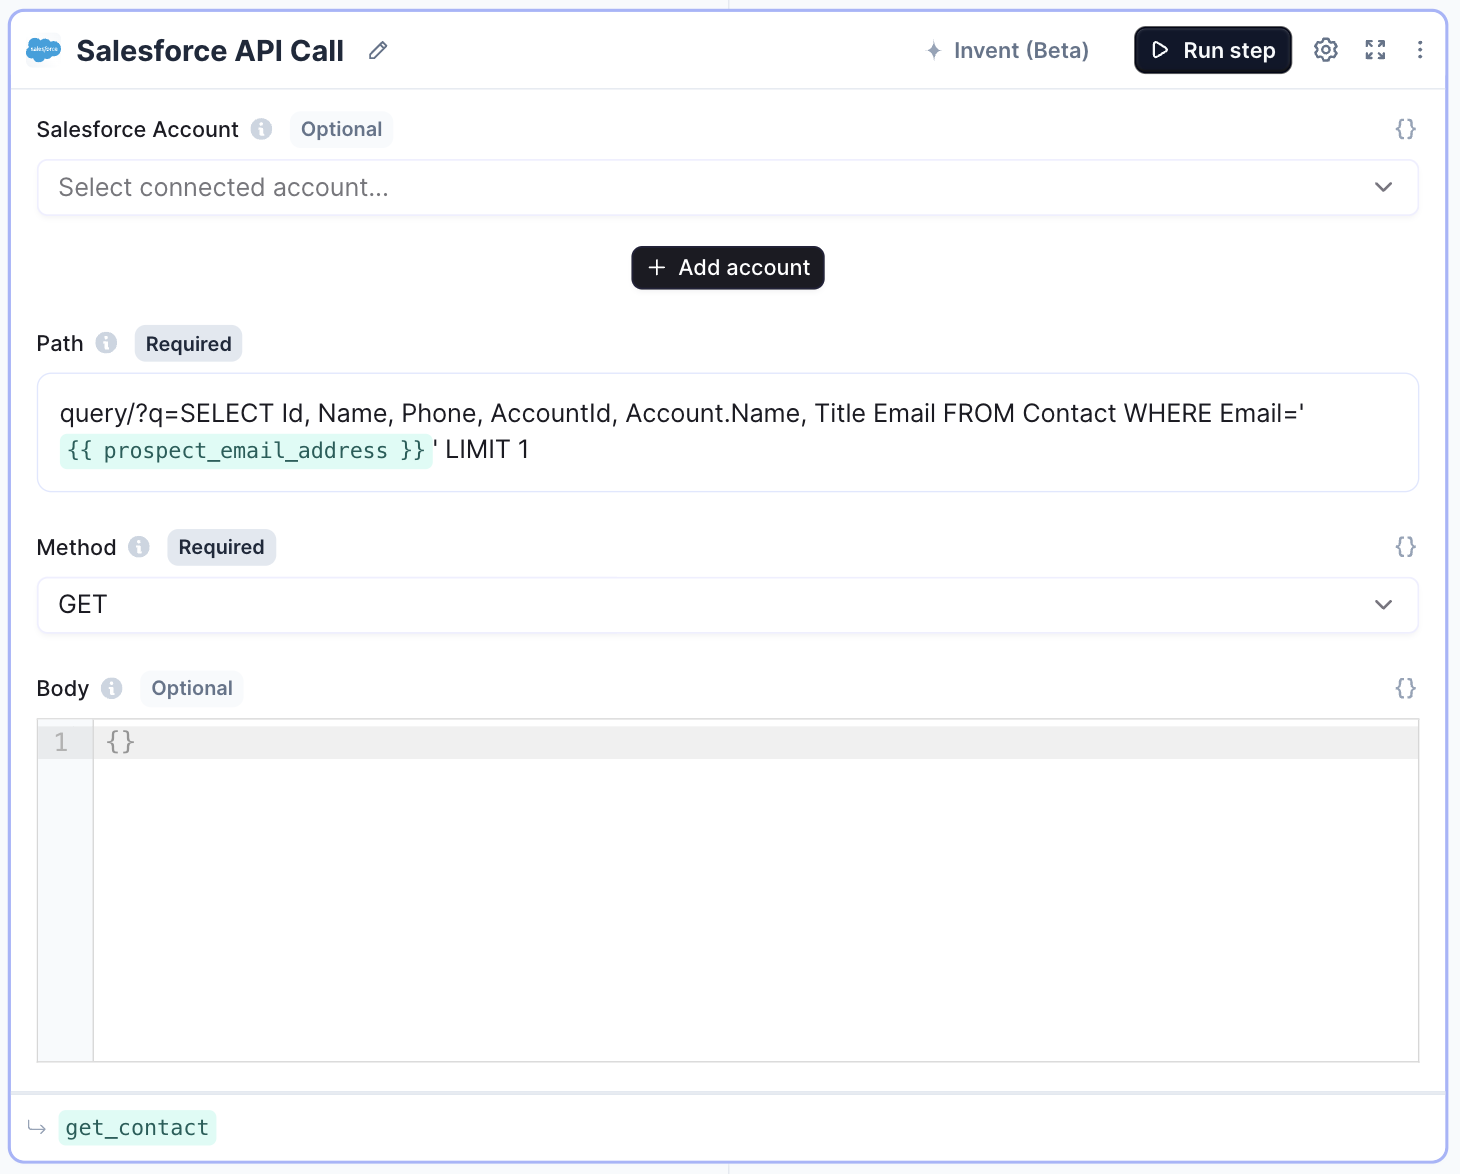 ### 3.2. Create a new Lead.
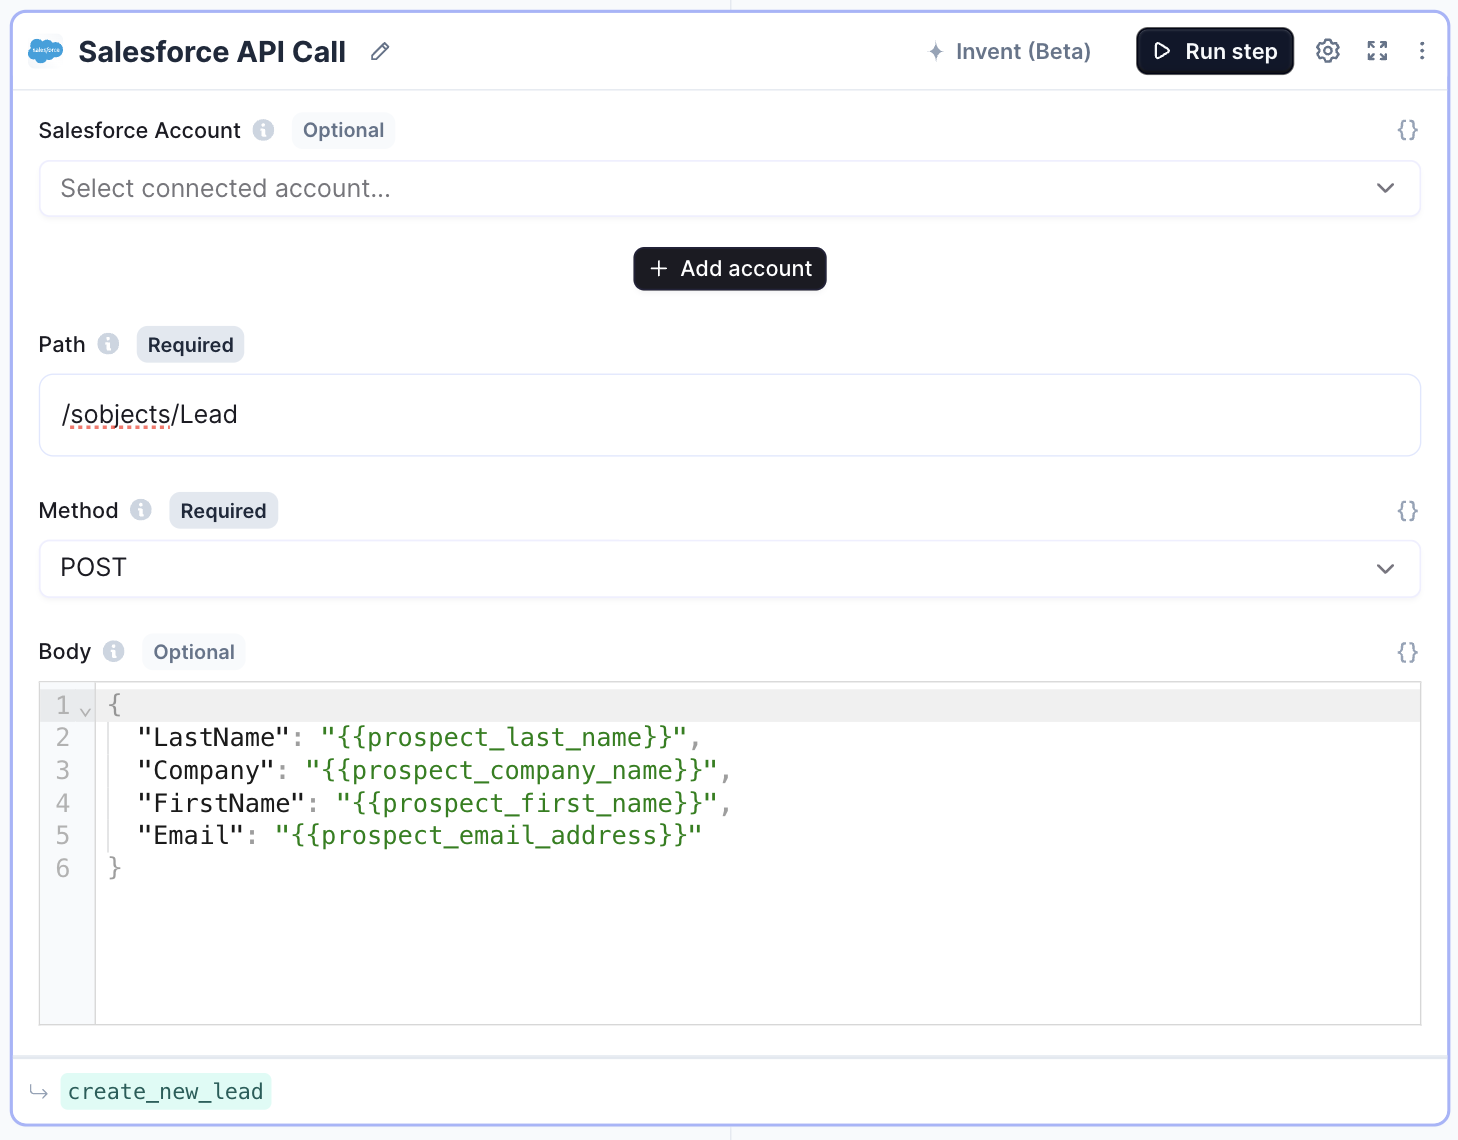 ### 3.3. Create a note (e.g. lead qual research).
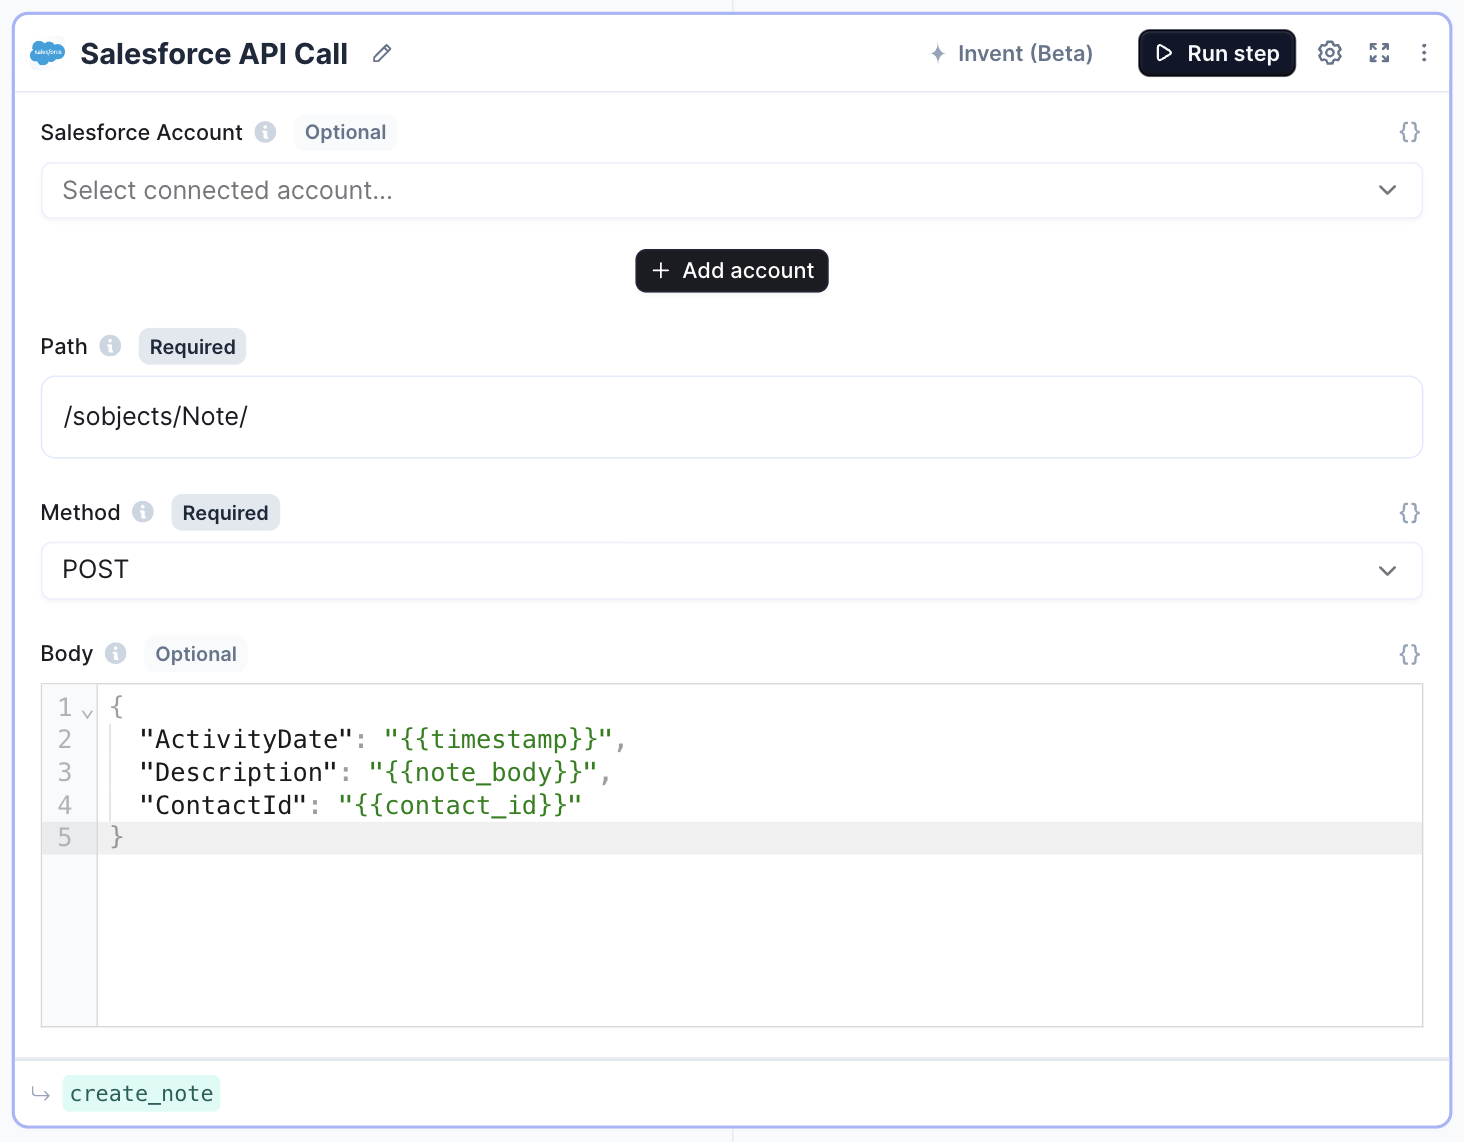 ### 3.4. Create a task
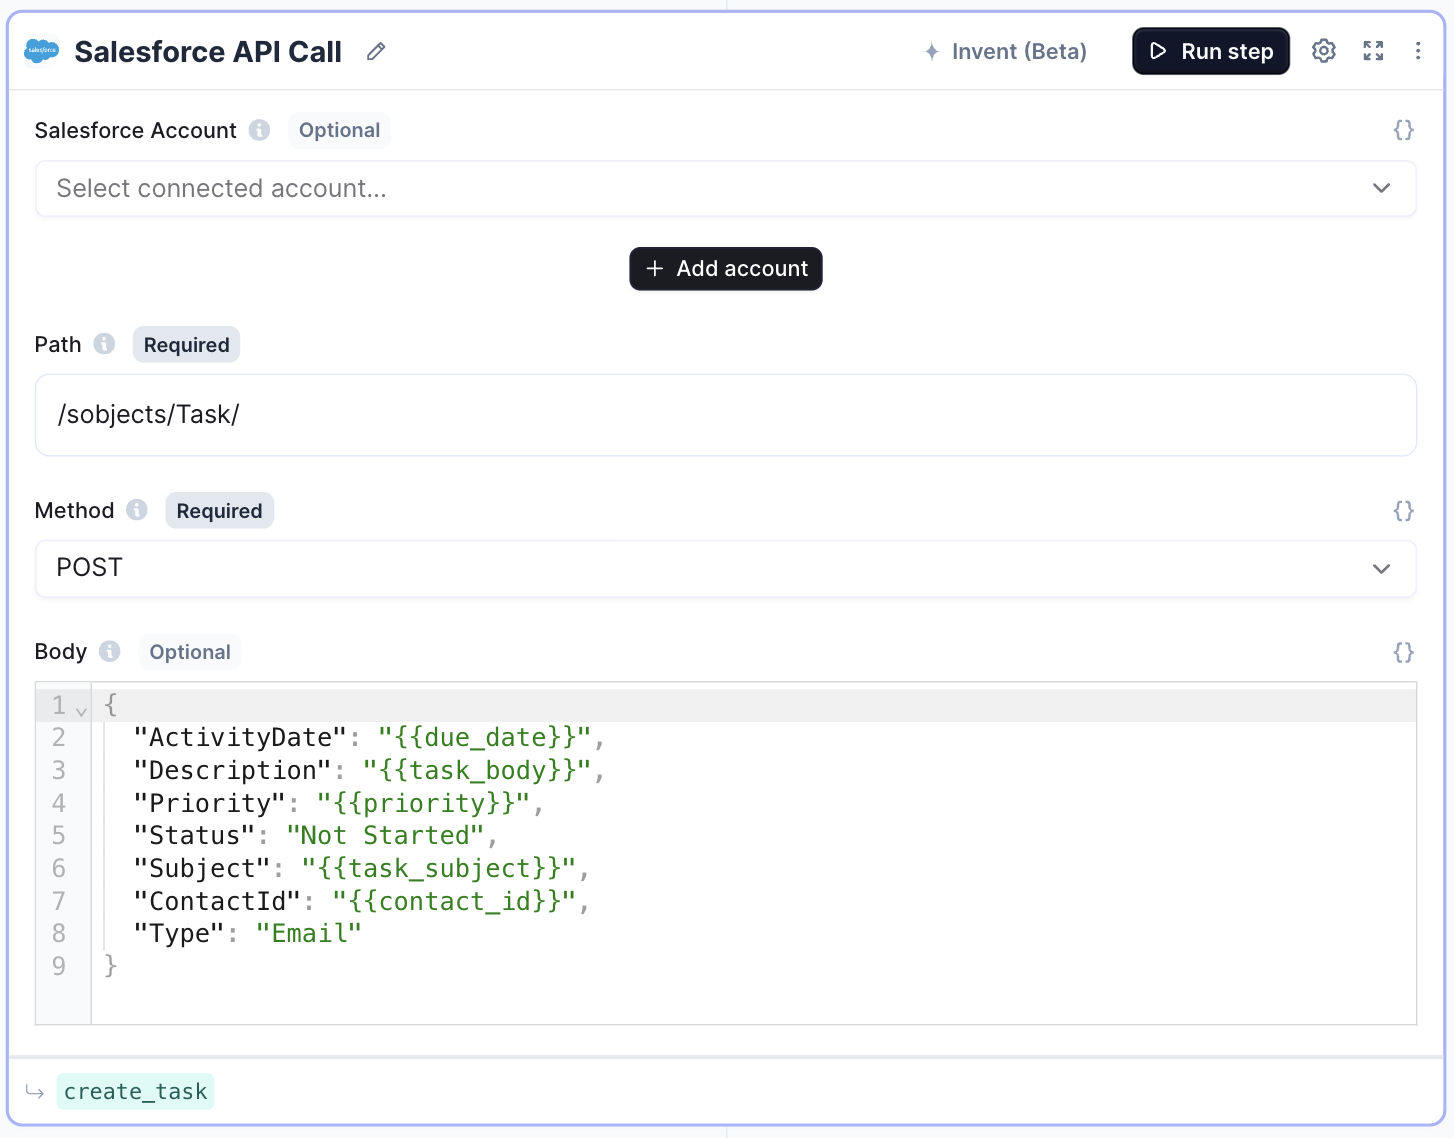 ### 3.5. Mark a task as complete
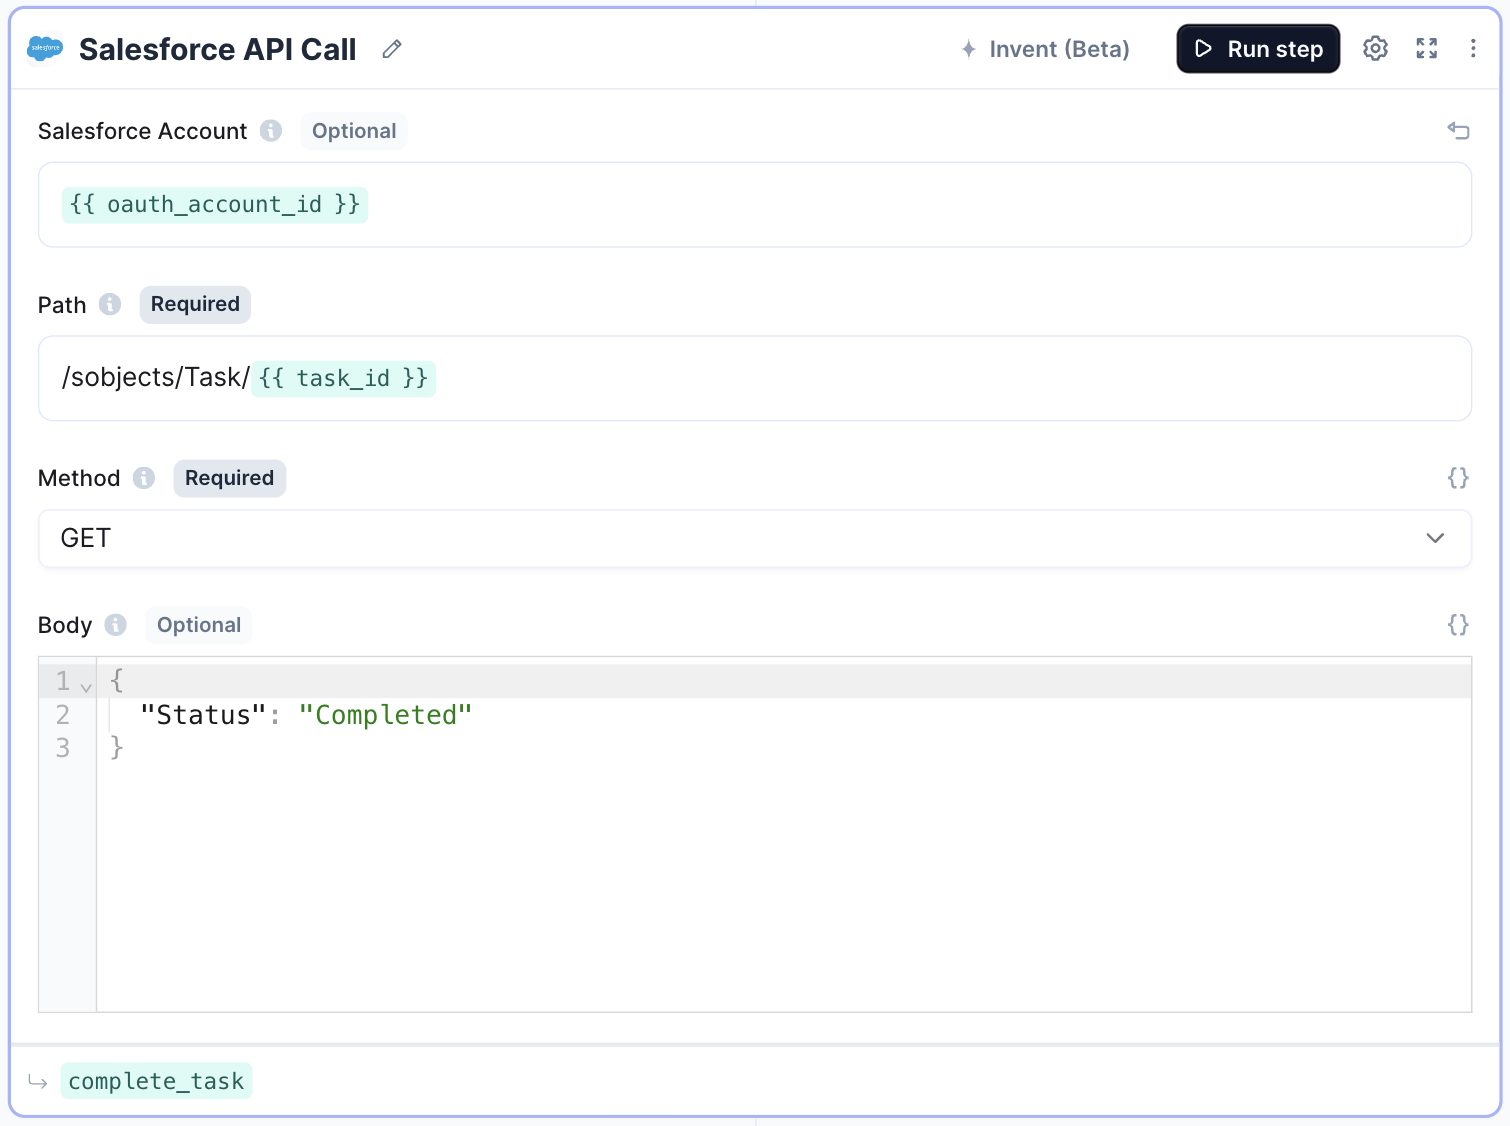 ## 4. Remove Salesforce integration
You can remove Salesforce as a Trigger in your agent settings, by clicking the three dots next to your connected account, and then "Remove".
If you want to remove the Salesforce integration completely, you can:
1. Go to the "Integrations" page from the sidebar
2. Select Zoom from the list
3. Click "..." on the account you want to remove
4. Click remove
# Whatsapp for Business
Source: https://relevanceai.com/docs/integrations/agent-integrations/whatsapp-for-business
Interact with your WhatsApp Business account with Relevance.
# WhatsApp For Business Integration
Connect your AI agents with WhatsApp Business to engage with customers directly through one of the world's most popular messaging platforms. The WhatsApp Business integration enables your agents to handle customer inquiries, provide support, and deliver personalized experiences through WhatsApp's familiar interface.
## Connect the integration
Setting up the WhatsApp Business integration with Relevance AI is straightforward:
1. Navigate to the "Integrations" page in the sidebar of your Relevance AI dashboard
2. Locate and click on "WhatsApp Business"
3. Click the "Add Integration" button
4. Follow the authentication flow to connect your WhatsApp Business account
5. Once connected, you'll see your WhatsApp Business account listed under active integrations
## Setting up triggers
The WhatsApp Business integration allows you to create powerful triggers that automatically activate your AI agents when specific events occur. This enables seamless customer engagement without manual intervention.
To set up a WhatsApp trigger:
1. Go to your agent's profile page
2. Under "Triggers", select "WhatsApp Business"
3. Configure the trigger settings:
* **Trigger on new messages**: Activate your agent when a customer sends a message to your WhatsApp Business number
* **Trigger on specific keywords**: Set your agent to respond only when certain keywords or phrases are detected
* **Trigger based on customer attributes**: Configure triggers based on customer data or conversation context
Once configured, your agent will automatically engage with customers through WhatsApp when the trigger conditions are met.
## Tools & Tool Steps
The WhatsApp Business integration provides a rich set of actions that your agents can use to interact with customers. These actions can be incorporated into your agent's workflow to create sophisticated conversation flows and deliver exceptional customer experiences.
Here are some of the key actions available:
### Send Message
Send text messages to customers through WhatsApp. This action supports rich text formatting, allowing your agent to send well-structured, easy-to-read messages.
### Send Media
Share images, documents, videos, or audio files with customers. This is perfect for sending product catalogs, instructional materials, or visual content to enhance the conversation.
### Send Template Message
Utilize pre-approved message templates for common scenarios like welcome messages, order confirmations, appointment reminders, and more. Templates ensure compliance with WhatsApp's policies while maintaining consistent communication.
### Send Interactive Messages
Create interactive experiences with buttons, list messages, and reply buttons that guide customers through specific flows or help them make selections without typing lengthy responses.
### Get Customer Profile
Retrieve customer profile information to personalize interactions based on available data, such as name, profile picture, or previous interaction history.
### Mark Messages as Read
Update message status to "read" to provide customers with confirmation that their messages have been received and processed.
### Create Groups
Create WhatsApp groups for specific purposes, such as product launches, support communities, or team discussions.
### Manage Contacts
Add, update, or retrieve contact information to maintain an accurate customer database.
These are just a few examples of the many actions available through the WhatsApp Business integration. The platform offers numerous additional capabilities to support complex business workflows and customer engagement strategies.
## Use the integration's API tool step (advanced)
For advanced users who need more customized functionality, Relevance AI provides direct access to the WhatsApp Business API through a dedicated API tool step:
1. Create a new tool in your Relevance AI dashboard
2. Scroll down to Tool-steps
3. Add the WhatsApp Business API tool-step
4. Select your connected WhatsApp Business account from the dropdown
With the API tool step, you can build custom tools that leverage the full power of the WhatsApp Business API, including:
### Custom Message Formatting
Create highly customized message formats with advanced formatting options not available through standard actions.
### Batch Operations
Send messages to multiple recipients simultaneously or perform bulk operations on conversations.
### Advanced Media Handling
Implement sophisticated media processing workflows, such as image analysis or document processing before sending responses.
### Integration with External Systems
Connect WhatsApp conversations with external databases, CRMs, or business systems to create unified customer experiences.
### Custom Analytics
Build specialized analytics tools to track conversation metrics, customer engagement patterns, or agent performance.
The API tool step gives you complete flexibility to extend the capabilities of the WhatsApp Business integration to meet your specific business requirements.
## Related Features
* [Outlook Integration](https://relevanceai.com/docs/integrations/outlook) - Connect your agents with email communications to create a unified messaging strategy across multiple channels.
* [Knowledge Base](https://relevanceai.com/docs/knowledge/create-knowledge) - Enhance your WhatsApp conversations by giving your agents access to your organization's knowledge base for accurate and consistent responses.
* [Agent Templates](https://relevanceai.com/docs/agent/templates) - Explore pre-built agent templates designed specifically for customer support and engagement through messaging platforms.
## FAQs
### What are the requirements for using the WhatsApp Business integration?
You need a WhatsApp Business account and must comply with WhatsApp's Business Policy. Your account must be verified and in good standing.
### Can I use the integration with multiple WhatsApp Business numbers?
Yes, you can connect multiple WhatsApp Business numbers to Relevance AI and configure different agents to work with specific numbers.
### How does the integration handle media files?
The integration supports sending and receiving various media types including images, documents, audio files, and videos, with size limitations as specified by WhatsApp's policies.
### Is the integration compliant with WhatsApp's messaging policies?
Yes, the integration is designed to comply with WhatsApp's Business Messaging Policy. However, it's your responsibility to ensure that your messaging practices adhere to these policies and local regulations.
# Zoominfo
Source: https://relevanceai.com/docs/integrations/agent-integrations/zoominfo
Interact with your Salesforce CRM with Relevance.
# ZoomInfo Integration
ZoomInfo is a powerful B2B database and intelligence platform that provides comprehensive company and contact information to help sales and marketing teams identify and connect with their ideal prospects. With the Relevance AI ZoomInfo integration, you can leverage this valuable data directly within your AI agents' workflows, enabling more effective prospecting, lead qualification, and account-based marketing initiatives.
## 1. Connect the integration
Connecting ZoomInfo to Relevance AI is a straightforward process that gives your agents access to valuable B2B data:
1. Go to the "Integrations" page in the sidebar.
2. Click on "ZoomInfo".
3. Click on the Add Integration button.
4. In the pop-up window, sign into your ZoomInfo account.
5. Authorize Relevance AI to access your ZoomInfo data.
6. Once connected, you'll see your ZoomInfo account listed under connected accounts.
## 2. Setting up triggers
ZoomInfo can serve as a powerful trigger for your AI agents, automatically initiating workflows when specific events occur in your ZoomInfo account. This is particularly valuable for sales teams who want to act quickly on intent signals and prospect activities.
### Set up ZoomInfo as an Agent Trigger
1. Create a new agent or edit an existing one.
2. Navigate to the "Triggers" section in the “Agent profile”.
3. Select "ZoomInfo" from the available triggers.
4. Configure your trigger settings based on the ZoomInfo events you want to monitor:
* **Intent Topics**: Trigger your agent when ZoomInfo detects buying intent for specific topics relevant to your business.
* **New Prospects**: Activate your agent when new prospects matching your criteria are added to ZoomInfo.
* **Account Updates**: Start workflows when there are significant updates to target accounts in your ZoomInfo instance.
For example, you could create a trigger that activates your agent whenever ZoomInfo detects new buying intent signals for "data analytics" from companies in your target market. Your agent can then automatically research these companies, prepare personalized outreach, and even initiate contact through your preferred channels.
## 3. Tools & Tool Steps
The ZoomInfo integration provides a rich set of actions (tool steps) that your agents can use to access and leverage B2B data. These actions can be incorporated into your agent's workflows to automate prospecting, enrichment, and research tasks.
### Common ZoomInfo Actions
Your agents can perform a wide range of ZoomInfo-related tasks, including:
* **Search Companies**: Find companies matching specific criteria such as industry, size, location, or technologies used.
* **Search Contacts**: Identify decision-makers and key stakeholders at target accounts.
* **Get Company Details**: Retrieve comprehensive information about a specific company, including firmographics, technographics, and recent news.
* **Get Contact Details**: Access detailed information about specific contacts, including job roles, contact information, and professional background.
* **Track Intent Signals**: Monitor buying intent signals for specific topics across your target accounts.
* **Export Lists**: Create and export lists of companies or contacts for use in marketing campaigns or sales outreach.
* **Update Records**: Keep your ZoomInfo data current by updating records with new information.
These are just a few examples of the many ZoomInfo actions available. The integration provides a comprehensive set of tools that allow your agents to leverage the full power of ZoomInfo's B2B intelligence platform.
### How to Add ZoomInfo Actions to Your Agent
1. Create or edit a tool in your Relevance AI workspace.
2. Add a new tool step.
3. Search for "ZoomInfo" in the tool step library.
4. Select the desired ZoomInfo action from the available options.
5. Configure the action parameters according to your needs.
6. Connect this tool to your agent to enable ZoomInfo data access.
## 4. Use the ZoomInfo API tool step (advanced)
In addition to the pre-built actions available in the tool library, advanced users can create custom ZoomInfo integrations using the ZoomInfo API Call tool step:
1. Create a new tool.
2. Scroll down to Tool-steps.
3. Add ZoomInfo API tool-step.
4. Select your connected ZoomInfo account in the dropdown.
5. Configure the API endpoint, parameters, and authentication details.
This approach gives you maximum flexibility to create custom ZoomInfo integrations tailored to your specific business needs. You can access any endpoint available in the ZoomInfo API, allowing for advanced use cases beyond what's available in the standard action library.
### Example: Custom Company Enrichment
Here's an example of how you might use the ZoomInfo API tool step to create a custom company enrichment workflow:
```json
{
"endpoint": "/companies/enrich",
"method": "POST",
"body": {
"company_name": "{{input.company_name}}",
"domain": "{{input.domain}}",
"include_attributes": ["industry", "revenue", "employee_count", "technologies", "location"]
}
}
```
This custom API call would retrieve specific company attributes that are most relevant to your qualification process, allowing your agent to make more informed decisions about prospect fit.
## Related Features
* [HubSpot Integration](https://relevanceai.com/docs/integrations/hubspot) - Combine ZoomInfo's rich B2B data with HubSpot's CRM capabilities to create powerful sales and marketing workflows that leverage both platforms.
* [Salesforce Integration](https://relevanceai.com/docs/integrations/salesforce) - Enrich your Salesforce records with ZoomInfo data and trigger automated workflows based on changes in either system.
# Email warmups
Source: https://relevanceai.com/docs/integrations/integration-use-case/email-warmups
Use case: Warm up your email before starting your email marketing campaigns.
## Why do you need to warmup your email inbox?
Email warmups refer to the process of gradually increasing the volume of emails sent from a new or unused email account to build a positive sender reputation with internet service providers (ISPs).
A warmedup email inbox helps you to avoid spam filters and ensure better deliverability rates.
We recommend that you create an email account especially for your email inbox manager agents. So warming up their inbox before sending out emails from their account will help your email marketing/inbox management campaigns start successfully.
## How to warmup your emails?
The process usually involvesn sending a small number of emails initially and slowly increasing the quantity over time. Start by sending a few emails to active, engaged recipients like colleagues who are likely to open and interact with your agent's emails.
We recommend starting with 4-8 warm-up emails per day per account with a target reply rate of 30%. After two weeks, you can increase the warm-up volume to 20-30 emails per day per account, with a higher target reply rate of 70% when engaging in outreach.
The maximum recommended warm-up email volume is 50 emails per day, with a reply rate of a max of 60%.
## Add email warmup integration to your Relevance account
You can use an in-built Relevance integration to warm up your chosen email account, by activating the email warmup integration.
Here is a video walking you through the process of doing this:
## 4. Remove Salesforce integration
You can remove Salesforce as a Trigger in your agent settings, by clicking the three dots next to your connected account, and then "Remove".
If you want to remove the Salesforce integration completely, you can:
1. Go to the "Integrations" page from the sidebar
2. Select Zoom from the list
3. Click "..." on the account you want to remove
4. Click remove
# Whatsapp for Business
Source: https://relevanceai.com/docs/integrations/agent-integrations/whatsapp-for-business
Interact with your WhatsApp Business account with Relevance.
# WhatsApp For Business Integration
Connect your AI agents with WhatsApp Business to engage with customers directly through one of the world's most popular messaging platforms. The WhatsApp Business integration enables your agents to handle customer inquiries, provide support, and deliver personalized experiences through WhatsApp's familiar interface.
## Connect the integration
Setting up the WhatsApp Business integration with Relevance AI is straightforward:
1. Navigate to the "Integrations" page in the sidebar of your Relevance AI dashboard
2. Locate and click on "WhatsApp Business"
3. Click the "Add Integration" button
4. Follow the authentication flow to connect your WhatsApp Business account
5. Once connected, you'll see your WhatsApp Business account listed under active integrations
## Setting up triggers
The WhatsApp Business integration allows you to create powerful triggers that automatically activate your AI agents when specific events occur. This enables seamless customer engagement without manual intervention.
To set up a WhatsApp trigger:
1. Go to your agent's profile page
2. Under "Triggers", select "WhatsApp Business"
3. Configure the trigger settings:
* **Trigger on new messages**: Activate your agent when a customer sends a message to your WhatsApp Business number
* **Trigger on specific keywords**: Set your agent to respond only when certain keywords or phrases are detected
* **Trigger based on customer attributes**: Configure triggers based on customer data or conversation context
Once configured, your agent will automatically engage with customers through WhatsApp when the trigger conditions are met.
## Tools & Tool Steps
The WhatsApp Business integration provides a rich set of actions that your agents can use to interact with customers. These actions can be incorporated into your agent's workflow to create sophisticated conversation flows and deliver exceptional customer experiences.
Here are some of the key actions available:
### Send Message
Send text messages to customers through WhatsApp. This action supports rich text formatting, allowing your agent to send well-structured, easy-to-read messages.
### Send Media
Share images, documents, videos, or audio files with customers. This is perfect for sending product catalogs, instructional materials, or visual content to enhance the conversation.
### Send Template Message
Utilize pre-approved message templates for common scenarios like welcome messages, order confirmations, appointment reminders, and more. Templates ensure compliance with WhatsApp's policies while maintaining consistent communication.
### Send Interactive Messages
Create interactive experiences with buttons, list messages, and reply buttons that guide customers through specific flows or help them make selections without typing lengthy responses.
### Get Customer Profile
Retrieve customer profile information to personalize interactions based on available data, such as name, profile picture, or previous interaction history.
### Mark Messages as Read
Update message status to "read" to provide customers with confirmation that their messages have been received and processed.
### Create Groups
Create WhatsApp groups for specific purposes, such as product launches, support communities, or team discussions.
### Manage Contacts
Add, update, or retrieve contact information to maintain an accurate customer database.
These are just a few examples of the many actions available through the WhatsApp Business integration. The platform offers numerous additional capabilities to support complex business workflows and customer engagement strategies.
## Use the integration's API tool step (advanced)
For advanced users who need more customized functionality, Relevance AI provides direct access to the WhatsApp Business API through a dedicated API tool step:
1. Create a new tool in your Relevance AI dashboard
2. Scroll down to Tool-steps
3. Add the WhatsApp Business API tool-step
4. Select your connected WhatsApp Business account from the dropdown
With the API tool step, you can build custom tools that leverage the full power of the WhatsApp Business API, including:
### Custom Message Formatting
Create highly customized message formats with advanced formatting options not available through standard actions.
### Batch Operations
Send messages to multiple recipients simultaneously or perform bulk operations on conversations.
### Advanced Media Handling
Implement sophisticated media processing workflows, such as image analysis or document processing before sending responses.
### Integration with External Systems
Connect WhatsApp conversations with external databases, CRMs, or business systems to create unified customer experiences.
### Custom Analytics
Build specialized analytics tools to track conversation metrics, customer engagement patterns, or agent performance.
The API tool step gives you complete flexibility to extend the capabilities of the WhatsApp Business integration to meet your specific business requirements.
## Related Features
* [Outlook Integration](https://relevanceai.com/docs/integrations/outlook) - Connect your agents with email communications to create a unified messaging strategy across multiple channels.
* [Knowledge Base](https://relevanceai.com/docs/knowledge/create-knowledge) - Enhance your WhatsApp conversations by giving your agents access to your organization's knowledge base for accurate and consistent responses.
* [Agent Templates](https://relevanceai.com/docs/agent/templates) - Explore pre-built agent templates designed specifically for customer support and engagement through messaging platforms.
## FAQs
### What are the requirements for using the WhatsApp Business integration?
You need a WhatsApp Business account and must comply with WhatsApp's Business Policy. Your account must be verified and in good standing.
### Can I use the integration with multiple WhatsApp Business numbers?
Yes, you can connect multiple WhatsApp Business numbers to Relevance AI and configure different agents to work with specific numbers.
### How does the integration handle media files?
The integration supports sending and receiving various media types including images, documents, audio files, and videos, with size limitations as specified by WhatsApp's policies.
### Is the integration compliant with WhatsApp's messaging policies?
Yes, the integration is designed to comply with WhatsApp's Business Messaging Policy. However, it's your responsibility to ensure that your messaging practices adhere to these policies and local regulations.
# Zoominfo
Source: https://relevanceai.com/docs/integrations/agent-integrations/zoominfo
Interact with your Salesforce CRM with Relevance.
# ZoomInfo Integration
ZoomInfo is a powerful B2B database and intelligence platform that provides comprehensive company and contact information to help sales and marketing teams identify and connect with their ideal prospects. With the Relevance AI ZoomInfo integration, you can leverage this valuable data directly within your AI agents' workflows, enabling more effective prospecting, lead qualification, and account-based marketing initiatives.
## 1. Connect the integration
Connecting ZoomInfo to Relevance AI is a straightforward process that gives your agents access to valuable B2B data:
1. Go to the "Integrations" page in the sidebar.
2. Click on "ZoomInfo".
3. Click on the Add Integration button.
4. In the pop-up window, sign into your ZoomInfo account.
5. Authorize Relevance AI to access your ZoomInfo data.
6. Once connected, you'll see your ZoomInfo account listed under connected accounts.
## 2. Setting up triggers
ZoomInfo can serve as a powerful trigger for your AI agents, automatically initiating workflows when specific events occur in your ZoomInfo account. This is particularly valuable for sales teams who want to act quickly on intent signals and prospect activities.
### Set up ZoomInfo as an Agent Trigger
1. Create a new agent or edit an existing one.
2. Navigate to the "Triggers" section in the “Agent profile”.
3. Select "ZoomInfo" from the available triggers.
4. Configure your trigger settings based on the ZoomInfo events you want to monitor:
* **Intent Topics**: Trigger your agent when ZoomInfo detects buying intent for specific topics relevant to your business.
* **New Prospects**: Activate your agent when new prospects matching your criteria are added to ZoomInfo.
* **Account Updates**: Start workflows when there are significant updates to target accounts in your ZoomInfo instance.
For example, you could create a trigger that activates your agent whenever ZoomInfo detects new buying intent signals for "data analytics" from companies in your target market. Your agent can then automatically research these companies, prepare personalized outreach, and even initiate contact through your preferred channels.
## 3. Tools & Tool Steps
The ZoomInfo integration provides a rich set of actions (tool steps) that your agents can use to access and leverage B2B data. These actions can be incorporated into your agent's workflows to automate prospecting, enrichment, and research tasks.
### Common ZoomInfo Actions
Your agents can perform a wide range of ZoomInfo-related tasks, including:
* **Search Companies**: Find companies matching specific criteria such as industry, size, location, or technologies used.
* **Search Contacts**: Identify decision-makers and key stakeholders at target accounts.
* **Get Company Details**: Retrieve comprehensive information about a specific company, including firmographics, technographics, and recent news.
* **Get Contact Details**: Access detailed information about specific contacts, including job roles, contact information, and professional background.
* **Track Intent Signals**: Monitor buying intent signals for specific topics across your target accounts.
* **Export Lists**: Create and export lists of companies or contacts for use in marketing campaigns or sales outreach.
* **Update Records**: Keep your ZoomInfo data current by updating records with new information.
These are just a few examples of the many ZoomInfo actions available. The integration provides a comprehensive set of tools that allow your agents to leverage the full power of ZoomInfo's B2B intelligence platform.
### How to Add ZoomInfo Actions to Your Agent
1. Create or edit a tool in your Relevance AI workspace.
2. Add a new tool step.
3. Search for "ZoomInfo" in the tool step library.
4. Select the desired ZoomInfo action from the available options.
5. Configure the action parameters according to your needs.
6. Connect this tool to your agent to enable ZoomInfo data access.
## 4. Use the ZoomInfo API tool step (advanced)
In addition to the pre-built actions available in the tool library, advanced users can create custom ZoomInfo integrations using the ZoomInfo API Call tool step:
1. Create a new tool.
2. Scroll down to Tool-steps.
3. Add ZoomInfo API tool-step.
4. Select your connected ZoomInfo account in the dropdown.
5. Configure the API endpoint, parameters, and authentication details.
This approach gives you maximum flexibility to create custom ZoomInfo integrations tailored to your specific business needs. You can access any endpoint available in the ZoomInfo API, allowing for advanced use cases beyond what's available in the standard action library.
### Example: Custom Company Enrichment
Here's an example of how you might use the ZoomInfo API tool step to create a custom company enrichment workflow:
```json
{
"endpoint": "/companies/enrich",
"method": "POST",
"body": {
"company_name": "{{input.company_name}}",
"domain": "{{input.domain}}",
"include_attributes": ["industry", "revenue", "employee_count", "technologies", "location"]
}
}
```
This custom API call would retrieve specific company attributes that are most relevant to your qualification process, allowing your agent to make more informed decisions about prospect fit.
## Related Features
* [HubSpot Integration](https://relevanceai.com/docs/integrations/hubspot) - Combine ZoomInfo's rich B2B data with HubSpot's CRM capabilities to create powerful sales and marketing workflows that leverage both platforms.
* [Salesforce Integration](https://relevanceai.com/docs/integrations/salesforce) - Enrich your Salesforce records with ZoomInfo data and trigger automated workflows based on changes in either system.
# Email warmups
Source: https://relevanceai.com/docs/integrations/integration-use-case/email-warmups
Use case: Warm up your email before starting your email marketing campaigns.
## Why do you need to warmup your email inbox?
Email warmups refer to the process of gradually increasing the volume of emails sent from a new or unused email account to build a positive sender reputation with internet service providers (ISPs).
A warmedup email inbox helps you to avoid spam filters and ensure better deliverability rates.
We recommend that you create an email account especially for your email inbox manager agents. So warming up their inbox before sending out emails from their account will help your email marketing/inbox management campaigns start successfully.
## How to warmup your emails?
The process usually involvesn sending a small number of emails initially and slowly increasing the quantity over time. Start by sending a few emails to active, engaged recipients like colleagues who are likely to open and interact with your agent's emails.
We recommend starting with 4-8 warm-up emails per day per account with a target reply rate of 30%. After two weeks, you can increase the warm-up volume to 20-30 emails per day per account, with a higher target reply rate of 70% when engaging in outreach.
The maximum recommended warm-up email volume is 50 emails per day, with a reply rate of a max of 60%.
## Add email warmup integration to your Relevance account
You can use an in-built Relevance integration to warm up your chosen email account, by activating the email warmup integration.
Here is a video walking you through the process of doing this:
 You can start and stop your email warmups at any time.
# Introduction
Source: https://relevanceai.com/docs/integrations/introduction
Connect your AI agents with external tools and services to create powerful, automated workflows across your entire tech stack.
## Overview
Integrations serve as bridges between your AI agents and the external services you rely on daily. By establishing these connections, you can create seamless workflows that span across multiple platforms, allowing your agents to access data from and perform actions within your entire digital ecosystem.
For new users, it's important to understand that integrations enable four key capabilities:
1. **Connecting external services** to your Relevance AI account
2. **Setting up triggers** that automatically activate your agents based on external events
3. **Using pre-built actions** that allow your agents to interact with external platforms
4. **Creating custom API calls** for advanced integration scenarios
Let's explore each of these capabilities in detail.
## 1. Connecting Integrations
The first step in leveraging integrations is connecting your external services to Relevance AI:
1. Navigate to the **Integrations** page from the left-hand menu of your Relevance AI account
2. Browse the available integrations and select the service you want to connect
3. Click on the integration card to begin the connection process
4. Follow the authentication steps to authorize the connection (typically involves logging into the service or providing API credentials)
5. Once connected, the integration will appear as "Connected" in your list of available integrations
You can start and stop your email warmups at any time.
# Introduction
Source: https://relevanceai.com/docs/integrations/introduction
Connect your AI agents with external tools and services to create powerful, automated workflows across your entire tech stack.
## Overview
Integrations serve as bridges between your AI agents and the external services you rely on daily. By establishing these connections, you can create seamless workflows that span across multiple platforms, allowing your agents to access data from and perform actions within your entire digital ecosystem.
For new users, it's important to understand that integrations enable four key capabilities:
1. **Connecting external services** to your Relevance AI account
2. **Setting up triggers** that automatically activate your agents based on external events
3. **Using pre-built actions** that allow your agents to interact with external platforms
4. **Creating custom API calls** for advanced integration scenarios
Let's explore each of these capabilities in detail.
## 1. Connecting Integrations
The first step in leveraging integrations is connecting your external services to Relevance AI:
1. Navigate to the **Integrations** page from the left-hand menu of your Relevance AI account
2. Browse the available integrations and select the service you want to connect
3. Click on the integration card to begin the connection process
4. Follow the authentication steps to authorize the connection (typically involves logging into the service or providing API credentials)
5. Once connected, the integration will appear as "Connected" in your list of available integrations